# Using Initia Wallet Widget
Source: https://docs.initia.xyz/developers/developer-guides/frontend/initia-wallet-widget
[Tutorial GitHub Repository](https://github.com/initia-labs/examples/tree/main/frontend/react-wallet-widget)
## Overview
In this guide, we will walk through the steps to integrate the Initia Wallet Widget into a NextJS project. The completed webapp will allow users to connect their Initia Wallet as well as other wallets and perform a simple token transfer transaction to their own wallet.
## Prerequisites
* [NodeJS](https://nodejs.org)
* [NextJS](https://nextjs.org)
## Project setup
First, we need to create a new template directory for our NextJS project.
```sh
bunx create-next-app@latest initia-wallet-widget
```
Select "**Yes**" for all of the configuration prompts except for "Would you like to customize the default import alias".
Once the project is created, navigate into the project directory and install the dependencies. For this tutorial, we will need to use 3 libraries:
* `@initia/react-wallet-widget`: A React component that enables users to connect their Initia Wallet as well as other wallets.
* `@initia/initia.js`: A JavaScript library to interact with the Initia L1 and Interwoven Rollups, including querying user balances and signing and sending transactions
* `@cosmjs/proto-signing`: A JavaScript library that allows us to sign encode Cosmos SDK messages for signing.
```sh
cd initia-wallet-widget
bun add @initia/react-wallet-widget @initia/initia.js @cosmjs/proto-signing
```
Once we have the project setup, we can start developing the frontend.
## Developing
### Adding the Wallet Widget Provider
First, we need to add the `WalletWidgetProvider` to our project. This will allow us to use the `useWallet` hook to interact with the wallet. To do so, we need to import the `WalletWidgetProvider` from `@initia/react-wallet-widget` and wrap the `children` component in `src/layout.tsx` with it.
```tsx src/layout.tsx
import type { Metadata } from 'next';
import { Inter } from 'next/font/google';
import './globals.css';
import { WalletWidgetProvider } from '@initia/react-wallet-widget'; // Import the WalletWidgetProvider
const inter = Inter({ subsets: ['latin'] });
export const metadata: Metadata = {
title: 'Create Next App',
description: 'Generated by create next app',
};
const chainId = 'initiation-2';
export default function RootLayout({
children,
}: Readonly<{
children: React.ReactNode;
}>) {
return (
{/* Wrap the children component with the WalletWidgetProvider */}
{children}
);
}
```
We can change the `chainId` to any chain that is in the [initia-registry](https://github.com/initia-labs/initia-registry).
### Using the Wallet Widget
Once we have the `WalletWidgetProvider` in place, we can use the `useWallet` hook to interact with the wallet. We will do this by modifying `src/page.tsx`.
First, we declare `use client` at the top of the file and import the necessary libraries and hooks.
```tsx src/page.tsx
'use client';
import { useAddress, useWallet } from '@initia/react-wallet-widget';
import { MsgSend } from '@initia/initia.js';
import type { EncodeObject } from '@cosmjs/proto-signing';
import type { Msg } from '@initia/initia.js';
import { useState } from 'react';
```
* `useAddress`: A hook that returns the address of the connected wallet.
* `useWallet`: A hook that returns the wallet object.
* `MsgSend`: A message type that is used to send tokens from one wallet to another.
* `EncodeObject`: A type that is used to encode Cosmos SDK messages for signing.
* `Msg`: A type that is used to represent a Cosmos SDK message.
* `useState`: A hook that allows us to use state in our component.
Then, we need to create a function that will convert an array of messages of `Msg` type into an array of `EncodeObject` types.
```ts
const toEncodeObject = (msgs: Msg[]): EncodeObject[] => {
return msgs.map((msg) => ({ typeUrl: msg.packAny().typeUrl, value: msg.toProto() }));
};
```
Finally, we will implement the Home component that will house our webapp functionality. We begin by declaring the states and variables we will need
```tsx src/page.tsx
const address = useAddress();
const { onboard, view, requestTx } = useWallet();
const [isLoading, setIsLoading] = useState(false);
const [transactionHash, setTransactionHash] = useState(null);
```
* `address`: The address of the connected wallet.
* `onboard`: The wallet object.
* `view`: A function that allows us to view the wallet.
* `requestTx`: A function that allows us to request a transaction from the wallet.
* `isLoading`: A state variable that indicates whether the transaction is being requested.
* `transactionHash`: A state variable that stores the transaction hash.
Then, we implement a `send` function that will send a transaction to the wallet. The function will check if the wallet is connected, and if it is, it will request a transaction to send 1000000 `uinit` (1 INIT) from the wallet to itself.
```tsx src/page.tsx
const send = async () => {
if (!address) return;
setIsLoading(true);
try {
const msgs = [new MsgSend(address, address, '1000000uinit')];
const hash = await requestTx({ messages: toEncodeObject(msgs), memo: 'Hello World' });
setTransactionHash(hash);
console.log(hash);
} catch (error) {
console.error('Transaction failed:', error);
} finally {
setIsLoading(false);
}
};
```
Finally, we return the component that will be exposed to the user. The example component below renders a simple user interface for wallet interaction:
* If no wallet is connected, it displays a "Connect" button.
* Once connected, it shows the user's address and a "Send 1 INIT" button.
* The send button triggers a transaction sending 1 INIT to the user's own address.
* After a successful transaction, it displays the transaction hash with a link to the block explorer.
```tsx src/page.tsx
return (
);
}
```
```tsx src/layout.tsx
import type { Metadata } from 'next';
import { Inter } from 'next/font/google';
import './globals.css';
import { WalletWidgetProvider } from '@initia/react-wallet-widget';
const inter = Inter({ subsets: ['latin'] });
export const metadata: Metadata = {
title: 'Create Next App',
description: 'Generated by create next app',
};
export default function RootLayout({
children,
}: Readonly<{
children: React.ReactNode;
}>) {
return (
{children}
);
}
```
You can then run the project with `bun run dev` and navigate to `http://localhost:3000` to see the project in action. If everything is working correctly, you should see a an interface similar to the following:
Clicking on "Connect" will open the wallet selector
Once a wallet is connected, clicking on "Send 1 INIT" will send a transaction to the wallet.
Once the transaction is sent, the transaction hash will be displayed in the interface.
And that's it! You have successfully integrated the Initia Wallet Widget into your NextJS project. You can further extend this example in various ways, such as:
* Showing the user's INIT balance when the wallet is connected.
* Preventing the user from sending transactions if they do not have enough INIT balance.
* Allowing users to specify the amount of INIT to send and the destination address
and more.
# Exchange Integration
Source: https://docs.initia.xyz/developers/developer-guides/guides/exchange-integration
This guide provides instructions for exchanges on how to integrate with Initia, from running a node to handling transactions and monitoring network activities.
## Network Details
You can find the details of Initia's network, including the chain endpoints, nodes, and peer information, below.
* [Initia L1 Networks](/resources/developer/initia-l1)
## Running a Node
For more information on running a node, please refer to
* [Running an Initia Node](/nodes-and-rollups/running-nodes/running-l1-nodes/l1-nodes-initiad)
## Creating and Managing Accounts
* [Creating an Account](/developers/developer-guides/tools/sdks/initia-js/accounts)
## Sending Transactions
### Transferring Tokens
* [Sending Transactions](/developers/developer-guides/tools/sdks/initia-js/transactions/sending-transactions)
### Signing Transactions Offline
In cases where network security is crucial, signing transactions offline ensures safe transaction handling.
* [Signing Transactions](/developers/developer-guides/tools/sdks/initia-js/transactions/signing-transactions)
### Handle Transaction Errors
Learn how to handle transaction errors to ensure that your transactions are executed properly.
* [Handling Errors](/developers/developer-guides/tools/sdks/initia-js/transactions/handling-errors)
## Monitoring Transactions
Initia provides various tools to monitor transaction activities, including event indexing and querying network data.
To keep track of transactions and blockchain events, you can use a simple indexer example:
* [Simple Indexer](https://github.com/initia-labs/simple-indexer)
For additional data like account balances and block details, you can use InitiaJS:
* [Querying Data](/developers/developer-guides/tools/sdks/initia-js/querying-data)
Additionally, you can manually monitor transactions with the following tools:
* [InitiaScan](https://scan.testnet.initia.xyz/initiation-2)
* [LCD Swagger](https://lcd.testnet.initia.xyz/swagger/#/Service/GetTx)
# Interacting with InitiaDEX
Source: https://docs.initia.xyz/developers/developer-guides/integrating-initia-apps/initiadex
## Creating New Pools
InitiaDEX allows anyone to create a liquidity pool.
```move
public entry fun create_pair_script(
creator: &signer,
name: String,
symbol: String,
swap_fee_rate: Decimal128,
coin_a_weight: Decimal128,
coin_b_weight: Decimal128,
coin_a_metadata: Object,
coin_b_metadata: Object,
coin_a_amount: u64,
coin_b_amount: u64,
)
```
| Parameter | Description |
| --------------------------------------- | ------------------------------------------------------- |
| `name` | Name of the trading pair and the corresponding LP Token |
| `symbol` | Symbol for the LP Token |
| `swap_fee_rate` | Fee rate applied to swaps |
| `coin_a_weight` and `coin_b_weight` | Balancer weights for the respective coins |
| `coin_a_metadata` and `coin_b_metadata` | Metadata for each coin in the pair |
| `coin_a_amount` and `coin_b_amount` | Initial amounts for each coin |
*For more information on metadata, please refer to [obtaining metadata](/developers/developer-guides/vm-specific-tutorials/movevm/creating-move-coin#obtaining-metadata).*
```bash
initiad tx move execute 0x1 dex create_pair_script \
--args '["string:name", "string:symbol", "bigdecimal:0.001", "bigdecimal:0.8", "bigdecimal:0.2", "object:0x...", "object:0x...", "u64:100", "u64:100"]' \
--from [key-name] \
--gas auto --gas-adjustment 1.5 --gas-prices 0.015uinit \
--node [rpc-url]:[rpc-port] --chain-id [chain-id]
```
```ts
import {
bcs,
RESTClient,
MnemonicKey,
MsgExecute,
Wallet,
} from '@initia/initia.js';
async function main() {
const restClient = new RESTClient('https://rest.testnet.initia.xyz', {
gasPrices: '0.015uinit',
gasAdjustment: '1.5',
});
const key = new MnemonicKey({
mnemonic: 'beauty sniff protect ...',
});
const wallet = new Wallet(restClient, key);
const msgs = [
new MsgExecute(
key.accAddress,
'0x1',
'dex',
'create_pair_script',
[],
[
bcs.string().serialize('name'), // name
bcs.string().serialize('symbol'), // symbol
bcs.bigdecimal().serialize('0.003'), // swap fee
bcs.bigdecimal().serialize('0.2'), // coin a weight
bcs.bigdecimal().serialize('0.8'), // coin b weight
bcs.object().serialize('0x...'), // coin a
bcs.object().serialize('0x...'), // coin b
bcs.u64().serialize(7500000000000), // coin a amount
bcs.u64().serialize(3000000000000), // coin b amount
].map(v => v.toBase64())
),
];
// sign tx
const signedTx = await wallet.createAndSignTx({ msgs });
// send(broadcast) tx
restClient.tx.broadcastSync(signedTx).then(res => console.log(res));
// {
// height: 0,
// txhash: '0F2B255EE75FBA407267BB57A6FF3E3349522DA6DBB31C0356DB588CC3933F37',
// raw_log: '[]'
// }
}
main();
```
## How to Provide Liquidity
### Provide Liquidity
`provide_liquidity` enables the users to provide liquidity of both `coin_a` and `coin_b` in the specific pair. In order to maximize liquidity, the user should provide in resonation with the current ratio. The Move module interface is as follows:
```bash
public entry fun provide_liquidity_script(
account: &signer,
pair: Object,
coin_a_amount_in: u64,
coin_b_amount_in: u64,
min_liquidity: Option
)
```
* `pair`: The metadata or object address of pair.
* `coin_a_amount_in` and `coin_b_amount_in`: Amount of token provided for `coin_a` and `coin_b`.
* `min_liquidity`: Minimum amount of liquidity token to receive. In case that the actual value is smaller than `min_liquidity`, the transaction will fail.
```bash
initiad tx move execute 0x1 dex provide_liquidity_script \
--args '["object:0x...", "u64:100", "u64:100", "option:100"]' \
--from [key-name] \
--gas auto --gas-adjustment 1.5 --gas-prices 0.015uinit \
--node [rpc-url]:[rpc-port] --chain-id [chain-id]
```
```ts
import {
bcs,
RESTClient,
MnemonicKey,
MsgExecute,
Wallet,
} from '@initia/initia.js';
async function main() {
const restClient = new RESTClient('https://rest.testnet.initia.xyz', {
gasPrices: '0.015uinit',
gasAdjustment: '1.5',
});
const key = new MnemonicKey({
mnemonic: 'beauty sniff protect ...',
});
const wallet = new Wallet(restClient, key);
const msgs = [
new MsgExecute(
key.accAddress,
'0x1',
'dex',
'provide_liquidity_script',
[],
[
bcs.object().serialize('0x...'), // pair object
bcs.u64().serialize(7500000000000), // coin a amount
bcs.u64().serialize(3000000000000), // coin b amount
bcs.option(bcs.u64()).serialize(100000000), // min liquidity amount
].map(v => v.toBase64())
),
];
// sign tx
const signedTx = await wallet.createAndSignTx({ msgs });
// send(broadcast) tx
restClient.tx.broadcastSync(signedTx).then(res => console.log(res));
// {
// height: 0,
// txhash: '0F2B255EE75FBA407267BB57A6FF3E3349522DA6DBB31C0356DB588CC3933F37',
// raw_log: '[]'
// }
}
main();
```
### Single Asset Provide Liquidity
Instead of creating a pair, the user can provide a pool of only one token. Internally, the token will be swapped to another token and provide liquidity, so there can be fee and slippage in occurrence. The Move function interface is as follows:
```move
public entry fun single_asset_provide_liquidity_script(
account: &signer,
pair: Object,
provide_coin: Object,
amount_in: u64,
min_liquidity: Option
)
```
* `pair`: The metadata or object address of pair.
* `provide_coin`: The metadata of the provided coin.
* `amount_in`: The amount of provided coin.
* `min_liquidity`: Minimum amount of liquidity token to receive. In case that the actual value is smaller than `min_liquidity`, the transaction will fail.
```bash
initiad tx move execute 0x1 dex single_asset_provide_liquidity_script \
--args '["object:0x...", "object:0x..", "u64:100", "option:100"]' \
--from [key-name] \
--gas auto --gas-adjustment 1.5 --gas-prices 0.015uinit \
--node [rpc-url]:[rpc-port] --chain-id [chain-id]
```
```ts
import {
bcs,
RESTClient,
MnemonicKey,
MsgExecute,
Wallet,
} from '@initia/initia.js';
async function main() {
const restClient = new RESTClient('https://rest.testnet.initia.xyz', {
gasPrices: '0.015uinit',
gasAdjustment: '1.5',
});
const key = new MnemonicKey({
mnemonic: 'beauty sniff protect ...',
});
const wallet = new Wallet(restClient, key);
const msgs = [
new MsgExecute(
key.accAddress,
'0x1',
'dex',
'single_asset_provide_liquidity_script',
[],
[
bcs.object().serialize('0x...'), // pair object
bcs.object().serialize('0x...'), // provide asset metadata
bcs.u64().serialize(3000000000000), // provide amount
bcs.option(bcs.u64()).serialize(100000000), // min liquidity amount
].map(v => v.toBase64())
),
];
// sign tx
const signedTx = await wallet.createAndSignTx({ msgs });
// send(broadcast) tx
restClient.tx.broadcastSync(signedTx).then(res => console.log(res));
// {
// height: 0,
// txhash: '0F2B255EE75FBA407267BB57A6FF3E3349522DA6DBB31C0356DB588CC3933F37',
// raw_log: '[]'
// }
}
main();
```
## How to Withdraw Liquidity
### Withdraw Liquidity
`withdraw_liquidity` allows users to provide liquidity tokens and receive `coin_a` and `coin_b`. The Move module interface is as follows:
```bash
public entry fun withdraw_liquidity_script(
account: &signer,
pair: Object,
liquidity: u64,
min_coin_a_amount: Option,
min_coin_b_amount: Option,
)
```
* `pair`: The metadata or object address of pair.
* `liquidity`: Amount of liquidity token.
* `min_coin_a_amount` and `min_coin_b_amount` : Minimum amount of `coin_a` or `coin_b` to receive. In case that the actual value is smaller than `min_coin_a_amount` or `min_coin_b_amount`, the transaction will fail.
```bash
initiad tx move execute 0x1 dex withdraw_liquidity_script \
--args '["object:0x...", "u64:100", "option:100", "option:100"]' \
--from [key-name] \
--gas auto --gas-adjustment 1.5 --gas-prices 0.015uinit \
--node [rpc-url]:[rpc-port] --chain-id [chain-id]
```
```ts
import {
bcs,
RESTClient,
MnemonicKey,
MsgExecute,
Wallet,
} from '@initia/initia.js';
async function main() {
const restClient = new RESTClient('https://rest.testnet.initia.xyz', {
gasPrices: '0.015uinit',
gasAdjustment: '1.5',
});
const key = new MnemonicKey({
mnemonic: 'beauty sniff protect ...',
});
const wallet = new Wallet(restClient, key);
const msgs = [
new MsgExecute(
key.accAddress,
'0x1',
'dex',
'withdraw_liquidity_script',
[],
[
bcs.object().serialize('0x...'), // pair object
bcs.u64().serialize(100000000), // liquidity
bcs.option(bcs.u64()).serialize(100000000), // min coin a amount
bcs.option(bcs.u64()).serialize(100000000), // min coin b amount
].map(v => v.toBase64())
),
];
// sign tx
const signedTx = await wallet.createAndSignTx({ msgs });
// send(broadcast) tx
restClient.tx.broadcastSync(signedTx).then(res => console.log(res));
// {
// height: 0,
// txhash: '0F2B255EE75FBA407267BB57A6FF3E3349522DA6DBB31C0356DB588CC3933F37',
// raw_log: '[]'
// }
}
main();
```
## How to Swap Pair
### Swap Simulation
`swap_simulation` is a view function to estimate the return value of said swap.
```move
#[view]
/// Return swap simulation result
public fun get_swap_simulation(
pair: Object,
offer_metadata: Object,
offer_amount: u64,
): u64 // return amount
```
* `pair`: The metadata or object address of pair.
* `offer_metadata`: Metadata of offered coin.
* `offer_amount`: Amount of offered coin.
```bash
curl -X POST "https://rest.testnet.initia.xyz/initia/move/v1/accounts/0x1/modules/dex/view_functions/get_swap_simulation" \
-H "accept: application/json" \
-H "Content-Type: application/json" \
-d "{ \"args\": [ \"[BCS_ENCODED_OBJECT, BCS_ENCODED_OBJECT, BCS_ENCODED_OFFER_AMOUNT]\" ]}"
#{
# "data": "\"100\"",
# "events": [],
# "gas_used": "5699"
#}
```
```bash
initiad query move view 0x1 dex get_swap_simulation \
--args '["object:0x...", "object:0x...", "u64:123"]' \
--node [rpc-url]:[rpc-port]
# data: '"123"'
# events: []
# gas_used: "5699"
```
```ts
import { RESTClient, bcs } from '@initia/initia.js';
const restClient = new RESTClient('https://rest.testnet.initia.xyz', {
gasPrices: '0.015uinit',
gasAdjustment: '1.5',
});
restClient.move
.view(
'0x1',
'dex',
'get_swap_simulation',
[],
[
bcs.object().serialize('0x...').toBase64(),
bcs.u64().serialize(100).toBase64(),
]
)
.then(console.log);
// { data: '"100"', events: [], gas_used: '21371' }
```
### Swap
The Move module interface for swap function is as follows:
```move
public entry fun swap_script(
account: &signer,
pair: Object,
offer_coin: Object,
offer_coin_amount: u64,
min_return: Option,
)
```
* `pair`: The metadata or object address of pair.
* `offer_coin`: Metadata of offered coin.
* `offer_coin_amount`: Amount of offered coin.
* `min_return`: Minimum return amount of coin. In case that the actual value is smaller than `min_return`, the transaction will fail.
```bash
initiad tx move execute 0x1 dex swap_script \
--args '["object:0x...", "object:0x...", "u64:100", "option:100"]' \
--from [key-name] \
--gas auto --gas-adjustment 1.5 --gas-prices 0.015uinit \
--node [rpc-url]:[rpc-port] --chain-id [chain-id]
```
```ts
import {
bcs,
RESTClient,
MnemonicKey,
MsgExecute,
Wallet,
} from '@initia/initia.js';
async function main() {
const restClient = new RESTClient('https://rest.testnet.initia.xyz', {
gasPrices: '0.015uinit',
gasAdjustment: '1.5',
});
const key = new MnemonicKey({
mnemonic: 'beauty sniff protect ...',
});
const wallet = new Wallet(restClient, key);
const msgs = [
new MsgExecute(
key.accAddress,
'0x1',
'dex',
'swap_script',
[],
[
bcs.object().serialize('0x...'), // pair object
bcs.object().serialize('0x...'), // offer asset metadata
bcs.u64().serialize(100000000), // offer amount
bcs.option(bcs.u64()).serialize(100000000), // min return amount
].map(v => v.toBase64())
),
];
// sign tx
const signedTx = await wallet.createAndSignTx({ msgs });
// send(broadcast) tx
restClient.tx.broadcastSync(signedTx).then(res => console.log(res));
// {
// height: 0,
// txhash: '0F2B255EE75FBA407267BB57A6FF3E3349522DA6DBB31C0356DB588CC3933F37',
// raw_log: '[]'
// }
}
main();
```
## How to Delegate LP Tokens
### Whitelist a Pair
To delegate your LP tokens to a validator, you need to whitelist the LP token first. We can use [MsgWhitelist](https://github.com/initia-labs/initia/blob/30d4e297f127c450626ebc06e99be0f263463cc8/proto/initia/move/v1/tx.proto#L299-L313) to whitelist the LP token.
```json proposal.json
{
"messages": [
{
"@type": "/initia.move.v1.MsgWhitelist",
"authority": "init10d07y265gmmuvt4z0w9aw880jnsr700j55nka3",
"metadata_lp": "init1law8gy5hj9mvtelssjnvg0amudfyn0y42kv4v04q4yl30pevmm2qhvvk8v",
"reward_weight": "1000000000000000000"
}
],
"deposit": "100000000uinit",
"metadata": "uinit",
"summary": "it is awesome",
"title": "awesome proposal"
}
```
```bash
initiad tx gov submit-proposal proposal.json \
--from [key-name] \
--gas auto --gas-adjustment 1.5 --gas-prices 0.015uinit \
--node [rpc-url]:[rpc-port] --chain-id [chain-id]
```
```ts
async function getLastProposalId(restClient: RESTClient): Promise {
const [proposals, pagination] = await restClient.gov.proposals()
if (proposals.length === 0) return 0
return proposals[proposals.length - 1].id
}
async function whitelistLP(lpMetadata: string) {
const msgWhiteList = new MsgWhitelist(
'init10d07y265gmmuvt4z0w9aw880jnsr700j55nka3', // authority
AccAddress.fromHex(lpMetadata), // metadata
'1000000000000000000' // weight for reward (10^18)
)
const proposal = new MsgSubmitProposal(
[msgWhiteList],
'100000000uinit', // deposit
user.key.accAddress, // proposer
'uinit', // metadata
'awesome proposal', // title
'it is awesome', // summary
false // expedited
)
const proposalId = (await getLastProposalId(user.rest)) + 1
// if there's only one validator, it will exceed the quorum (cause we set as user = validator)
const vote = new MsgVote(proposalId, user.key.accAddress, VoteOption.VOTE_OPTION_YES, '')
const signedTx = await user.createAndSignTx({ msgs: [proposal, vote]})
await user.rest.tx.broadcast(signedTx).catch(console.log)
}
```
### Delegate LP Tokens
After whitelisting the LP token, you can delegate your LP tokens to a validator. We can use `MsgDelegate` to delegate LP tokens.
```bash
# initiad tx mstaking delegate [validator-addr] [amount]
initiad tx mstaking delegate initvaloper1.... 100move/ff5c7412979 \
--from [key-name] \
--gas auto --gas-adjustment 1.5 --gas-prices 0.015uinit \
--node [rpc-url]:[rpc-port] --chain-id [chain-id]
```
```ts
async function delegateLP(
lpMetadata: string,
amount: number
) {
// we can get lp denom from lp metadata by adding 'move/' prefix
// if lp metadata is ff5c7412979...
// then lp denom is move/ff5c7412979...
const msg = new MsgDelegate(
user.key.accAddress, // delegator
validator.key.valAddress, // validator
`${amount}move/${lpMetadata}` // lp token
)
const signedTx = await user.createAndSignTx({ msgs: [msg] })
await user.rest.tx.broadcast(signedTx).catch(console.log)
}
```
## Example Code
The following example demonstrates the above functions in a single script using InitiaJS.
The script includes the following steps:
1. Create a pair
2. Provide liquidity
3. Whitelist LP
4. Delegate LP tokens to the validator
5. Withdraw rewards from the validator
To run the script, you need to install the following packages:
```bash
npm install @initia/initia.js @initia/initia.proto @noble/hashes @cosmjs/encoding bluebird
```
Also, we assume:
* Local Initia node is running on `http://localhost:1317`.
* The user and validator share the same mnemonic for simplicity.
```ts create-and-provide-liquidity.ts
// NOTE: In this example, we use the same mnemonic for both user and validator.
// The reason is that we want to simplify the example.
// This will make it easier to whitelist during the proposal.
// It takes a bit of time to whitelist, so you can skip this step 3 and do it manually.
// Some possible errors:
// location=0000000000000000000000000000000000000000000000000000000000000001::object, code=524289 -> The object (pair) is already created, skip step 1
// location=0000000000000000000000000000000000000000000000000000000000000001::object, code=393218 -> The object (pair) is not created yet, retry step 1
import { AccAddress, bcs, RESTClient, MnemonicKey, MsgDelegate, MsgExecute, MsgSubmitProposal, MsgVote, MsgWhitelist, MsgWithdrawDelegatorReward, Wallet } from "@initia/initia.js"
import { ProposalStatus, VoteOption } from "@initia/initia.proto/cosmos/gov/v1/gov"
import { delay } from "bluebird"
import { sha3_256 } from "@noble/hashes/sha3";
import { concatBytes, toBytes } from "@noble/hashes/utils";
import { toHex } from "@cosmjs/encoding"
import { MsgUndelegate } from "vm/move/msgs/staking";
const user = new Wallet(
new RESTClient('http://localhost:1317', {
gasPrices: '0.015uinit',
gasAdjustment: '1.75'
}),
new MnemonicKey({
// TODO: put your mnemonic here
mnemonic: 'mimic exist actress ...'
})
)
const validator = new Wallet(
new RESTClient('http://localhost:1317', {
gasPrices: '0.015uinit',
gasAdjustment: '1.75'
}),
new MnemonicKey({
// TODO: put your mnemonic here
mnemonic: 'mimic exist actress ...'
})
)
function coinMetadata(creator: string, symbol: string) {
const OBJECT_FROM_SEED_ADDRESS_SCHEME = 0xfe
const addrBytes = bcs.address().serialize(creator).toBytes()
const seed = toBytes(symbol)
const bytes = new Uint8Array([...concatBytes(addrBytes, seed), OBJECT_FROM_SEED_ADDRESS_SCHEME])
const sum = sha3_256.create().update(bytes).digest()
return toHex(sum)
}
async function getLastProposalId(restClient: RESTClient): Promise {
const [proposals, pagination] = await restClient.gov.proposals()
if (proposals.length === 0) return 0
return proposals[proposals.length - 1].id
}
async function getProposalStatus(restClient: RESTClient, proposalId: number): Promise {
const proposal = await restClient.gov.proposal(proposalId)
return proposal ? proposal.status : null
}
async function checkProposalPassed(restClient: RESTClient, proposalId: number): Promise {
for (;;) {
console.log(`checking proposal ${proposalId} status... in ${restClient.URL}/cosmos/gov/v1/proposals/${proposalId}`)
const status = await getProposalStatus(restClient, proposalId)
if (status === ProposalStatus.PROPOSAL_STATUS_PASSED) return
if (status === ProposalStatus.PROPOSAL_STATUS_REJECTED) throw new Error(`proposal ${proposalId} rejected`)
if (status === ProposalStatus.PROPOSAL_STATUS_FAILED) throw new Error(`proposal ${proposalId} failed`)
await delay(5_000)
}
}
async function provideLiquidity(
lp_metadata: string,
coin_a_amount: number,
coin_b_amount: number,
min_liquidity: number | null
) {
const msg = new MsgExecute(
user.key.accAddress,
'0x1',
'dex',
'provide_liquidity_script',
[],
[
bcs.string().serialize(lp_metadata).toBase64(),
bcs.u64().serialize(coin_a_amount).toBase64(),
bcs.u64().serialize(coin_b_amount).toBase64(),
bcs.option(bcs.u64()).serialize(min_liquidity).toBase64()
]
)
const signedTx = await user.createAndSignTx({ msgs: [msg] })
await user.rest.tx.broadcast(signedTx).catch(console.log)
}
async function createPairScript(
sender: Wallet,
name: string,
symbol: string,
swap_fee_rate: number,
coin_a_weight: number,
coin_b_weight: number,
coin_a_metadata: string,
coin_b_metadata: string,
coin_a_amount: number,
coin_b_amount: number
) {
const msg = new MsgExecute(
sender.key.accAddress,
'0x1',
'dex',
'create_pair_script',
[],
[
bcs.string().serialize(name).toBase64(),
bcs.string().serialize(symbol).toBase64(),
bcs.bigdecimal().serialize(swap_fee_rate).toBase64(),
bcs.bigdecimal().serialize(coin_a_weight).toBase64(),
bcs.bigdecimal().serialize(coin_b_weight).toBase64(),
bcs.object().serialize(coin_a_metadata).toBase64(),
bcs.object().serialize(coin_b_metadata).toBase64(),
bcs.u64().serialize(coin_a_amount).toBase64(),
bcs.u64().serialize(coin_b_amount).toBase64()
]
)
const signedTx = await sender.createAndSignTx({ msgs: [msg] })
await sender.rest.tx.broadcast(signedTx).catch(console.log)
}
async function whitelistLP(lpMetadata: string) {
const msgWhiteList = new MsgWhitelist(
'init10d07y265gmmuvt4z0w9aw880jnsr700j55nka3', // authority
AccAddress.fromHex(lpMetadata), // metadata
'1000000000000000000' // weight for reward (10^18)
)
const proposal = new MsgSubmitProposal(
[msgWhiteList],
'100000000uinit', // deposit
user.key.accAddress, // proposer
'uinit', // metadata
'awesome proposal', // title
'it is awesome', // summary
false // expedited
)
const proposalId = (await getLastProposalId(user.rest)) + 1
// if there's only one validator, it will exceed the quorum (cause we set as user = validator)
const vote = new MsgVote(proposalId, user.key.accAddress, VoteOption.VOTE_OPTION_YES, '')
const signedTx = await user.createAndSignTx({ msgs: [proposal, vote]})
await user.rest.tx.broadcast(signedTx).catch(console.log)
await checkProposalPassed(user.rest, proposalId)
}
async function delegateLP(
lpMetadata: string,
amount: number
) {
// we can get lp denom from lp metadata by adding 'move/' prefix
// if lp metadata is ff5c7412979...
// then lp denom is move/ff5c7412979...
const msg = new MsgDelegate(
user.key.accAddress, // delegator
validator.key.valAddress, // validator
`${amount}move/${lpMetadata}` // lp token
)
const signedTx = await user.createAndSignTx({ msgs: [msg] })
await user.rest.tx.broadcast(signedTx).catch(console.log)
}
async function withdrawRewards() {
const msg = new MsgWithdrawDelegatorReward(
user.key.accAddress,
validator.key.valAddress
)
const signedTx = await user.createAndSignTx({ msgs: [msg] })
await user.rest.tx.broadcast(signedTx).catch(console.log
}
// NOTE: if you uncomment step 2, there will be an error
// because it takes a bit of time to create a pair
async function main() {
console.log('user:', user.key.accAddress)
console.log('validator:', validator.key.valAddress)
// step 1: create pair script
await createPairScript(
user,
'init-usdc',
'init-usdc',
0.003,
0.5,
0.5,
coinMetadata('0x1', 'uinit'),
coinMetadata('0x1', 'uusdc'),
100_000_000,
100_000_000
)
const lpMetadata = coinMetadata(user.key.accAddress, 'init-usdc') // ff5c7412979176c5e7f084a6...
console.log('step 1 done, lp metadata:', lpMetadata)
// step 2 (optional): provide liquidity
// you will get LP tokens when you create a pair, so you can skip this step
// await provideLiquidity(
// lpMetadata,
// 100_000_000,
// 100_000_000,
// 100_000
// )
// console.log('step 2 provide liquidity done')
// step 3: whitelist LP
// this step could take a while (check your 'expedited_voting_period' time in genesis.json)
await whitelistLP(lpMetadata)
console.log('step 3 whitelist done')
// step 4: delegate LP tokens to the validator
await delegateLP(lpMetadata, 100_000)
console.log('step 4 delegate done')
// step 5: withdraw rewards
// await withdrawRewards()
// console.log('step 5 withdraw done')
}
if (require.main === module) {
main()
}
```
# Introduction
Source: https://docs.initia.xyz/developers/developer-guides/integrating-initia-apps/registry/introduction
For an asset or rollup to be supported by all of Initia's apps, including App, Bridge, Scan, and Wallet Widget, it must be registered in the [Initia Registry](http://github.com/initia-labs/initia-registry). Currently, registration is done via a GitHub pull request to the registry repository. The file and directory that need to be updated in the PR vary depending on the type of information being added.
## Adding Profiles
For an application's information including logo, name, description, and more to show up on Initia's [ecosystem page](https://initia.xyz/ecosystem), it must be registered in the [Initia Registry](https://github.com/initia-labs/initia-registry). In the registration PR, create a new file in the `profiles` directory with the structure that follows [this schema](https://github.com/initia-labs/initia-registry/blob/main/profile.schema.json). The JSON file name should be the name of the application.
This step can be completed at anytime before your rollup is live and public.
## Adding Rollups
Once your rollup is live, you also then need to register it in the registry for it to supported on the Bridge, Scan, and Wallet Widget pages. For this, navigate to the corresponding network directory in the registry repository and create a new folder. The folder name should be the same as the profile JSON file name you created in the previous step. You then need to create two files in the folder:
1. [chain.json](https://github.com/initia-labs/initia-registry/blob/main/chain.schema.json) - Contains key information about the rollup including the chain ID, name, API endpoints, and more.
2. [assetlist.json](https://github.com/initia-labs/initia-registry/blob/main/assetlist.schema.json) - A file containing all of the major assets on the rollup such as symbol, logo, and decimal precision.
You can create a PR to add both a profile and rollup at the same time, but the profile file is required for the rollup to be fully supported.
## Adding Assets
When creating a new assets, teams and other developers should also registry the asset information to the registry. This will allow the assets to be displayed in the user's balances, selectable on bridge and swap pages, and more. To do so, modify the corresponding rollup's and Initia L1's `assetlist.json` file in the registry repository with the new asset information.
# Querying Initia Usernames
Source: https://docs.initia.xyz/developers/developer-guides/integrating-initia-apps/usernames
## Module Addresses
| Network | Address |
| ---------------------- | ------------------------------------------------------------------------------------------------------------------------------------------------------------------------------------------------------- |
| Testnet (initiation-2) | [0x42cd8467b1c86e59bf319e5664a09b6b5840bb3fac64f5ce690b5041c530565a](https://scan.testnet.initia.xyz/initiation-2/modules/0x42cd8467b1c86e59bf319e5664a09b6b5840bb3fac64f5ce690b5041c530565a/usernames) |
## Tutorials
### Getting Address from Usernames
To retrieve an address from a username, we use the `get_address_from_name` function. The function interface is as follows:
```move
#[view]
public fun get_address_from_name(name: String): Option
```
```js InitiaJS
const { RESTClient, bcs } = require('@initia/initia.js');
const moduleAddress = '0x...';
const name = 'initia';
const restClient = new RESTClient('https://rest.testnet.initia.xyz', {
gasPrices: '0.015uinit',
gasAdjustment: '1.5',
});
restClient.move
.view(
moduleAddress,
'usernames',
'get_address_from_name',
[],
[bcs.string().serialize(name).toBase64()]
)
.then(console.log);
// Response:
// {
// data: '"0x.."',
// events: [],
// gas_used: '5699'
// }
```
### Getting Usernames from Address
To retrieve a username from an address, we use the `get_name_from_address` function.
```move
#[view]
public fun get_name_from_address(addr: address): Option
```
```js InitiaJS
const { RESTClient, bcs } = require('@initia/initia.js');
const moduleAddress = '0x...';
const address = "init1...";
const restClient = new RESTClient('https://rest.testnet.initia.xyz', {
gasPrices: '0.015uinit',
gasAdjustment: '1.5',
});
restClient.move
.view(
moduleAddress
'usernames',
'get_name_from_address',
[],
[
bcs
.address()
.serialize(address)
.toBase64(),
]
)
.then(console.log);
// Response:
// {
// data: '"abc..."',
// events: [],
// gas_used: '5699'
// }
```
# Integrating VIP
Source: https://docs.initia.xyz/developers/developer-guides/integrating-initia-apps/vip/integrate-vip
This guide explains how a rollup can prepare for and integrate Initia's [VIP](/home/core-concepts/vip).
## Prerequisites
* [Weave CLI](/developers/developer-guides/tools/clis/weave-cli/rollup/introduction)
* [Minitiad CLI](/developers/developer-guides/tools/clis/minitiad-cli/introduction)
First, launch your rollup. For local deployments, you can use the [Weave CLI](/developers/developer-guides/tools/clis/weave-cli/rollup/introduction) to launch a rollup.
Once your rollup is running, we need to fetch the rollup's version. To do so, run the following command:
```bash
export RPC_URL={YOUR_ROLLUP_RPC_URL}
curl -X POST $RPC_URL/abci_info
```
The output will be in the format below. The `version` field is the rollup's version.
```json highlight={7}
{
"jsonrpc": "2.0",
"id": -1,
"result": {
"response": {
"data": "minitia",
"version": "v1.0.2",
"last_block_height": "10458738",
"last_block_app_hash": "lS/hN6BDFU45Z0Oee04MZm15TS49yx+//SQJsXSSfms="
}
}
}
```
We then need to install the `minitiad` CLI that matches the rollup's version.
```bash
export MINIEVM_VERSION=1.1.7 # Replace with your rollup's version
git clone https://github.com/initia-labs/minievm.git
cd minievm
git checkout $MINIEVM_VERSION
make install
```
```bash
export MINIMOVE_VERSION=1.0.6
git clone https://github.com/initia-labs/minimove.git
cd minimove
git checkout $MINIMOVE_VERSION # Replace with your rollup's version
make install
```
```bash
export MINIWASM_VERSION=1.0.6 # Replace with your rollup's version
git clone https://github.com/initia-labs/miniwasm.git
cd miniwasm
git checkout $MINIWASM_VERSION
make install
```
Next, we will create a VIP operator account and a VIP contract deployer account to deploy the VIP scoring contract.
* The VIP operator account will receive the VIP operator rewards
* the VIP contract deployer account will handle the deployment of the VIP scoring contract.
If you have an existing account you want to use for these roles, you can use the `--recover` option to recover it using a BIP39 mnemonic phrase. If you do not have a mnemonic phrase, you can create a new account without this option.
```bash
export OPERATOR_KEY_NAME=operator
export DEPLOYER_KEY_NAME=deployer
minitiad keys add $OPERATOR_KEY_NAME --recover
# > Enter your bip39 mnemonic
# glare boil shallow hurt distance grant rose pledge begin main stage affair alpha garlic tornado enemy enable swallow unusual foster maid pelican also bus
minitiad keys add $DEPLOYER_KEY_NAME --recover
# > Enter your bip39 mnemonic
# room fruit chalk buyer budget wisdom theme sound north square regular truck deal anxiety wrestle toy flight release actress critic saddle garment just found
```
Alternatively, if you want to use a Ledger hardware wallet, you can use the `--ledger` option to create an account that uses Ledger for signing transactions.
```bash
minitiad keys add $OPERATOR_KEY_NAME --ledger
```
In this step, you will deploy the VIP scoring contract that tracks addresses and scores. To do so, follow the steps based on your rollup's VM.
The VIP scoring contract must specify the stage at which the rollup participates in VIP when deployed. To retrieve the current VIP stage, choose the example for your network and run either the curl request or the TypeScript example. Both will query the VIP module store on L1 and return the current VIP stage information.
```bash curl
curl https://rest.initia.xyz/initia/move/v1/accounts/0x3a886b32a802582f2e446e74d4a24d1d7ed01adf46d2a8f65c5723887e708789/resources/by_struct_tag?struct_tag=0x3a886b32a802582f2e446e74d4a24d1d7ed01adf46d2a8f65c5723887e708789%3A%3Avip%3A%3AModuleStore
```
```ts initia.js
import { RESTClient } from '@initia/initia.js'
const L1_VIP_CONTRACT = '0x3a886b32a802582f2e446e74d4a24d1d7ed01adf46d2a8f65c5723887e708789'
const L1_REST_URL = 'https://rest.initia.xyz'
async function getCurrentStage(): Promise {
const rest = new RESTClient(L1_REST_URL)
return rest.move.resource(L1_VIP_CONTRACT, `${L1_VIP_CONTRACT}::vip::ModuleStore`).then((res) => res.data.stage)
}
```
```bash curl
curl https://rest.testnet.initia.xyz/initia/move/v1/accounts/0xe55cc823efb411bed5eed25aca5277229a54c62ab3769005f86cc44bc0c0e5ab/resources/by_struct_tag?struct_tag=0xe55cc823efb411bed5eed25aca5277229a54c62ab3769005f86cc44bc0c0e5ab%3A%3Avip%3A%3AModuleStore
```
```ts initia.js
import { RESTClient } from '@initia/initia.js'
const L1_VIP_CONTRACT = '0xe55cc823efb411bed5eed25aca5277229a54c62ab3769005f86cc44bc0c0e5ab'
const L1_REST_URL = 'https://rest.testnet.initia.xyz'
async function getCurrentStage(): Promise {
const rest = new RESTClient(L1_REST_URL)
return rest.move.resource(L1_VIP_CONTRACT, `${L1_VIP_CONTRACT}::vip::ModuleStore`).then((res) => res.data.stage)
}
```
Clone the [`vip-score-evm`](https://github.com/initia-labs/vip-score-evm) repository.
```bash
git clone https://github.com/initia-labs/vip-score-evm.git
```
Compile the `VIPScore.sol` contract. If you do not have [Foundry](https://github.com/foundry-rs/foundry) installed, follow the [Foundry installation instructions](https://getfoundry.sh).
```bash
forge build
```
Deploy the contract. Make sure to set the `JSON_RPC_URL`, `PRIVATE_KEY`, and `INIT_STAGE` environment variables before running the script. Set `JSON_RPC_URL` to your rollup’s RPC endpoint, `PRIVATE_KEY` to the VIP contract deployer key, and `INIT_STAGE` to the starting VIP stage number.
To get `INIT_STAGE`, you can check the current VIP stage by using the curl request or the TypeScript example provided in the previous note.
```bash
export JSON_RPC_URL=https://json-rpc.minievm-2.initia.xyz # Replace with your rollup's JSON_RPC endpoint
export PRIVATE_KEY=0xabcd1234... # Replace with your deployer's private key
export INIT_STAGE=1 # Replace with the starting stage number for scoring.
forge script script/VipScore.s.sol:DeployVipScore --rpc-url $JSON_RPC_URL --broadcast
# ...
# ✅ [Success] Hash: 0xd55beed5a745b203b56dc68c9e9141fcfd433c4c47587ce50655a99f5c449abc
# Contract Address: 0x1F00dfc319F1B74462B2Ef301c3978ee71f0d0E2
# Block: 238
# Paid: 0.000000000000525763 ETH (525763 gas * 0.000000001 gwei)
# ✅ Sequence #1 on 1982194020580198 | Total Paid: 0.000000000000525763 ETH (525763 gas * avg 0.000000001 gwei)
# ...
```
Clone the [`vip-score-move`](https://github.com/initia-labs/vip-score-move) repository.
```bash
git clone https://github.com/initia-labs/vip-score-move.git
```
Set the `vip_score.move` deployer address in the `Move.toml` file. This address will be used to deploy the contract and interact with it.
```toml
[addresses]
vip_score = "0x1234..." # Replace with your deployer address
```
Compile the Move package.
```bash
cd vip-score-move
minitiad move build
```
Deploy the contract. Make sure to set the `GAS_PRICES`, `RPC_NODE_URL`, and `CHAIN_ID` environment variables before running the command.
```bash
export GAS_PRICES=0.015l2/771d639f30fbe45e3fbca954ffbe2fcc26f915f5513c67a4a2d0bc1d635bdefd # Replace with your roll gas prices
export RPC_NODE_URL=https://rpc.minimove-2.initia.xyz # Replace with your rollup's RPC endpoint
export CHAIN_ID=minimove-2 # Replace with your rollup's chain ID
minitiad move deploy \
--from $DEPLOYER_KEY_NAME \
--gas auto \
--gas-prices $GAS_PRICES \
--node $RPC_NODE_URL \
--chain-id $CHAIN_ID
```
Clone the [`vip-score-wasm`](https://github.com/initia-labs/vip-score-wasm) repository.
```bash
git clone https://github.com/initia-labs/vip-score-wasm.git
```
Compile the Wasm package. If you don't have [Rust](https://www.rust-lang.org/), follow the [Rust and Cargo installation instructions](https://doc.rust-lang.org/cargo/getting-started/installation.html).
```bash
cd vip-score-wasm
cargo build --release --target wasm32-unknown-unknown
```
Upload the contract. Make sure to set the `GAS_PRICES`, `RPC_NODE_URL`, and `CHAIN_ID` environment variables before running the command.
```bash
export GAS_PRICES=0.015l2/2588fd87a8e081f6a557f43ff14f05dddf5e34cb27afcefd6eaf81f1daea30d0 # Replace with your rollup gas prices
export RPC_NODE_URL=https://rpc.miniwasm-2.initia.xyz # Replace with your rollup's RPC endpoint
export CHAIN_ID=miniwasm-2 # Replace with your rollup's chain ID
minitiad tx wasm store ./target/wasm32-unknown-unknown/release/vip_score.wasm \
--from $DEPLOYER_KEY_NAME \
--gas auto \
--gas-prices $GAS_PRICES \
--node $RPC_NODE_URL \
--chain-id $CHAIN_ID
```
To instantiate the contract, you need to fetch the code ID from the transaction output. You'll need [`jq`](https://jqlang.org/download/) to parse the JSON output.
```bash
TX_HASH=4CDCE81C5D0FFBCB92683E64198B4DA9F449707BB4F87FCFD8E3F02EBCE042CF
RESP=$(minitiad q tx $TX_HASH -o json --node $RPC_NODE_URL)
echo "$RESP" | jq -r '.events[]| select(.type=="store_code").attributes[]| select(.key=="code_id").value'
```
The output will be the code ID of the uploaded contract, which you will use to instantiate the contract. To get `INIT_STAGE`, you can check the current VIP stage by using the curl request or the TypeScript example provided in the previous note.
```bash
export ADDRESS=$(minitiad keys show $KEY_NAME -a)
export CODE_ID=100 # Replace with the actual code ID from the previous step
export INIT_STAGE=1 # Set the initial stage number
export LABEL="vip_score" # Set the label for the contract
export INIT_MSG='{"allow_list":["'"$ADDRESS"'"],"init_stage":'"$INIT_STAGE"'}'
minitiad tx wasm instantiate "$CODE_ID" "$INIT_MSG" \
--admin $ADDRESS \
--from $KEY_NAME \
--label $LABEL \
--gas auto \
--gas-prices $GAS_PRICES \
--node $RPC_NODE_URL \
--chain-id $CHAIN_ID
```
Save the deployed contract address. It will be required for the VIP whitelist proposal.
Clone the Initia Registry repository.
```bash
git clone https://github.com/initia-labs/initia-registry.git
```
Then, add your rollup information to the registry repo before submitting a pull request. For detailed instructions, see the [Initia Registry page](/developers/developer-guides/integrating-initia-apps/registry/introduction).
Draft a forum post with the whitelist template and include your operator address, scoring policy, and VIP score contract address. The full procedure is described in the [Whitelisting Rollup for VIP](/developers/developer-guides/integrating-initia-apps/vip/whitelist-rollup-for-vip) guide. This proposal is required only for mainnet rollups. For testnet deployments, contact the Initia team directly to have your rollup whitelisted.
Each VIP stage follows the same sequence of steps. Use the methods below to update scores and finalize each stage.
| Action | Method | Description |
| -------------- | ----------------------------------------- | ------------------------------------------------------------------------------------------------- |
| Update scores | `updateScores(stage, addrs[], amounts[])` | Update the scores for a list of addresses in the specified stage |
| Finalize stage | `finalizeStage(uint64 stage)` | Finalize the given stage, preventing further changes and prepares the contract for the next stage |
This code snippet shows how to use the [viem](https://viem.sh/) library to interact with the VIP scoring contract:
```ts vip-score-evm-tutorial.ts
import { createPublicClient, createWalletClient, http, parseAbi, encodeFunctionData, Hash, defineChain } from 'viem';
import { privateKeyToAccount } from 'viem/accounts';
import { RESTClient } from '@initia/initia.js';
/* -------------------------------------------------------- *
* Environment variables *
* -------------------------------------------------------- */
const JSON_RPC_URL = process.env.JSON_RPC_URL || 'https://json-rpc.minievm-2.initia.xyz'; // Your rollup's JSON RPC endpoint
const PRIVATE_KEY = process.env.PRIVATE_KEY || '0xabcd1234...'; // Your contract deployer's private key. Do not hardcode it in production
const SCORE_CONTRACT = process.env.SCORE_CONTRACT || '0x12345...'; // The deployed VIP scoring contract address
const EVM_CHAIN_ID = process.env.EVM_CHAIN_ID || '1982194020580198'; // Your rollup's chain ID
const TARGET_STAGE = process.env.TARGET_STAGE || '1'; // The stage number you want to update scores for
/* -------------------------------------------------------- *
* Update addresses and scores (Mock Implementation) *
* Replace these with actual addresses and scores *
* -------------------------------------------------------- */
// ADDRESSES and SCORES should be arrays of the same length.
const ADDRESSES = [
'0x1111111111111111111111111111111111111111',
'0x2222222222222222222222222222222222222222',
] as `0x${string}`[];
const SCORES = [100n, 250n];
const chain = defineChain({
id: parseInt(EVM_CHAIN_ID),
name: 'MiniEVM',
nativeCurrency: {
decimals: 18,
name: 'Gas Token',
symbol: 'GAS',
},
rpcUrls: {
default: {
http: [JSON_RPC_URL],
},
},
})
const publicClient = createPublicClient({ chain, transport: http(JSON_RPC_URL) });
const account = privateKeyToAccount(PRIVATE_KEY as `0x${string}`);
const walletClient = createWalletClient({ chain, transport: http(JSON_RPC_URL), account });
const vipAbi = parseAbi([
'function updateScores(uint64 stage, address[] addrs, uint64[] amounts)',
'function finalizeStage(uint64 stage)',
]);
async function send(txData: Hash) {
const receipt = await publicClient.waitForTransactionReceipt({ hash: txData });
if (receipt.status !== 'success') throw new Error(`Tx failed: ${txData}`);
return receipt;
}
async function run() {
const stage = TARGET_STAGE; // or await getCurrentStage();
/* update scores ---------------------------------- */
const tx1 = await walletClient.sendTransaction({
to: SCORE_CONTRACT as `0x${string}`,
data: encodeFunctionData({
abi: vipAbi,
functionName: 'updateScores',
args: [BigInt(stage), ADDRESSES, SCORES],
}),
});
await send(tx1);
console.log('Scores updated successfully.');
/* finalize stage --------------------------------- */
const tx2 = await walletClient.sendTransaction({
to: SCORE_CONTRACT as `0x${string}`,
data: encodeFunctionData({ abi: vipAbi, functionName: 'finalizeStage', args: [BigInt(stage)] }),
});
await send(tx2);
console.log('Stage finalized successfully.');
}
run().catch(console.error);
```
To get the EVM chain ID, call the `eth_chainId` JSON-RPC method. For example, using `curl`:
```bash
curl -X POST https://json-rpc.minievm-2.initia.xyz/ \
-H "Content-Type: application/json" \
-d '{"jsonrpc":"2.0","method":"eth_chainId","params":[],"id":1}'
```
| Action | Method | Description |
| -------------- | -------------------------------------------------------- | ----------------------------------------------------------------------------------------------------------------------------------------------------------------- |
| Add deployer | `add_deployer_script(signer, stage)` | Add the deployer to the VIP scoring contract for the specified stage. This ensures that the deployer has the necessary permissions to interact with the contract. |
| Set init stage | `set_init_stage(signer, stage)` | Set the initial stage for the VIP process |
| Update scores | `update_score_script(signer, stage, addrs[], amounts[])` | Update the scores for a list of addresses in the specified stage |
| Finalize stage | `finalize_script(signer, stage)` | Finalize the given stage, preventing further changes and prepares the contract for the next stage |
```ts vip-score-move-tutorial.ts
import { bcs, isTxError, MnemonicKey, Msg, MsgExecute, RESTClient, Wallet } from '@initia/initia.js'
/* -------------------------------------------------------- *
* Environment variables *
* -------------------------------------------------------- */
const REST_URL = process.env.REST_URL || 'https://rest.minimove-2.initia.xyz'; // Your rollup's REST endpoint
const MNEMONIC_KEY = process.env.MNEMONIC_KEY || 'castle lung ...'; // Your contract deployer's mnemonic key. Do not hardcode it in production
const SCORE_CONTRACT = process.env.SCORE_CONTRACT || '0x12345...'; // The deployed VIP scoring contract address
const TARGET_STAGE = process.env.TARGET_STAGE || '1'; // The stage number you want to update scores for
/* -------------------------------------------------------- *
* Update addresses and scores (Mock Implementation) *
* Replace these with actual addresses and scores *
* -------------------------------------------------------- */
// ADDRESSES and SCORES should be arrays of the same length.
const ADDRESSES = [
'0x1111111111111111111111111111111111111111',
'0x2222222222222222222222222222222222222222'
] as `0x${string}`[]
const SCORES = [100n, 250n]
const restClient = new RESTClient(REST_URL)
const wallet = new Wallet(
restClient,
new MnemonicKey({
mnemonic: MNEMONIC_KEY
})
)
async function send(msgs: Msg[]) {
const tx = await wallet.createAndSignTx({
msgs
})
const broadcastRes = await wallet.rest.tx.broadcast(tx)
if (isTxError(broadcastRes)) {
throw new Error(`Error while sending tx: ${broadcastRes.code} ${broadcastRes.raw_log}`)
}
}
async function run() {
const stage = TARGET_STAGE // or await getCurrentStage();
/* add deployer ------------------------------ */
const msgs0 = [
new MsgExecute(
wallet.key.accAddress,
SCORE_CONTRACT,
'vip_score',
'add_deployer_script',
[],
[
bcs.address().serialize(wallet.key.accAddress).toBase64()
]
)
]
await send(msgs0)
console.log('Deployer added successfully.')
/* set initial stage ---------------------------- */
const msgs1 = [
new MsgExecute(
wallet.key.accAddress,
SCORE_CONTRACT,
'vip_score',
'set_init_stage',
[],
[
bcs.u64().serialize(TARGET_STAGE).toBase64()
]
)
]
await send(msgs1)
console.log('Initial stage set successfully.')
/* update scores --------------------------------- */
const msgs2 = [
new MsgExecute(
wallet.key.accAddress,
SCORE_CONTRACT,
'vip_score',
'update_score_script',
[],
[
bcs.u64().serialize(stage).toBase64(),
bcs.vector(bcs.address()).serialize(ADDRESSES).toBase64(),
bcs.vector(bcs.u64()).serialize(SCORES).toBase64()
]
)
]
await send(msgs2)
console.log('Scores updated successfully.')
/* finalize stage --------------------------------- */
const msgs3 = [
new MsgExecute(
wallet.key.accAddress,
SCORE_CONTRACT,
'vip_score',
'finalize_script',
[],
[
bcs.u64().serialize(stage).toBase64()
]
)
]
await send(msgs3)
console.log('Stage finalized successfully.')
}
run().catch(console.error)
```
| Action | Method | Description |
| -------------- | -------------------------------------------------- | ------------------------------------------------------------------------------------------------- |
| Update scores | `update_scores(signer, stage, addrs[], amounts[])` | Update the scores for a list of addresses in the specified stage |
| Finalize stage | `finalize_stage(stage)` | Finalize the given stage, preventing further changes and prepares the contract for the next stage |
```ts vip-score-wasm-tutorial.ts
import { Coins, isTxError, MnemonicKey, Msg, MsgExecuteContract, RESTClient, Wallet } from '@initia/initia.js'
/* -------------------------------------------------------- *
* Environment variables *
* -------------------------------------------------------- */
const RPC_URL = process.env.REST_URL || 'https://rest.miniwasm-2.initia.xyz'; // Your rollup's REST endpoint
const MNEMONIC_KEY = process.env.MNEMONIC_KEY || 'castle ping ...'; // Your contract deployer's mnemonic key. Do not hardcode it in production
const SCORE_CONTRACT = process.env.SCORE_CONTRACT || 'init1ga1g...'; // The deployed VIP scoring contract address
const TARGET_STAGE = process.env.TARGET_STAGE || '1'; // The stage number you want to update scores for
/* -------------------------------------------------------- *
* Update addresses and scores (Mock Implementation) *
* Replace these with actual addresses and scores *
* -------------------------------------------------------- */
// ADDRESSES and SCORES should be arrays of the same length.
const ADDRESSES = [
'init1lf0swvvhy3vqautdemmvunfmp0grfrjgzznx9s',
'init1qqqqqqqqqqqqqqqqqqqqqqqqqqqqqqqpqr5e3d'
]
const SCORES = [100, 250]
const restClient = new RESTClient(RPC_URL)
const wallet = new Wallet(
restClient,
new MnemonicKey({
mnemonic: MNEMONIC_KEY
})
)
async function send(msgs: Msg[]) {
const tx = await wallet.createAndSignTx({
msgs
})
const broadcastRes = await wallet.rest.tx.broadcast(tx)
if (isTxError(broadcastRes)) {
throw new Error(`Error while sending tx: ${broadcastRes.code} ${broadcastRes.raw_log}`)
}
}
async function run() {
const stage = Number(TARGET_STAGE) // or await getCurrentStage();
/* update scores ----------------------------- */
const msgs1 = [
new MsgExecuteContract(
wallet.key.accAddress,
SCORE_CONTRACT,
Buffer.from(
JSON.stringify({
update_scores: {
stage,
scores: [
...ADDRESSES.map((addr, i) => ([addr, SCORES[i]]))
]
}
})
).toString('base64'),
new Coins()
)
]
await send(msgs1)
console.log('Scores updated successfully.')
/* finalize stage --------------------------------- */
const msgs2 = [
new MsgExecuteContract(
wallet.key.accAddress,
SCORE_CONTRACT,
Buffer.from(
JSON.stringify({
finalize_stage: {
stage,
},
})
).toString('base64'),
new Coins()
)
]
await send(msgs2)
console.log('Stage finalized successfully.')
}
run().catch(console.error)
```
# Managing Operator Settings
Source: https://docs.initia.xyz/developers/developer-guides/integrating-initia-apps/vip/manage-operator-settings
## Prerequisites
* [Initiad CLI](/developers/developer-guides/tools/clis/initiad-cli)
## Updating Operator Address
The operator is the account you specify during VIP whitelisting that will receives your rollup's operator commission rewards. To learn more about the VIP operator rewards, see [this section](/home/core-concepts/vip/architecture#distribution-to-rollup-operators).
To replace the operator address, call `update_operator` on the VIP contract and pass two arguments in order: the rollup bridge ID and the new operator address. The bridge ID uniquely identifies your rollup bridge and can be retrieved from `${REST_URL}/opinit/opchild/v1/bridge_info`.
```bash
export BRIDGE_ID=29 # Replace with your rollup bridge ID. You can get it from `${REST_URL}/opinit/opchild/v1/bridge_info`
export NEW_OPERATOR_ADDRESS=init14zmga05vl324ddaw7wqwdqt9pcvjeeyae3jn2k # Replace with the new operator address
export OPERATOR_KEY_NAME=operator # Replace with your operator key. Check `initiad keys list` for the list of your keys
export VIP_CONTRACT='init182yxkv4gqfvz7tjyde6dfgjdr4ldqxklgmf23aju2u3cslnss7ys6dy6w8'
export RPC_URL='https://rpc.initia.xyz'
export CHAIN_ID='interwoven-1'
initiad tx move execute-json $VIP_CONTRACT vip update_operator \
--args '["'${BRIDGE_ID}'", "'${NEW_OPERATOR_ADDRESS}'"]' \
--from $OPERATOR_KEY_NAME \
--node $RPC_URL \
--chain-id $CHAIN_ID \
--gas-prices 0.015uinit \
--gas auto
```
```bash
export BRIDGE_ID=29 # Replace with your rollup bridge ID. You can get it from `${REST_URL}/opinit/opchild/v1/bridge_info`
export NEW_OPERATOR_ADDRESS=init14zmga05vl324ddaw7wqwdqt9pcvjeeyae3jn2k # Replace with the new operator address
export OPERATOR_KEY_NAME=operator # Replace with your operator key. Check `initiad keys list` for the list of your keys
export VIP_CONTRACT='init1u4wvsgl0ksgma40w6fdv55nhy2d9f332kdmfqp0cdnzyhsxquk4swhuwfz'
export RPC_URL='https://rpc.testnet.initia.xyz'
export CHAIN_ID='initiation-2'
initiad tx move execute-json $VIP_CONTRACT vip update_operator \
--args '["'${BRIDGE_ID}'", "'${NEW_OPERATOR_ADDRESS}'"]' \
--from $OPERATOR_KEY_NAME \
--node $RPC_URL \
--chain-id $CHAIN_ID \
--gas-prices 0.015uinit \
--gas auto
```
## Updating Operator Commission
Operator commissions can be adjusted based on the `operator_commission_max_rate` and `operator_commission_max_change_rate` settings established during VIP whitelisting.
Note that the commission value can be modified only once per stage, and any updated rate will take effect starting from the next stage. To update the operator commission, call `update_operator_commission` on the VIP contract. This function takes three arguments
1. the rollup bridge ID
2. the version number
3. the new commission rate
Use version value `1` when the rollup is listed for the first time. If the rollup is delisted and later relisted, set the version to the previous value plus 1.
```bash
export BRIDGE_ID=29 # Replace with your actual bridge ID. You can get it from `${REST_URL}/opinit/opchild/v1/bridge_info`
export VERSION=1 # Use 1 unless your rollup has been delisted before
export NEW_COMMISSION_RATE=0.05 # Replace with the new commission rate (e.g., 0.05 for 5%)
export OPERATOR_KEY_NAME=operator # Replace with your operator key name. Check `initiad keys list` for the list of your keys
export VIP_CONTRACT='init182yxkv4gqfvz7tjyde6dfgjdr4ldqxklgmf23aju2u3cslnss7ys6dy6w8'
export RPC_URL='https://rpc.initia.xyz'
export CHAIN_ID='interwoven-1'
initiad tx move execute-json $VIP_CONTRACT vip update_operator_commission \
--args '["'${BRIDGE_ID}'", "'${VERSION}'", "'${NEW_COMMISSION_RATE}'"]' \
--from $OPERATOR_KEY_NAME \
--node $RPC_URL \
--chain-id $CHAIN_ID \
--gas-prices 0.015uinit \
--gas auto
```
```bash
export BRIDGE_ID=29 # Replace with your actual bridge ID. You can get it from `${REST_URL}/opinit/opchild/v1/bridge_info`
export VERSION=1 # Use 1 unless your rollup has been delisted before
export NEW_COMMISSION_RATE=0.05 # Replace with the new commission rate (e.g., 0.05 for 5%)
export OPERATOR_KEY_NAME=operator # Replace with your operator key name. Check `initiad keys list` for the list of your keys
export VIP_CONTRACT='init1u4wvsgl0ksgma40w6fdv55nhy2d9f332kdmfqp0cdnzyhsxquk4swhuwfz'
export RPC_URL='https://rpc.testnet.initia.xyz'
export CHAIN_ID='initiation-2'
initiad tx move execute-json $VIP_CONTRACT vip update_operator_commission \
--args '["'${BRIDGE_ID}'", "'${VERSION}'", "'${NEW_COMMISSION_RATE}'"]' \
--from $OPERATOR_KEY_NAME \
--node $RPC_URL \
--chain-id $CHAIN_ID \
--gas-prices 0.015uinit \
--gas auto
```
# Updating VIP Scoring Criteria
Source: https://docs.initia.xyz/developers/developer-guides/integrating-initia-apps/vip/update-vip-scoring-criteria
This guide explains how to update the VIP scoring criteria for a rollup.
Use the provided [proposal template](https://forum.initia.xyz/t/epoch-x-rollup-vip-update/263) to submit forum proposal on the [Initia Forum](https://forum.initia.xyz) outlining the new scoring criteria and the changes. This proposal should be submitted at least one week before the VIP scoring criteria update date to allow the community to review and discuss it.
In your original VIP whitelist proposal forum post, add a comment that links to the new draft so community members can follow the discussion.
Inform the Initia team about your new criteria and share the link to the corresponding forum post so the VIP Committee can review it.
The VIP committee will verify that your new criteria follow the [scoring policy](/home/core-concepts/vip/scoring#scoring-criteria) and is logically sound. If the new scoring criteria meet the requirements, the VIP committee will approve them and notify you.
After the VIP committee approves the new scoring criteria, announce the changes at least one week before it is implemented to your community. Examples include posting on Discord, X (Twitter), and your other communication channels. The announcement must clearly explain every change, give the exact date and time when the new criteria take effect. It should also link to the forum post and list any actions users must take so they have enough time to prepare.
# Whitelisting Rollup for VIP
Source: https://docs.initia.xyz/developers/developer-guides/integrating-initia-apps/vip/whitelist-rollup-for-vip
A rollup must be whitelisted before it can participate in the Vested Interest Program (VIP).
The following steps are for whitelisting a rollup for VIP on Mainnet. For testnet rollups, please contact the Initia team. This section also assumes you have already added your rollup to the [Initia Registry](/developers/developer-guides/integrating-initia-apps/registry/introduction). If not, please follow the guide in the [previous section](/developers/developer-guides/integrating-initia-apps/vip/integrate-vip).
Deploy the appropriate VIP scoring contract for your rollup’s VM.
* EVM: [https://github.com/initia-labs/vip-score-evm](https://github.com/initia-labs/vip-score-evm)
* Wasm: [https://github.com/initia-labs/vip-score-wasm](https://github.com/initia-labs/vip-score-wasm)
* Move: [https://github.com/initia-labs/vip-score-move](https://github.com/initia-labs/vip-score-move)
Before your rollup can be whitelisted, you must create a proposal in the [Initia Forum](https://forum.initia.xyz). See the [template](https://forum.initia.xyz/t/whitelist-new-rollup-on-vip/146) for the necessary information.
After creating the forum proposal, you finally need to submit a governance proposal on the Initia L1. The script below shows how to do so.
```ts vip-l1-gov-proposal.ts expandable
import { MnemonicKey, RESTClient, Wallet, bcs, MsgSubmitProposal, MsgGovExecute } from '@initia/initia.js'
const MNEMONIC_KEY = process.env.MNEMONIC_KEY || 'castle lung ...' // Your wallet's mnemonic key
const REST_URL = process.env.REST_URL || 'https://rest.initia.xyz' // Initia L1 REST endpoint
// Core parameters
const VIP_CONTRACT_ADDRESS =
process.env.VIP_CONTRACT || 'init182yxkv4gqfvz7tjyde6dfgjdr4ldqxklgmf23aju2u3cslnss7ys6dy6w8' // Rollup's VIP contract address
const OPERATOR_ADDRESS =
process.env.OPERATOR_ADDRESS || '0x68b8295438b3d50f81679db88260a596b8ab1f4be1caa94af87c6b853baf7b20' // Rollup's VIP operator address
const BRIDGE_ID = process.env.BRIDGE_ID || '16' // Bridge ID
const BRIDGE_ADDRESS = process.env.BRIDGE_ADDRESS || 'init1y3avrs2r9q3ggj5xs2q5zg4mmpqvr2necwl6s6fhfergtyp93ueq5270ht' // Bridge address
const L2_SCORE_CONTRACT_ADDRESS = process.env.L2_SCORE_CONTRACT_ADDRESS || '0x668dc438bd71f365d1e9ae39ac92f35d5ccde03d' // L2 score contract address
// Operator commission settings
const OPERATOR_COMMISSION_MAX_RATE = process.env.OPERATOR_COMMISSION_MAX_RATE || '0.2' // Operator commission max rate, e.g., 0.2 for 20%
const OPERATOR_COMMISSION_MAX_CHANGE_RATE = process.env.OPERATOR_COMMISSION_MAX_CHANGE_RATE || '0.2' // Operator commission max change rate, e.g., 0.2 for 20%
const OPERATOR_COMMISSION_RATE = process.env.OPERATOR_COMMISSION_RATE || '0.2' // Operator commission rate, e.g., 0.2 for 20%
// Proposal parameters
const PROPOSAL_METADATA = process.env.PROPOSAL_METADATA || 'https://forum.initia.xyz' // VIP proposal forum URL
const PROPOSAL_TITLE = process.env.PROPOSAL_TITLE || 'Whitelist Rollup on VIP' // VIP proposal title
const PROPOSAL_SUMMARY = process.env.PROPOSAL_SUMMARY || 'This proposal is to whitelist Rollup on Initia VIP program.' // VIP proposal summary
const ROLLUP_VM_TYPE = process.env.ROLLUP_VM_TYPE || 0 // Rollup VM type, 0 for MoveVM, 1 for WasmVM, 2 for EVM
async function main() {
const key = new MnemonicKey({ mnemonic: MNEMONIC_KEY })
const rest = new RESTClient(REST_URL, {
gasPrices: `0.015uinit`
})
const wallet = new Wallet(rest, key)
const msg = new MsgSubmitProposal(
[
new MsgGovExecute(
'init10d07y265gmmuvt4z0w9aw880jnsr700j55nka3',
VIP_CONTRACT_ADDRESS,
'vip',
'register',
[],
[
bcs.address().serialize(OPERATOR_ADDRESS).toBase64(),
bcs.u64().serialize(BRIDGE_ID).toBase64(),
bcs.address().serialize(BRIDGE_ADDRESS).toBase64(),
bcs.string().serialize(L2_SCORE_CONTRACT_ADDRESS).toBase64(),
bcs.bigdecimal().serialize(OPERATOR_COMMISSION_MAX_RATE).toBase64(),
bcs.bigdecimal().serialize(OPERATOR_COMMISSION_MAX_CHANGE_RATE).toBase64(),
bcs.bigdecimal().serialize(OPERATOR_COMMISSION_RATE).toBase64(),
bcs.u64().serialize(ROLLUP_VM_TYPE).toBase64()
]
)
],
'100000000uinit',
wallet.key.accAddress,
PROPOSAL_METADATA,
PROPOSAL_TITLE,
PROPOSAL_SUMMARY,
false
)
const tx = await wallet.createAndSignTx({ msgs: [msg] })
const result = await rest.tx.broadcast(tx)
console.log('Transaction result:', result)
}
main().catch(console.error)
```
Once the proposal is submitted, it will enter a voting period of 7 days. Finally, if the proposal passes, the rollup will be whitelisted and active for VIP.
# Account
Source: https://docs.initia.xyz/developers/developer-guides/tools/clis/initiad-cli/accounts
## Creating an Account
Before you can start building and transacting, you'll need to create an account.
```bash
export ACCOUNT_NAME=test-account
initiad keys add $ACCOUNT_NAME
# - address: init17exjfvgtpn5ne4pgmuatjg52mvvtj08773tgfx
# name: test-account
# pubkey: '{"@type":"/cosmos.crypto.secp256k1.PubKey","key":"Ap+WnRzOsJGgfgsrgc4APi/EiTzl3t52ruiKGev7X9LW"}'
# type: local
# **Important** write this mnemonic phrase in a safe place.
# It is the only way to recover your account if you ever forget your password.
# glass easy miracle sign tent anchor position cluster shift calm march elite menu must nose inform antique reason meadow relief layer term crush gesture
```
The mnemonic key is the only way to recover your account if you forget your password.
If you want to create an EVM account, you can use the following command:
```bash
export ETH_KEY_TYPE=eth_secp256k1
export ETH_COIN_TYPE=60
initiad keys add $ACCOUNT_NAME --key-type $ETH_KEY_TYPE --coin-type $ETH_COIN_TYPE
```
Even with the same mnemonic phrase, the derived addresses differ because the method of generating the public key varies, leading to each account being treated separately.
## Importing an Account
You can import an account by providing a mnemonic phrase.
```bash
initiad keys add $ACCOUNT_NAME --recover
> Enter your bip39 mnemonic
glass easy miracle sign tent anchor position cluster shift calm march elite menu must nose inform antique reason meadow relief layer term crush gesture
# - address: init1x7jl4cx6pq4urdppmnhwtyzfdtn5w7ssw4hjfm
# name: test-account
# pubkey: '{"@type":"/cosmos.crypto.secp256k1.PubKey","key":"Am9tmvRft+pcol+h/unlMB9gRbKAZF/7Y8K3iWOtr9Dw"}'
# type: local
```
To export the account's private key, run:
```bash
initiad keys export $ACCOUNT_NAME > key.json
>Enter passphrase to encrypt the exported key:
# key.json
# -----BEGIN TENDERMINT PRIVATE KEY-----
# kdf: argon2
# salt: BE84B59652876BFBEEB0E01CA2AA753C
# type: secp256k1
# edch8EcPYgSQrWHdJlmRMZGmh7gqOLYvAHsynbovXonq2reSeP+eEgtvwNYEnrQu
# 2MZwMIs=
# =ObmR
# -----END TENDERMINT PRIVATE KEY-----
```
The exported private key is encrypted with a passphrase. So, you can only import it using `initiad` CLI. It is not possible to import it directly on Wallet Apps.
To import the account using the exported private key, run:
```bash
export NEW_ACCOUNT_NAME=test-account2
initiad keys import $NEW_ACCOUNT_NAME key.json
```
## Retrieving Account Data
You can retrieve account data stored in the keyring.
```bash
initiad keys list
# - address: init1x7jl4cx6pq4urdppmnhwtyzfdtn5w7ssw4hjfm
# name: test-account
# pubkey: '{"@type":"/cosmos.crypto.secp256k1.PubKey","key":"Am9tmvRft+pcol+h/unlMB9gRbKAZF/7Y8K3iWOtr9Dw"}'
# type: local
```
## Validator Address
If you run a validator node, you can get the validator address by running:
```bash
initiad comet show-address
# initvalcons1kknrtmntc39v3z4hgv84hddeclyfsxdgzdtn3q
```
To get validator consensus public key, run:
```bash
initiad comet show-validator
# {"@type":"/cosmos.crypto.ed25519.PubKey","key":"lusuUL6CKywnZDPul5COzCFKLPLDGEMbLEIZIZlDp44="}
```
# Introduction
Source: https://docs.initia.xyz/developers/developer-guides/tools/clis/initiad-cli/introduction
[initiad](https://github.com/initia-labs/initia) is a CLI tool for interacting with the Initia L1.
You can use initiad to create and manage accounts, query data, send transactions and more.
## Getting Started
To getting started using initiad CLI, you simply need to install the CLI.
```bash
export VERSION=v0.5.7
git clone https://github.com/initia-labs/initia.git
cd initia
git checkout $VERSION
make install
```
If the installation is successful, you should be able to run the following command:
```bash
initiad version
# v0.5.7
```
# Querying Data
Source: https://docs.initia.xyz/developers/developer-guides/tools/clis/initiad-cli/querying-data
The initiad CLI offers a range of commands for querying data from Initia L1.
This guide walks you through using these commands to retrieve blockchain data.
`initiad query` command enables you to query data from the blockchain. Each module provides a client-facing query interface.
The general syntax for querying data is:
```bash
initiad query [module-name] [query-name] [args] [flags]
```
## Querying Account Balance
After receiving tokens to your address, you can view your account's balance like:
```bash
export ADDRESS=init1x7jl4cx6pq4urdppmnhwtyzfdtn5w7ssw4hjfm
export NODE_URL=https://rpc.testnet.initia.xyz
initiad query bank balances $ADDRESS --node $NODE_URL
# - amount: "100000000"
# denom: uinit
```
## Querying Blocks
You can query a single block by its height or hash using the following command:
```bash
export BLOCK_HEIGHT=1000
export BLOCK_HASH=04B7658B40508B290B04C61A0021EB5E9354F1E8C70DF5D6AE2A9B1F0B8D32A3
initiad query block --type=height $BLOCK_HEIGHT --node $NODE_URL
initiad query block --type=hash $BLOCK_HASH --node $NODE_URL
```
## Querying Transactions
You can query a single transaction by its hash using the following command:
```bash
export TX_HASH=6DFEE8E4BFC38341E8AADBD74A23588D8DE94FA38052CB5721DDA780A24F8B1D
initiad query tx $TX_HASH --node $NODE_URL
# code: 0
# codespace: ""
# data: 12240A222F696E697469612E6D6F76652E76312E4D736745786563757465526573706F6E7365
# events:
# - attributes:
# - index: true
# key: sender
# value: 0x1,0x512536dfca0b50144483dab26790912ad85b17fe
# ...
```
## Querying Params
You can query the module parameters using the following command:
```bash
initiad query mstaking params --node $NODE_URL
# bond_denoms:
# - uinit
# - move/dbf06c48af3984ec6d9ae8a9aa7dbb0bb1e784aa9b8c4a5681af660cf8558d7d
# - move/a2b0d3c8e53e379ede31f3a361ff02716d50ec53c6b65b8c48a81d5b06548200
# - move/b134ae6786f10ef74294e627d2519b63b7c742a6735f98682929fea9a84744d2
# historical_entries: 10000
# max_entries: 7
# max_validators: 100
# min_commission_rate: "0.000000000000000000"
# min_voting_power: "1000000"
# unbonding_time: 1814400s
initiad query move params --node $NODE_URL
# allowed_publishers: []
# base_denom: uinit
# base_min_gas_price: "0.015000000000000000"
# contract_shared_revenue_ratio: "0.000000000000000000"
# script_enabled: true
```
## Querying Oracle
If node has oracle module enabled, you can query the currency pairs and price using the following commands:
```bash
initiad query oracle currency-pairs --node $NODE_URL
# currency_pairs:
# - Base: AAVE
# Quote: USD
# - Base: ADA
# Quote: USD
# - Base: AEVO
# Quote: USD
initiad query oracle price AAVE USD --node $NODE_URL
# decimals: "8"
# id: "19"
# nonce: "1233969"
# price:
# block_height: "1237222"
# block_timestamp: "2024-10-30T05:36:59.810774835Z"
# price: "15143771245"
```
# Transactions
Source: https://docs.initia.xyz/developers/developer-guides/tools/clis/initiad-cli/transactions
`initiad tx` command enables you to modify the chain state by submitting a transaction.
Each modules provides a client-facing transaction interface.
The general syntax for submitting a transaction is:
```bash
initiad tx [module-name] [action-name] [args] [flags]
```
## Send Tokens
To send tokens from one account to another, you can use the following command:
```bash
export NODE_URL=https://rpc.testnet.initia.xyz
export ACCOUNT_NAME=test-account
export RECIPIENT_ADDRESS=init1x7jl4cx6pq4urdppmnhwtyzfdtn5w7ssw4hjfm
export CHAIND_ID=initiation-2
initiad tx bank send $ACCOUNT_NAME $RECIPIENT_ADDRESS 1000uinit \
--node $NODE_URL \
--from $ACCOUNT_NAME \
--chain-id $CHAIN_ID \
--gas auto \
--gas-adjustment 1.4
```
## Deploy Move module
First, clone the initia-tutorials repository, which contains the read\_write module we'll be using.
```bash
git clone git@github.com:initia-labs/initia-tutorials.git
```
Before building the module, you need to update the module owner's address to your own address in the `Move.toml` configuration file located in `./initia-tutorials/move/read_write`.
Use the following command to parse your Initia address into bytes format, which is your HEX address.
```bash
initiad keys parse init138ntr4czqvrfzz8vvfsmdz0a36u8h6g5ct5cna
# bytes: 89E6B1D70203069108EC6261B689FD8EB87BE914
# human: init
```
Now, modify the `Move.toml` file to include your HEX address:
```toml
[package]
name = "read_write"
version = "0.0.0"
[dependencies]
InitiaStdlib = { git = "https://github.com/initia-labs/movevm.git", subdir = "precompile/modules/initia_stdlib", rev = "main" }
[addresses]
std = "0x1"
your_address = "0x89E6B1D70203069108EC6261B689FD8EB87BE914"
```
Build the module using either CLI:
```bash
initiad move build --path ./initia-tutorials/move/read_write
```
Then, publish the module to the Initia blockchain:
```bash
initiad move deploy \
--path ./initia-tutorials/move/read_write \
--upgrade-policy COMPATIBLE \
--from $ACCOUNT_NAME \
--gas auto --gas-adjustment 1.5 \
--gas-prices 0.015uinit \
--node $NODE_URL \
--chain-id $CHAIN_ID
```
**About the upgrade policy:**
| Policy | Description |
| -------------- | --------------------------------------------------------------------------------------------------------------------- |
| **COMPATIBLE** | Performs a compatibility check during upgrades, ensuring no public function changes or resource layout modifications. |
| **IMMUTABLE** | Marks the modules as immutable, preventing any future upgrades. |
To interact with the module, you can use the following command:
```bash
export MODULE_ADDRESS=0x89E6B1D70203069108EC6261B689FD8EB87BE914
initiad query move view $MODULE_ADDRESS read_write read \
--node $NODE_URL
# data: '"initial content"'
# events: []
# gas_used: "1166"
initiad tx move execute $MODULE_ADDRESS read_write write \
--args '["string:new_string"]' \
--from $ACCOUNT_NAME \
--gas auto --gas-adjustment 1.5 --gas-prices 0.015uinit \
--node $NODE_URL --chain-id $CHAIN_ID
initiad query move view $MODULE_ADDRESS read_write read \
--node $NODE_URL
# data: '"new_string"'
# events: []
# gas_used: "1150"
```
# Introduction
Source: https://docs.initia.xyz/developers/developer-guides/tools/clis/minitiad-cli/introduction
# Gas Station
Source: https://docs.initia.xyz/developers/developer-guides/tools/clis/weave-cli/gas-station
The Gas Station is a dedicated account used by Weave to fund critical infrastructure components of the Interwoven stack. It distributes funds to essential services like [OPinit Bots](/home/core-concepts/interwoven-stack/opinit-framework/introduction) (including Bridge Executor, Output Submitter, Batch Submitter, and Challenger) and the [IBC relayer](https://tutorials.cosmos.network/academy/2-cosmos-concepts/13-relayer-intro.html) to ensure smooth operation of the network.
This is essential for seamless operation with Weave as it eliminates the need for manual fund distribution.
While Weave requires your consent for all fund transfers, using a separate account prevents any potential misuse of an existing account.
We strongly recommend creating a new dedicated account for Gas Station use rather than using an existing account
## Setting up the Gas Station
```bash
weave gas-station setup
```
You can either import an existing mnemonic or have Weave generate a new one.
Once setup is complete, you'll see two addresses in `init` and `celestia` format.
While the Gas Station addresses for Celestia and the Initia ecosystem will be
different, both are derived from the same mnemonic that you entered.
Then fund the account with at least 10 INIT tokens to support the necessary components. If you're planning to use Celestia as your Data Availability Layer, you'll also need to fund the account with `TIA` tokens.
For testnet operations: - Get testnet `INIT` tokens from the [Initia
faucet](https://faucet.testnet.initia.xyz/) - Get testnet `TIA` tokens from
the [Celestia
faucet](https://docs.celestia.org/how-to-guides/mocha-testnet#mocha-testnet-faucet)
## Viewing Gas Station Information
```bash
weave gas-station show
```
This command displays the addresses and current balances of the Gas Station account in both `init` and `celestia` bech32 formats.
# Bootstrapping Initia Node
Source: https://docs.initia.xyz/developers/developer-guides/tools/clis/weave-cli/initia-node
Setting up a node for a Cosmos SDK chain has traditionally been a complex process requiring multiple steps:
* Locating the correct repository and version of the node binary compatible with your target network
* Either cloning and building the source code or downloading a pre-built binary from the release page
* Configuring the node with appropriate `config.toml` and `app.toml` files, which involves:
* Setting correct values for `seeds`, `persistent_peers`, and `pruning`
* Navigating through numerous other parameters that rarely need modification
* Finding and implementing the correct genesis file to sync with the network
* Setting up cosmovisor for automatic updates or manually maintaining the node binary
Weave streamlines this entire process into a simple command.
## Initialize your node
```bash
weave initia init
```
This command guides you through the node setup process, taking you from an empty directory to a fully synced node ready for operation.
Once complete, you can run the node using `weave initia start`.
**Available Flags**
The directory to store the node's data and configuration files.
## Running your node
```bash
weave initia start
```
**Available Flags**
Whether to run the node in the background.
```bash
weave initia stop
```
```bash
weave initia restart
```
```bash
weave initia log
```
**Available Flags**
The number of lines to display from the end of the logs.
## Help
To see all the available commands:
```bash
weave initia --help
```
# Installation & Setup
Source: https://docs.initia.xyz/developers/developer-guides/tools/clis/weave-cli/installation
## Prerequisites
* Operating System: **Linux, MacOS**
* Go **v1.23** or higher
* NPM & Node **v20** or higher (if you wish to run relayer in the same machine)
## Installation
```bash
brew install initia-labs/tap/weave
```
**AMD64**
```bash
VERSION=$(curl -s https://api.github.com/repos/initia-labs/weave/releases/latest | grep '"tag_name":' | cut -d'"' -f4 | cut -c 2-)
wget https://github.com/initia-labs/weave/releases/download/v$VERSION/weave-$VERSION-linux-amd64.tar.gz
tar -xvf weave-$VERSION-linux-amd64.tar.gz
```
**ARM64**
```bash
VERSION=$(curl -s https://api.github.com/repos/initia-labs/weave/releases/latest | grep '"tag_name":' | cut -d'"' -f4 | cut -c 2-)
wget https://github.com/initia-labs/weave/releases/download/v$VERSION/weave-$VERSION-linux-arm64.tar.gz
tar -xvf weave-$VERSION-linux-arm64.tar.gz
```
```bash
git clone https://github.com/initia-labs/weave.git
cd weave
VERSION=$(curl -s https://api.github.com/repos/initia-labs/weave/releases/latest | grep '"tag_name":' | cut -d'"' -f4 | cut -c 2-)
git checkout tags/v$VERSION
make install
```
```bash
weave version
```
This should return the version of the Weave binary you have installed.
To get started with Weave, run
```bash
weave init
```
It will ask you to setup the [Gas Station](/developers/developer-guides/tools/clis/weave-cli/gas-station) account and ask which infrastructure you want to setup.
After that, Weave will guide you through the setup process step-by-step.
We recommend reading the [Gas Station](/developers/developer-guides/tools/clis/weave-cli/gas-station) section to understand the purpose and usage of the Gas Station before proceeding.
By default, Weave collects non-identifiable usage data to help improve the product. If you prefer not to share this data, you can opt out by running the following command:
```bash
weave analytics disable
```
### Next Steps
Setup your Initia node and start syncing with the chain.
Configure and launch your own rollup.
Setup and run the IBC relayer. This is necessary for built-in oracle to
work.
Setup the OPinit bots to complete the optimistic rollup setup.
or run
```bash
weave --help
```
to learn more about all the commands available.
# Introduction
Source: https://docs.initia.xyz/developers/developer-guides/tools/clis/weave-cli/introduction
Weave is a CLI tool designed to make working with Initia and its Interwoven Rollups easier. Instead of dealing with multiple tools and extensive documentation,
developers can use a single command-line interface for the entire development and deployment workflow.
Its primary purpose is to solve several key challenges:
1. **Infrastructure Management:** Weave can handles all critical infrastructure components within the Interwoven Rollup ecosystem:
* Initia node setup and management (including state sync and chain upgrade management)
* Rollup deployment and configuration
* OPinit bots setup for the Optimistic bridge
* IBC Relayer setup between Initia L1 and your Rollup
2. **Built for both local development and production deployments:** Weave provides
* Interactive guided setup for step-by-step configuration and
* Configuration file support for automated deployments
3. **Developer Experience:** Not only it consolidates multiple complex operations into a single CLI tool, but it also changes how you interact with the tool to setup your configuration.
## How experience with Weave is different
Here are some of the key features that make it stand out:
1. **Tooltip support in each step:**
Users can toggle Tooltip on and off in each step by pressing `Ctrl + T` to get more information about the current step they are on.
We give you the right amount of information at the right time. Less time spent on googling and finding the information you need.
2. **Ability to go back to the previous step (for most steps):**
Weave allows you to go back to the previous step in the setup process by pressing `Ctrl + Z`. This is particularly useful when you make a mistake in the setup process and need to correct it. Please note that this is not available for all steps.
3. **Simple service management:**
Weave provides a simple command to start, stop, restart a service just like how you would do it with `systemctl` or `launchctl`. It also provides a `log` command to view the logs of the service.
In essence, every infra-service you setup can be managed with the following commands:
```bash
weave start, stop, restart, log
```
Get started with Weave now by following this [installation guide](/developers/developer-guides/tools/clis/weave-cli/installation).
# Introduction
Source: https://docs.initia.xyz/developers/developer-guides/tools/clis/weave-cli/rollup/introduction
Previously, for your rollup to be fully operational,
you need to follow a series of extensive steps (multiple binaries, multiple configuration files, etc.) described [here](/nodes-and-rollups/deploying-rollups).
Weave CLI simplifies all these steps into a set of easy-to-follow commands, getting your rollup fully operational in no time.
**For a complete rollup deployment from scratch, follow these steps in order**. If you only need to set up specific components, you can navigate directly to the relevant sections.
1. [Launch your rollup and run sequencer/operator node(s)](/developers/developer-guides/tools/clis/weave-cli/rollup/launch)
2. [Running IBC Relayer](/developers/developer-guides/tools/clis/weave-cli/rollup/relayer) (necessary for the built-in oracle and IBC support)
3. [Running OPinit Bots](/developers/developer-guides/tools/clis/weave-cli/rollup/opinit-bots) (executor and challenger)
# Launching your Rollup
Source: https://docs.initia.xyz/developers/developer-guides/tools/clis/weave-cli/rollup/launch
Weave simplifies [this lengthy complex rollup deployment process](/nodes-and-rollups/deploying-rollups) into a single command.
Weave will send some funds from Gas Station to the OPinit Bot accounts during this process. Please make sure that your Gas Station account has enough funds to cover the total amount of funds to be sent (this amount will be shown to you before sending the funds).
Haven't set up the Gas Station yet? Please [Check out this guide](/developers/developer-guides/tools/clis/weave-cli/gas-station) first.
```bash
weave rollup launch
```
Once the process completes, your rollup node will be running and ready to process queries and transactions.
The command also provides an [InitiaScan](https://scan.testnet.initia.xyz/) magic link that automatically adds your local rollup to the explorer, allowing you to instantly view your rollup's transactions and state.
This command only sets up the bot addresses but does not start the OPinit Bots (executor and challenger).
To complete the setup, proceed to the [OPinit Bots setup](/developers/developer-guides/tools/clis/weave-cli/rollup/opinit-bots) section to configure and run the OPinit Bots.
To launch from the config file without going through the interactive setup process, use the `--with-config` and `--vm` flags.
```bash
weave rollup launch --with-config --vm
```
**Available Flags**
The directory to store the rollup node data and configuration files.
Path to the rollup config file. Use this flag to launch from a config file without going through the interactive setup process.
The VM to use for the rollup node. The available options are `move`, `wasm`,
and `evm`. **This is required when `--with-config` flag is provided.**
Force the launch of the rollup node even if the config file already exists.
**This only works when `--with-config` flag is provided.**
## Running your Rollup node
```bash
weave rollup start
```
Note that `launch` command already starts the rollup node for you. This
command is only needed if you have stopped the node and want to start it
again.
**Available Flags**
Whether to run the rollup node in the background.
```bash
weave rollup stop
```
```bash
weave rollup restart
```
```bash
weave rollup log
```
**Available Flags**
The number of lines to display from the end of the logs.
## Help
To see all the available commands:
```bash
weave rollup --help
```
# Next Steps
Source: https://docs.initia.xyz/developers/developer-guides/tools/clis/weave-cli/rollup/next-steps
## Building on Your Rollup
Once your rollup node is launched and both the OPinit bots and IBC Relayer are configured, you can start integrating it with Initia tools. The resources below will help you get started:
* **VM-specific tutorials**: Learn how to deploy contracts and interact with your rollup on each VM.
* [EVM tutorials](/developers/developer-guides/vm-specific-tutorials/evm)
* [MoveVM tutorials](/developers/developer-guides/vm-specific-tutorials/movevm)
* [WasmVM tutorials](/developers/developer-guides/vm-specific-tutorials/wasmvm)
* **[Oracle](/developers/developer-guides/tools/oracles/connect/fetching-prices-from-api/getting-single-asset-price)**: Integrate oracles to fetch off-chain token price data and use it in your rollup applications.
* **[Indexer](/developers/developer-guides/tools/indexers/transactions-by-account)**: Use the Initia Indexer to query and retrieve data from your rollup.
* **[SDKs](/developers/developer-guides/tools/sdks)**: Explore the Initia SDKs for building applications on your rollup.
## Going Live
If you are launching a rollup for testing purposes, you can skip this section. When your rollup is ready for production and you want it to be publicly visible in the Initia ecosystem, contact the Initia team first via [Discord](https://discord.gg/initia) by raising a ticket. We will walk you through the registry and bridge integration steps described below.
To make your rollup node visible to the Initia ecosystem, register it in the [Initia Registry](https://github.com/initia-labs/initia-registry) and the [Skip Go Registry](https://github.com/initia-labs/skip-go-registry). To list your rollup node on **InitiaScan** and the **Initia Wallet widget**, follow these steps:
* **[Register Initia Registry](/nodes-and-rollups/deploying-rollups/initia-registry)**
For bridge integration, register your rollup in Initia Registry first, then open a PR that adds your node information to **skip-go-registry** repository.
* **[Skip Go Registry Repository](https://github.com/skip-mev/skip-go-registry)**
# Running OPinit Bots
Source: https://docs.initia.xyz/developers/developer-guides/tools/clis/weave-cli/rollup/opinit-bots
Weave provides a streamlined way to configure and run [OPinit Bots](/home/core-concepts/interwoven-stack/opinit-framework/introduction) (executor and challenger) for your rollup.
## Setting up
```bash
weave opinit init
```
This command will guide you through selecting the bot type (executor or challenger), configuring bot keys if needed, and setting up the bot's configuration.
You can also specify the bot type directly:
```bash
weave opinit init executor
```
To setup Executor from the [config file](https://github.com/initia-labs/opinit-bots/blob/main/executor/README.md) without going through the interactive setup process, use the `--with-config` flag together with either `--generate-key-file` or `--key-file` flags.
For example, to let Weave generate Executor's keys for you, use the following command:
```bash
weave opinit init executor --with-config --generate-key-file
```
To provide your own keys, use the following command:
```bash
weave opinit init executor --with-config --key-file
```
**Available Flags**
The directory to store OPinit bots data and configuration files
Path to the rollup directory that contains the rollup's artifacts. This is
useful when you are setting up OPinit bots for a rollup that you have just
launched, as it can use the artifacts from the rollup to setup the bots.
Path to the rollup [config file](https://github.com/initia-labs/opinit-bots/blob/main/executor/README.md). Use this flag to setup Executor from a config file without going through the interactive setup process.
Whether to generate Executor's keys during the setup process. Can only be used when `--with-config` flag is provided. Conflicts with `--key-file` flag.
Path to the Executor's keys file. Can only be used when `--with-config` flag is provided. Conflicts with `--generate-key-file` flag.
```bash
weave opinit init challenger
```
To setup Challenger from the [config file](https://github.com/initia-labs/opinit-bots/blob/main/challenger/README.md) without going through the interactive setup process, use the `--with-config` flag together with either `--generate-key-file` or `--key-file` flags.
For example, to let Weave generate Challenger's keys for you, use the following command:
```bash
weave opinit init challenger --with-config --generate-key-file
```
To provide your own OPinit bot keys, use the following command:
```bash
weave opinit init challenger --with-config --key-file
```
**Available Flags**
The directory to store OPinit bots data and configuration files
Path to the rollup directory that contains the rollup's artifacts. This is
useful when you are setting up OPinit bots for a rollup that you have just
launched, as it can use the artifacts from the rollup to setup the bots.
Path to the rollup [config file](https://github.com/initia-labs/opinit-bots/blob/main/challenger/README.md). Use this flag to setup Challenger from a config file without going through the interactive setup process.
Whether to generate Challenger's keys during the setup process. Can only be used when `--with-config` flag is provided. Conflicts with `--key-file` flag.
Path to the Challenger's keys file. Can only be used when `--with-config` flag is provided. Conflicts with `--generate-key-file` flag.
## Managing Keys
To modify bot keys, use the following command to either generate new keys or restore existing ones:
```bash
weave opinit setup-keys
```
**Available Flags**
The directory to store OPinit bots data and configuration files
Path to the rollup directory that contains the rollup's artifacts. This is
useful when you are setting up OPinit bots for a rollup that you have just
launched, as it can use the artifacts from the rollup to setup the bots.
For Executor bot to work, Bridge Executor, Output Submitter, and Batch Submitter keys must be set up.
For Challenger bot to work, Challenger key must be set up.
For rollups with built-in oracle enabled, Oracle Executor key must be set up.
## Resetting OPinit Bots
Reset Executor's database. This will clear all the data stored in the Executor's database (the configuration files are not affected).
```bash
weave opinit reset executor
```
Reset Challenger's database. This will clear all the data stored in the Challenger's database (the configuration files are not affected).
```bash
weave opinit reset challenger
```
## Running OPinit Bots
```bash
weave opinit start executor
```
**Available Flags**
Whether to run the Executor in the background.
```bash
weave opinit stop executor
```
```bash
weave opinit restart executor
```
```bash
weave opinit log executor
```
**Available Flags**
The number of lines to display from the end of the Executor's logs.
```bash
weave opinit start challenger
```
**Available Flags**
Whether to run the node in the background.
```bash
weave opinit stop challenger
```
```bash
weave opinit restart challenger
```
```bash
weave opinit log challenger
```
**Available Flags**
The number of lines to display from the end of the logs.
## Help
To see all the available commands:
```bash
weave opinit --help
```
# Running IBC Relayer
Source: https://docs.initia.xyz/developers/developer-guides/tools/clis/weave-cli/rollup/relayer
An IBC relayer is a software component that facilitates communication between two distinct blockchain networks that support the Inter-Blockchain Communication (IBC) protocol. It is required for built-in oracle, Minitswap, and other cross-chain services to function with your rollup.
Weave currently only supports Rapid relayer configuration generation. It will support running the rapid relayer directly in the future. For more detailed information about Rapid relayer, see the [Rapid relayer documentation](https://github.com/initia-labs/rapid-relayer).
Weave only supports IBC relayer setup between Initia L1 and Interwoven Rollups. Setting up relayers between other arbitrary networks is not supported.
## Setting up
For this guide, you'll need Weave v0.3.0 or newer. You can check your Weave version by running `weave version`. If you need to upgrade, run `weave upgrade`.
```bash
weave relayer init
```
This command will guide you through 2 major parts of the relayer setup:
* Setting up networks and channels to relay messages between
* Setting up the account responsible for relaying messages
For the former, Weave will present you with three options:
1. Configure channels between Initia L1 and a whitelisted Rollup (those available in [Initia Registry](https://github.com/initia-labs/initia-registry))
2. Configure using artifacts from `weave rollup launch` (recommended for users who have just launched their rollup)
3. Configure manually
As for the latter, Weave will ask whether you want to use the OPinit Challenger bot account for the relayer. This is recommended as it is exempted from gas fees on the rollup and able to stop other relayers from relaying when it detects a malicious message.
Relayer requires funds to relay messages between Initia L1 and your rollup (if it's not in the fee whitelist). If Weave detects that your account does not have enough funds, Weave will ask you to fund via Gas Station.
## Running Relayer
Currently, Weave generates the relayer configuration file but does not run the relayer directly. You'll need to manually set up and run the Rapid relayer using the generated configuration.
Make sure you have Node.js and npm installed on your system if you wish to run the relayer in the same machine.
Clone the Rapid relayer repository and install its dependencies:
```bash
git clone https://github.com/initia-labs/rapid-relayer
cd rapid-relayer
npm install
```
Move the generated configuration file to the Rapid relayer directory:
```bash
cp ~/.relayer/config.json ./config.json
```
Launch the relayer with the configuration:
```bash
npm start
```
## Help
To see all the available commands:
```bash
weave relayer --help
```
# Introduction
Source: https://docs.initia.xyz/developers/developer-guides/tools/indexers/indexer-introduction
All rollups comes with a built-in indexer that automatically index and store all relevant data on the chain. This data is then exposed through a REST API that can be used to query various historical and current data including historical account transactions, NFTs owned by an account, and more.
# NFT Collection Details
Source: https://docs.initia.xyz/developers/developer-guides/tools/indexers/nft-collection-details
GET https://rest.minievm-2.initia.xyz/indexer/nft/v1/collections/{collection_addr}
This endpoint returns the details of a specific ERC721 NFT collection.
The address of the NFT collection to retrieve details for
# NFT Collections by Account
Source: https://docs.initia.xyz/developers/developer-guides/tools/indexers/nft-collections-by-account
GET https://rest.minievm-2.initia.xyz/indexer/nft/v1/collections/by_account/{account}
This endpoint returns the all the ERC721 NFT collections owned by the specified account.
The account to get the NFT collections for
# NFT Tokens by Account
Source: https://docs.initia.xyz/developers/developer-guides/tools/indexers/nft-tokens-by-account
GET https://rest.minievm-2.initia.xyz/indexer/nft/v1/tokens/by_account/{account}
This endpoint returns all the ERC721 NFT tokens owned by the specified account.
The account to get the NFT tokens for
# NFT Tokens by Collection
Source: https://docs.initia.xyz/developers/developer-guides/tools/indexers/nft-tokens-by-collection
GET https://rest.minievm-2.initia.xyz/indexer/nft/v1/tokens/by_collection/{collection_addr}
This endpoint returns all the ERC721 NFT tokens within a specific collection.
The address of the NFT collection to retrieve tokens from
# Transactions by Account
Source: https://docs.initia.xyz/developers/developer-guides/tools/indexers/transactions-by-account
GET https://rest.minievm-2.initia.xyz/indexer/tx/v1/txs/by_account/{account}
This endpoint queries all transactions of a given account.
The account address to retrieve transactions for
# Transaction by Hash
Source: https://docs.initia.xyz/developers/developer-guides/tools/indexers/transactions-by-hash
GET https://rest.minievm-2.initia.xyz/indexer/tx/v1/txs/{tx_hash}
This endpoint queries a specific transaction by its hash.
The transaction hash to retrieve details for
# Transactions by Height
Source: https://docs.initia.xyz/developers/developer-guides/tools/indexers/transactions-by-height
GET https://rest.minievm-2.initia.xyz/indexer/tx/v1/txs/by_height/{height}
This endpoint queries all transactions at a given block height.
The block height to retrieve transactions from
# Single Asset Price
Source: https://docs.initia.xyz/developers/developer-guides/tools/oracles/connect/fetching-prices-from-api/getting-single-asset-price
GET /connect/oracle/v2/get_price?currency_pair={baseCurrency}/{quoteCurrency}
The base currency of the asset to get the price for (e.g. `BTC`)
The quote currency of the asset to get the price for (e.g. `USD`)
This endpoint returns the latest price data for a given `baseCurrency` and `quoteCurrency` pair. Note that `baseCurrency` and `quoteCurrency` must be a pair supported and found in the [supported feeds](/developers/developer-guides/tools/oracles/connect/fetching-prices-from-api/getting-supported-feeds) endpoint, and combinations are not supported.
For example, even if `BTC`/`USD` and `ETH`/`USD` are supported, `BTC`/`ETH` is not supported.
# Supported Feeds
Source: https://docs.initia.xyz/developers/developer-guides/tools/oracles/connect/fetching-prices-from-api/getting-supported-feeds
GET /connect/oracle/v2/get_all_tickers
This endpoint returns all of the asset/currency pairs that are currently supported by Connect on the given network.
# Fetching Connect Prices from Smart Contract
Source: https://docs.initia.xyz/developers/developer-guides/tools/oracles/connect/fetching-prices-from-contracts
As mentioned earlier in this section, Connect price data can also be fetched and utilized directly by smart contracts. On Initia, the way that this is done varies depending on the smart contract framework that is used
Fetch prices from Solidity and other EVM-based smart contracts
Fetch prices from Move modules
Fetch prices from CosmWasm contracts
# Introduction to Connect
Source: https://docs.initia.xyz/developers/developer-guides/tools/oracles/connect/introduction
Connect is an enshrined oracle service built by [Skip](https://skip.money), designed to deliver fast and up-to-date asset price data to the blockchain.
The system achieves this by leveraging two new features introduced in Cosmos SDK version 0.50: [ABCI++](https://members.delphidigital.io/learn/abci) and [Vote Extensions](https://docs.cosmos.network/main/build/abci/vote-extensions). These features enable the chain's validators to submit arbitrary data, such as asset price information, into the block proposal process, which is then stored on-chain. This eliminates the possibility of price updates being censored or delayed due to chain congestion or other censorship attempts, ensuring the chain and its applications always have access to fresh and up-to-date price data.
Once on-chain, application developers can then query and make use of the data in various ways, such as querying the chain directly through the command line or a frontend, or through the smart contract level.
In Initia's case, Connect prices can also be relayed from the Initia L1 to any rollup through the rollup's [OPinit Bot](/home/core-concepts/interwoven-stack/opinit-framework/components/introduction). This eliminates the need for rollup teams to spend resources and time finding and integrating their own oracle provider.
For more information on Connect, please see their [documentation](https://docs.skip.build/connect/introduction).
# Account
Source: https://docs.initia.xyz/developers/developer-guides/tools/sdks/initia-js/accounts
## Creating an Account
Before you can start building and transacting, you'll need to create an account.
```ts InitiaJS
import { MnemonicKey } from '@initia/initia.js'
const key = new MnemonicKey()
```
The mnemonic key is the only way to recover your account if you forget your password.
## Importing an Account
You can also import an account by providing a mnemonic phrase or a raw key.
```ts InitiaJS
import { MnemonicKey } from '@initia/initia.js'
const keyByMnemonic = new MnemonicKey({
mnemonic: 'bird upset ... evil cigar'
})
const keyByRawKey = new RawKey(keyByMnemonic.privateKey)
console.log('keyByMnemonic:', keyByMnemonic.privateKey)
console.log('keyByRawKey:', keyByRawKey.privateKey)
```
Output:
```bash
keyByMnemonic:
keyByRawKey:
```
If you want to create an EVM account, you can use the following code:
```ts InitiaJS
const cosmosKeyByMnemonic = new MnemonicKey({
mnemonic: 'bird upset ... evil cigar',
})
const evmKeyByMnemonic = new MnemonicKey({
mnemonic: 'bird upset ... evil cigar',
coinType: 60,
eth: true
})
console.log('cosmosKeyByMnemonic:', cosmosKeyByMnemonic.accAddress)
console.log('evmKeyByMnemonic:', evmKeyByMnemonic.accAddress)
```
Output:
```bash
cosmosKeyByMnemonic: init1d7s3q7nmlzqz9v4tk6ntrvfmavu2vk656gr29j
evmKeyByMnemonic: init1f7t8tqnltm2n0ghs3g9uyplkj3rf2mh9tcf4r9
```
## Retrieving Account Data
You can retrieve account data from the key object.
```ts InitiaJS
import { MnemonicKey } from '@initia/initia.js'
const key = new MnemonicKey({
mnemonic: 'across debate retreat border auction drum inflict demise jaguar fine dizzy absorb general include brush wet exclude host reward post angle shield mouse model',
})
console.log('mnemonic:', key.mnemonic)
console.log('private key:', key.privateKey)
console.log('public key:', key.publicKey)
console.log('account address:', key.accAddress)
console.log('account validator address:', key.valAddress)
```
Output:
```bash
mnemonic: across debate retreat border auction drum inflict demise jaguar fine dizzy absorb general include brush wet exclude host reward post angle shield mouse model
private key:
public key: Z { key: 'AmXrEF5FHNkRMehfDmBM3AwqZ4Y21r2H+hUMjS6++CSP' }
account address: init17mq4sqemx2djc59tda76y20nwp4pfn4943x9ze
account validator address: initvaloper17mq4sqemx2djc59tda76y20nwp4pfn49p5luvf
```
# Introduction
Source: https://docs.initia.xyz/developers/developer-guides/tools/sdks/initia-js/introduction
[InitiaJS](https://npmjs.org/@initia/initia.js) is a TypeScript library for interacting with the Initia L1 and rollups. The SDK allows developers to query data from the chains, sign and send transactions, and more.
## Getting Started
To getting started using InitiaJS, you simply need to install the SDK using npm or other package managers.
```bash
npm install @initia/initia.js
```
# Querying Data
Source: https://docs.initia.xyz/developers/developer-guides/tools/sdks/initia-js/querying-data
The InitiaJS SDK offers a powerful `RESTClient` that simplifies the process of querying data from both the Initia L1 and rollups. This client encapsulates various endpoints and methods into user-friendly helper functions, organized under sub-categories of the `rest` client based on their corresponding Cosmos SDK modules.
In this tutorial, we'll explore several examples demonstrating how to leverage these helper functions to retrieve key data points efficiently using the SDK.
For demonstration purposes, we will assume that all of these examples are implemented in a file named `src/query.ts`.
## Querying Account Balance
To query the balance of an account, we can use the `balance` function from the `bank` module. This function takes in an address and returns the balance of the account.
First, we will make the necessary imports and initialize the `RESTClient`.
```ts
import { RESTClient, Coin } from '@initia/initia.js';
const restClient = new RESTClient('https://rest.testnet.initia.xyz', {
chainId: 'initiation-2',
gasPrices: '0.015uinit', // default gas prices
gasAdjustment: '2.0', // default gas adjustment for fee estimation
});
```
Adjust gasPrices and gasAdjustment according to current [network](/resources/developer/initia-l1) conditions for optimal transaction processing.
Next, we will create a function to query the balance of an account. This function will take in an address and return the balance of the account.
Note that response from the query is paginated, so we need to handle the pagination properly in the function. Specifically, response that are paginated will return a `next_key` in the pagination object, which we can use to get the next page of results. We will then keep looping through the results until we have all the pages, which we will know is the case when `next_key` is `null`.
```ts
async function queryBalance(address: string) {
let allCoins: Coin[] = [];
let nextKey: string | null = null;
do {
const [coins, pagination] = await restClient.bank.balance(address, { 'pagination.key': nextKey || undefined });
allCoins = [...allCoins, ...coins];
nextKey = pagination.next_key || null;
} while (nextKey);
console.log(`${address} has:`);
allCoins.forEach((coin: Coin) => {
console.log(`- ${coin.amount.toString()} ${coin.denom}`);
});
}
```
We can then call the function with an address to query the balance of the account.
```ts
queryBalance('init1w4cqq6udjqtvl5xx0x6gjeyzgwtze8c05kysnu');
```
If successful, you should see an output similar to the following:
```sh
init1w4cqq6udjqtvl5xx0x6gjeyzgwtze8c05kysnu has:
- 721662 uinit
- 1000000 uinit
```
## Complete Example
```ts src/query.ts
import { RESTClient, Coin } from '@initia/initia.js';
const restClient = new RESTClient('https://rest.testnet.initia.xyz');
async function queryBalance(address: string) {
let allCoins: Coin[] = [];
let nextKey: string | null = null;
do {
const [coins, pagination] = await restClient.bank.balance(address, { 'pagination.key': nextKey || undefined });
allCoins = [...allCoins, ...coins];
nextKey = pagination.next_key || null;
} while (nextKey);
console.log(`${address} has:`);
allCoins.forEach((coin: Coin) => {
console.log(`- ${coin.amount.toString()} ${coin.denom}`);
});
}
queryBalance('init1w4cqq6udjqtvl5xx0x6gjeyzgwtze8c05kysnu');
```
## VM-Agnostic Queries
VM-agnostic queries are queries that can be used across all VMs.
* `balance()` : query the balance of an account
```typescript
const balances = await restClient.bank.balance('init14l3c2vxrdvu6y0sqykppey930s4kufsvt97aeu')
```
* `blockInfo()`: query the block information
```typescript
const blockInfo = await restClient.tendermint.blockInfo(10000) // If no height is given, the latest block is returned.
```
* `txInfo()`: query the transaction information
```typescript
const txInfo = await restClient.tx.txInfo('6DFEE8E4BFC38341E8AADBD74A23588D8DE94FA38052CB5721DDA780A24F8B1D')
```
* `price()`: query the oracle price
```typescript
const currenyPair = new CurrencyPair('BTC', 'USD')
const price = await restClient.oracle.price(currenyPair)
```
## VM-Specific Queries
{/* TODO: Move these example to vm-specific tutorials and link them */}
## MoveVM
* `viewfunction()`: query the move contract view functions
```typescript
// `object.move`
//
// #[view]
// public fun owner(object: Object): address acquires ObjectCore {
// ...
// }
const res = await restClient.move.viewFunction(
'0x1', // owner of the module
'object', // name of the module
'owner', // function name
["0x1::object::ObjectCore"], // type arguments
[
bcs.object().serialize('0xc4f0b3c2300c99b0d7717ce43cd76821407a34c79587542919876a8c241a2f94').toBase64(),
] // arguments
)
```
* `viewJSON()`: query the move contract view functions with JSON arguments
```typescript
const res = await restClient.move.viewJSON(
'0x1', // owner of the module
'object', // name of the module
'owner', // function name
["0x1::object::ObjectCore"], // type arguments
[
`"0xc4f0b3c2300c99b0d7717ce43cd76821407a34c79587542919876a8c241a2f94"`,
] // arguments
)
```
* `resources()`: query the move contract resources
```typescript
const resources = await restClient.move.resources('0x1')
const resource = await restClient.move.resource('0x1', '0x1::code::ModuleStore')
```
* `modules()`: query the move contract modules
```typescript
const modules = await restClient.move.module('0x1')
const module = await restClient.move.module('0x1', 'object')
```
* `tableInfo()`: query the move contract table info
```typescript
const tableHandle = '0xc8c40eef193fc150fcb54264419bd3e39339c2ee8ba5834aed7826a9841cfb53'
const entryKeyBytes = 'A0vD7ATVOvfCWo1T7H8Pz2MOt5k6rvsScYEGgXe0QDw='
const tableInfo = await restClient.move.tableInfo(tableHandle)
const tableEntries = await restClient.move.tableEntries(tableHandle)
const tableEntry = await restClient.move.tableEntry(tableHandle,entryKeyBytes)
```
## WasmVM
* `contractInfo()`: query the wasm contract info
```typescript
const contractInfo = await restClient.wasm.contractInfo('init14mv62l7x4ducykg0crfa9a22egf8yrltmxzy84zn0wqgmr496jqs5z7k0c')
const contracts = await restClient.wasm.contractsByCode(1)
```
* `smartContractState()`: query the wasm smart contract state
```typescript
const contractState = await restClient.wasm
.smartContractState(
'init1jue5rlc9dkurt3etr57duutqu7prchqrk2mes2227m52kkrual3qdrydg6', // contract address
Buffer.from(
JSON.stringify({ // query data
get_stage_info: {
stage: 1,
},
})
).toString('base64')
)
const allContractStates = await restClient.wasm.allContractState('init14mv62l7x4ducykg0crfa9a22egf8yrltmxzy84zn0wqgmr496jqs5z7k0c')
```
## EVM
* `call()`: query the evm contract
```typescript
const contractInfo = JSON.parse(
fs
.readFileSync(
'../solidity/evm-example/artifacts/contracts/example.sol/example.json' // path of build response
)
.toString()
);
const contract = new ethers.Contract(contractAddress, contractInfo.abi)
const res = await restClient.evm
.call(
'init1jvxywa6dmdxumr9nhdez838af06f9v42w0rd26', // sender
'0x16e999092BF37913a3eff185949997b6f7bd698c', // contract_addr
contract.interface.encodeFunctionData(
'getPoints', [2, 0, 10] // hex encoded execution input bytes
).slice(2),
false // whether to return the trace
)
```
# Quickstart
Source: https://docs.initia.xyz/developers/developer-guides/tools/sdks/initia-js/quickstart
For most of the following examples in this section, we will be assuming that the guides on each page are implemented as separate functions and files under a single project directory. To set up your project, follow the steps below.
First, we need to create a directory to store our project files.
```bash
mkdir initia-js-quickstart && cd initia-js-quickstart
```
Next, we need to initialize our project.
```bash
npm init && npm add -D typescript @types/node ts-node && npx tsc --init && mkdir src && echo 'async function example() { console.log("Running example!")}; example()' > src/quickstart.ts
```
Now we need to install InitiaJS.
```bash
npm add @initia/initia.js
```
Once we have installed InitiaJS, we can test our installation. First, we will replace the contents of `src/quickstart.ts` with the following code.
```ts
import { RESTClient, Coin } from '@initia/initia.js';
const restClient = new RESTClient('https://rest.testnet.initia.xyz');
(async () => {
const chainId = await restClient.tendermint.chainId();
console.log(chainId);
})();
```
Next, we will run the script.
```bash
npx ts-node src/quickstart.ts
```
If you get `initiation-2` as the output, then your installation was successful!
# Messages
Source: https://docs.initia.xyz/developers/developer-guides/tools/sdks/initia-js/transactions/messages
Message is a data structure that represents an action to be executed on the blockchain.
It is a part of the transaction, which is a collection of messages that are executed atomically.
This guide will show you how to create a message object for different types of actions.
## VM-Agnostic Messages
VM-agnostic messages are messages that can be used across all VMs.
* `MsgSend()`: send coins to other address
```typescript
const msg = new MsgSend(
'init1kdwzpz3wzvpdj90gtga4fw5zm9tk4cyrgnjauu', // sender address
'init18sj3x80fdjc6gzfvwl7lf8sxcvuvqjpvcmp6np', // recipient address
'1000uinit' // send amount
)
```
* `MsgDelegate()`: delegate governance coin to validators (staking)
```typescript
const msg = new MsgDelegate(
'init1kdwzpz3wzvpdj90gtga4fw5zm9tk4cyrgnjauu', // delegator address
'initvaloper14qekdkj2nmmwea4ufg9n002a3pud23y8l3ep5z', // validator's operator address
'100000uinit', // delegate amount
)
```
## VM-Specific Messages
{/* TODO: Move these example to vm-specific tutorials and link them */}
#### MoveVM
* `MsgExecute()`: execute move contract entry functions
```typescript
const msg = new MsgExecute(
'init1kdwzpz3wzvpdj90gtga4fw5zm9tk4cyrgnjauu', // sender address
'0x1', // module owner address
'dex', // module name
'swap_script', // function name
[], // type arguments
[
bcs.address().serialize('0x2').toBase64(), // arguments, BCS-encoded
bcs.address().serialize('0x3').toBase64(), // arguments, BCS-encoded
bcs.u64().serialize(10000).toBase64() // arguments, BCS-encoded
],
)
```
#### WasmVM
* `MsgStoreCode()`: store wasm contract code
```typescript
const wasmByteCode = fs
.readFileSync('./wasm-modules/miniwasm/example.wasm') // path of wasm file
.toString('base64'),
const msg = new MsgStoreCode(
'init1kdwzpz3wzvpdj90gtga4fw5zm9tk4cyrgnjauu', // sender address
wasmByteCode, // raw or gzip compressed wasm bytecode
undefined // instantiate permission (optional)
)
```
* `MsgInstantiateContract()`: instantiate wasm contract
```typescript
const instantiateMsg = Buffer.from(JSON.stringify({ init_list: ['init1kdwzpz3wzvpdj90gtga4fw5zm9tk4cyrgnjauu'] })).toString('base64')
const msg = new MsgInstantiateContract(
'init1kdwzpz3wzvpdj90gtga4fw5zm9tk4cyrgnjauu', // sender address
'init1kdwzpz3wzvpdj90gtga4fw5zm9tk4cyrgnjauu', // admin address
9, // code id
'example', // label
instantiateMsg, // instantiate msg
new Coins(), // init funds
)
```
* `MsgExecuteContract()`: execute wasm contract functions
```typescript
const jsonEncodedMsg = Buffer.from(
JSON.stringify({
prepare_point: {
stage: 1,
},
})
).toString('base64')
const msg = new MsgExecuteContract(
'init1kdwzpz3wzvpdj90gtga4fw5zm9tk4cyrgnjauu', // sender address
'init1jue5rlc9dkurt3etr57duutqu7prchqrk2mes2227m52kkrual3qdrydg6', // contract address
jsonEncodedMsg, // json encoded input msg
new Coins() // coins transferred to the contract on execution
),
```
#### EVM
* `MsgCreate()`: create EVM contract code
```typescript
const contractInfo = JSON.parse(
fs
.readFileSync(
'../solidity/evm-example/artifacts/contracts/example.sol/example.json' // path of build response
)
.toString()
);
const msg = new MsgCreate(
'init1kdwzpz3wzvpdj90gtga4fw5zm9tk4cyrgnjauu', // sender address
contractInfo.bytecode.slice(2) // hex encoded raw contract bytes code
),
```
* `MsgCall()`: execute EVM contract functions
```typescript
const contractAddress = '0x1kdwzpz3wzvpdj90gtga4fw5zm9tk4cyrgnjauu'
const contractInfo = JSON.parse(
fs
.readFileSync(
'../solidity/evm-example/artifacts/contracts/example.sol/example.json' // path of build response
)
.toString()
);
const contract = new ethers.Contract(contractAddress, contractInfo.abi)
const msg = new MsgCall(
'init1kdwzpz3wzvpdj90gtga4fw5zm9tk4cyrgnjauu', // sender address
contractAddress, // contract address
contract.interface.encodeFunctionData('preparePoint', [2]).slice(2) // hex encoded execution input bytes
)
```
# Sending Transactions
Source: https://docs.initia.xyz/developers/developer-guides/tools/sdks/initia-js/transactions/sending-transactions
Sending transactions using InitiaJS is straightforward. First, we need to import the necessary classes and functions.
```ts
import { Wallet, RESTClient, MnemonicKey, MsgSend, Tx, WaitTxBroadcastResult } from '@initia/initia.js';
```
Next, we need to set up our environment variables. We will need the following:
* `MNEMONIC`: The mnemonic of the account that will be sending the transaction.
* `REST_URL`: The URL of the Initia REST.
* `GAS_PRICES`: The gas prices for the transaction.
* `SENDER_ADDRESS`: The address of the account that will be sending the transaction.
* `RECIPIENT_ADDRESS`: The address of the account that will be receiving the transaction.
* `AMOUNT`: The amount of tokens to send.
```ts
if (!process.env.MNEMONIC) {
throw new Error('MNEMONIC environment variable is required');
}
const mnemonic = process.env.MNEMONIC;
const restUrl = process.env.REST_URL || "https://rest.testnet.initia.xyz";
const gasPrices = process.env.GAS_PRICES || "0.015uinit"; // Will be INIT for mainnet
const senderAddress = process.env.SENDER_ADDRESS || 'init1w4cqq6udjqtvl5xx0x6gjeyzgwtze8c05kysnu';
const recipientAddress = process.env.RECIPIENT_ADDRESS || 'init1w4cqq6udjqtvl5xx0x6gjeyzgwtze8c05kysnu';
const amount = process.env.AMOUNT || '1000uinit';
```
We can then use the use these variables to ultimately create the `wallet` client, as well as the `sendMsg` object. Since for this example we're making a token transfer, we'll use the `MsgSend` object. But the SDK provides many other message types for different actions related to staking, governance, and more.
```ts
const key: MnemonicKey = new MnemonicKey({ mnemonic }); // Create a key from the mnemonic
const restClient: RESTClient = new RESTClient(restUrl, { gasPrices });
const wallet: Wallet = new Wallet(restClient, key);
const sendMsg: MsgSend = new MsgSend(senderAddress, recipientAddress, amount);
```
Finally, we can create the function to send the transaction.
* We first create the transaction by calling `wallet.createAndSignTx`. This function takes in the raw message object, signs it using the `wallet`, and returns a signed transaction object.
* We then broadcast the transaction by calling `restClient.tx.broadcast`. This function takes in the signed transaction object and broadcasts it to the network.
```ts
async function sendTransaction(): Promise {
try {
const signedTx: Tx = await wallet.createAndSignTx({
msgs: [sendMsg],
memo: 'memo',
});
const result: WaitTxBroadcastResult = await restClient.tx.broadcast(signedTx);
console.log('Transaction successful');
console.log('Transaction hash:', result.txhash);
return result;
} catch (error: unknown) {
if (error instanceof Error) {
console.error('Transaction failed:', error.message);
} else {
console.error('Transaction failed with an unknown error');
}
throw error;
}
}
```
Finally, we can call the function to send the transaction.
```ts
sendTransaction()
.then(() => process.exit(0))
.catch(() => process.exit(1));
```
If you then run the script using `npx ts-node src/sending-transactions.ts`, you should see an output similar to the following:
```
Transaction successful
Transaction hash: 4F0B810D15FA7D6A2B9EC2B98B263B0A20E791A8DABCB549620445941B25C699
```
### Full Example
```ts src/sending-transactions.ts
import { Wallet, RESTClient, MnemonicKey, MsgSend, Tx, WaitTxBroadcastResult } from '@initia/initia.js';
const mnemonic = process.env.MNEMONIC;
const restUrl = process.env.REST_URL || "https://rest.testnet.initia.xyz";
const gasPrices = process.env.GAS_PRICES || "0.015uinit"; // Will be INIT for mainnet
const senderAddress = process.env.SENDER_ADDRESS || 'init1w4cqq6udjqtvl5xx0x6gjeyzgwtze8c05kysnu';
const recipientAddress = process.env.RECIPIENT_ADDRESS || 'init1w4cqq6udjqtvl5xx0x6gjeyzgwtze8c05kysnu';
const amount = process.env.AMOUNT || '1000uinit';
const key: MnemonicKey = new MnemonicKey({ mnemonic });
const restClient: RESTClient = new RESTClient(restUrl, { gasPrices });
const wallet: Wallet = new Wallet(restClient, key);
const sendMsg: MsgSend = new MsgSend(senderAddress, recipientAddress, amount);
async function sendTransaction(): Promise {
try {
const signedTx: Tx = await wallet.createAndSignTx({
msgs: [sendMsg],
memo: 'memo',
});
const result: WaitTxBroadcastResult = await restClient.tx.broadcast(signedTx);
console.log('Transaction successful');
console.log('Transaction hash:', result.txhash);
return result;
} catch (error: unknown) {
if (error instanceof Error) {
console.error('Transaction failed:', error.message);
} else {
console.error('Transaction failed with an unknown error');
}
throw error;
}
}
sendTransaction()
.then(() => process.exit(0))
.catch(() => process.exit(1));
```
# Signing Transactions
Source: https://docs.initia.xyz/developers/developer-guides/tools/sdks/initia-js/transactions/signing-transactions
Sometimes, you may want to sign a transaction without broadcasting it. This is useful in situations where you want to sign a transaction and then broadcast it later. To showcase this, we will write a script that will sign a transaction, compute the transaction hash from the signed transaction, and compare the transaction hash to what we receive from broadcasting the transaction.
First, we need to import the necessary classes and functions.
* `Coins`: A class that represents a list of [Cosmos SDK coins](https://github.com/cosmos/cosmos-sdk/blob/main/types/coin.go).
* `Fee`: A class that's used to define the fee for a transaction.
* `RESTClient`: A class that represents a REST client.
* `MnemonicKey`: A class that's used to create a key from a mnemonic.
* `MsgSend`: A class that represents a message to send.
* `Wallet`: A class that represents a wallet.
```ts
import {
Coins,
Fee,
RESTClient,
MnemonicKey,
MsgSend,
Wallet,
} from '@initia/initia.js';
import crypto from 'crypto';
```
Next, we need to set up our environment variables. We will need the following:
* `mnemonic`: The mnemonic of the account that will be signing the transaction.
* `chainId`: The chain ID of the network you are working on.
* `restUrl`: The URL of the Initia REST.
* `gasPrices`: The gas prices for the transaction.
```ts
const mnemonic = process.env.MNEMONIC;
const chainId = process.env.CHAIN_ID || "initiation-2";
const restUrl = process.env.REST_URL || "https://rest.testnet.initia.xyz";
const gasPrices = process.env.GAS_PRICES || "0.015uinit"; // Will be INIT for mainnet
```
We will also need to create a helper function to convert the signed transaction data into a transaction hash hex string.
```ts
export function getTxHash(tx: Uint8Array): string {
const s256Buffer = crypto
.createHash(`sha256`)
.update(Buffer.from(tx))
.digest();
const txbytes = new Uint8Array(s256Buffer);
return Buffer.from(txbytes.slice(0, 32)).toString(`hex`).toUpperCase();
}
```
Finally, we can create the main function to sign the transaction and compare the transaction hash. Let's call this function `offlineSingingTest`.
To start, we will create two `RESTClient` instances. One that is connected to the network, and one that is offline. We will be using the offline REST client to sign the transaction, and the online REST client to broadcast the transaction to later compare.
```ts
const offlineRestClient = new RESTClient(``, {
chainId: chainId,
gasPrices: gasPrices,
});
// rest client that is connected
const onlineRestClient = new RESTClient(restUrl, {
chainId: chainId,
gasPrices: gasPrices,
});
```
Next, we will generate the wallet client, as well as define the message, gas limit, and fee for the transaction. We need to define the later two because we will be signing the transaction completely offline without interacting with the network or any nodes.
```ts
// set up key
const key = new MnemonicKey({
mnemonic: mnemonic,
});
const account = await onlineRestClient.auth.accountInfo(key.accAddress); // you have to know account number and current sequence
const wallet = new Wallet(offlineRestClient, key);
// msg to send
const msg = new MsgSend(key.accAddress, key.accAddress, '100uinit');
// use fixed fee to not estimate gas
const gasLimit = 500000;
const feeAmount = new Coins(offlineRestClient.config.gasPrices)
.toArray()[0]
.mul(gasLimit);
const fee = new Fee(gasLimit, new Coins([feeAmount]));
```
Once we have all of that, we will create the transaction by calling `wallet.createAndSignTx`. This function takes
* `msgs`: The message to send.
* `accountNumber`: The account number of the account that will be signing the transaction.
* `sequence`: The sequence number of the account that will be signing the transaction.
* `fee`: The fee for the transaction.
and returns a signed transaction object. We will then convert the signed transaction object to a byte array and compute the transaction hash using the helper function we created earlier.
```ts
const signedTx = await wallet.createAndSignTx({
msgs: [msg],
accountNumber: account.getAccountNumber(),
sequence: account.getSequenceNumber(),
fee,
});
const signedTxBytes = signedTx.toBytes();
const txHash = getTxHash(signedTxBytes);
```
Finally, if we want to broadcast the transaction to the network later, we can do so by using the `onlineRestClient` client. If we then retrieve the transaction hash from the online REST client and compare it to the transaction hash we computed earlier, we should see that they match.
```ts
const broadcastRes = await onlineRestClient.tx.broadcastSync(signedTx);
// true
console.log(txHash === broadcastRes.txhash);
```
### Full Example
```ts src/signing-transaction.ts
import {
Coins,
Fee,
RESTClient,
MnemonicKey,
MsgSend,
Wallet,
} from '@initia/initia.js';
import crypto from 'crypto';
const mnemonic = process.env.MNEMONIC;
const chainId = process.env.CHAIN_ID || "initiation-2";
const restUrl = process.env.REST_URL || "https://rest.testnet.initia.xyz";
const gasPrices = process.env.GAS_PRICES || "0.015uinit"; // Will be INIT for mainnet
export function getTxHash(tx: Uint8Array): string {
const s256Buffer = crypto
.createHash(`sha256`)
.update(Buffer.from(tx))
.digest();
const txbytes = new Uint8Array(s256Buffer);
return Buffer.from(txbytes.slice(0, 32)).toString(`hex`).toUpperCase();
}
async function offlineSingingTest() {
// rest client that is not connected
const offlineRestClient = new RESTClient(``, {
chainId: chainId,
gasPrices: gasPrices,
});
// rest client that is connected
const onlineRestClient = new RESTClient(restUrl, {
chainId: chainId,
gasPrices: gasPrices,
});
// set up key
const key = new MnemonicKey({
mnemonic: mnemonic,
});
const account = await onlineRestClient.auth.accountInfo(key.accAddress); // you have to know account number and current sequence
const wallet = new Wallet(offlineRestClient, key);
// msg to send
const msg = new MsgSend(key.accAddress, key.accAddress, '100uinit');
// use fixed fee to not estimate gas
const gasLimit = 500000;
const feeAmount = new Coins(offlineRestClient.config.gasPrices)
.toArray()[0]
.mul(gasLimit);
const fee = new Fee(gasLimit, new Coins([feeAmount]));
const signedTx = await wallet.createAndSignTx({
msgs: [msg],
accountNumber: account.getAccountNumber(),
sequence: account.getSequenceNumber(),
fee,
});
const signedTxBytes = signedTx.toBytes();
const txHash = getTxHash(signedTxBytes);
const broadcastRes = await onlineRestClient.tx.broadcastSync(signedTx);
// true
console.log(txHash === broadcastRes.txhash);
}
offlineSingingTest();
```
# Address Format Conversion
Source: https://docs.initia.xyz/developers/developer-guides/vm-specific-tutorials/evm/address-conversion
[Tutorial GitHub Repository](https://github.com/initia-labs/examples/tree/main/evm/address-conversion)
This tutorial demonstrates how to convert between an EVM hex address and a Cosmos bech32 address.
## Prerequisites
* [NodeJS](https://nodejs.org)
## Project Setup
First, we need to create a new directory for our project.
```sh
mkdir address-conversion
cd address-conversion
```
Next, we will initialize the project and installed the `bech32-converting` package.
```sh
npm init
npm install bech32-converting
```
We then create a new file called `index.js` in the `src` directory where we will write our code.
You can use any package that allows you to encode and decode bech32-prefixed addresses. However, the specific steps for using those packages may vary.
## Development
For this tutorial, we will assume that we have an EVM address `0x0901aeeD1d5144987DaE3D95AB219ff75e9bA636` that we want to convert to a Cosmos address, and then convert it back to an EVM address.
First, we import the `bech32-converting` package and initialize the variable for the chain's Bech32 prefix.
```js src/index.js
const converter = require("bech32-converting")
let bech32Address = "init1pyq6amga29zfsldw8k26kgvl7a0fhf3kftflmr";
```
### EVM Address to Cosmos Address
To convert an EVM address to a Cosmos address, we will be using the `bech32-converting` package's `toHex` function.
```js src/index.js
const hexAddress = converter('init').toHex(bech32Address)
console.log(hexAddress) // 0x0901aeeD1d5144987DaE3D95AB219ff75e9bA636
```
### Cosmos Address to EVM Address
To convert a Cosmos address to an EVM address, we will be using the `bech32-converting` package's `fromHex` function.
```js src/index.js
bech32Address = converter('init').toBech32(hexAddress)
console.log(bech32Address) // init1pyq6amga29zfsldw8k26kgvl7a0fhf3kftflmr
```
The full code for the script is then as follows:
```js src/index.js
const converter = require("bech32-converting")
let bech32Address = "init1pyq6amga29zfsldw8k26kgvl7a0fhf3kftflmr";
const hexAddress = converter('init').toHex(bech32Address)
console.log(hexAddress) // 0x0901aeeD1d5144987DaE3D95AB219ff75e9bA636
bech32Address = converter('init').toBech32(hexAddress)
console.log(bech32Address) // init1pyq6amga29zfsldw8k26kgvl7a0fhf3kftflmr
```
If we run this script, we should see the following output:
```sh
0x0901aeeD1d5144987DaE3D95AB219ff75e9bA636
init1pyq6amga29zfsldw8k26kgvl7a0fhf3kftflmr
```
# Using Connect Oracle
Source: https://docs.initia.xyz/developers/developer-guides/vm-specific-tutorials/evm/connect-oracles
[Tutorial GitHub Repository](https://github.com/initia-labs/guides/tree/main/rollups/evm/connect-oracle)
Compiling contracts that use [ConnectOracle.sol](https://github.com/initia-labs/minievm/blob/main/x/evm/contracts/connect_oracle/ConnectOracle.sol) requires the [viaIR](https://soliditylang.org/blog/2024/07/12/a-closer-look-at-via-ir) feature. For Foundry/Forge, this can be done by using the `--via-ir` flag. The relevant methods for other tools may vary.
### Foundry
For this tutorial, we will be using [Foundry](https://github.com/foundry-rs/foundry) toolkit to develop, compile, and deploy our contracts. If you do not have Foundry installed, follow the [Foundry installation instructions](https://getfoundry.sh/).
## Setup
Create a new project directory and initialize it with `forge init`:
```sh
mkdir connect-oracle
cd connect-oracle
forge init
```
## Implementing the Contract
Before writing our contract, we first need to rename the template contract to `Oracle.sol`
```sh
mv src/Counter.sol src/Oracle.sol
```
We then update the contract from the template to be our oracle contract. We declare the `IConnectOracle` interface, which will be used to interact with the ConnectOracle contract.
```solidity src/Oracle.sol
// SPDX-License-Identifier: MIT
pragma solidity ^0.8.24;
interface IConnectOracle {
struct Price {
uint256 price;
uint256 timestamp;
uint64 height;
uint64 nonce;
uint64 decimal;
uint64 id;
}
function get_price(string memory pair_id) external view returns (Price memory);
function get_prices(string[] memory pair_ids) external view returns (Price[] memory);
}
contract Oracle {
IConnectOracle public connect;
```
We then need to define the constructor for our contract. This will be used to initialize the contract with the ConnectOracle contract address.
The ConnectOracle contract is on MiniEVM precompiles. You can get its address by querying `${REST_URL}/minievm/evm/v1/connect_oracle` where `${REST_URL}` refers to the REST endpoint URL of the rollup.
```sh
curl https://rest.minievm-2.initia.xyz/minievm/evm/v1/connect_oracle
```
The output will look like this:
```json
{
"address": "0x031ECb63480983FD216D17BB6e1d393f3816b72F"
}
```
```solidity src/Oracle.sol
constructor(address oracleAddress) {
connect = IConnectOracle(oracleAddress);
}
```
Once the constructor is implemented, we move on to defining the different functions that our contract will have
* `oracle_get_price`: This function will return the price of a single asset pair
* `oracle_get_prices`: This function will return the price of multiple asset pairs
```solidity src/Oracle.sol
function oracle_get_price() external view returns (uint256 price, uint256 timestamp) {
IConnectOracle.Price memory p = connect.get_price("BTC/USD");
return (p.price, p.timestamp);
}
function oracle_get_prices() external view returns (uint256[] memory prices) {
string[] memory pair_ids = new string[](2);
pair_ids[0] = "BTC/USD";
pair_ids[1] = "ETH/USD";
IConnectOracle.Price[] memory result = connect.get_prices(pair_ids);
prices = new uint256[](result.length);
for (uint256 i = 0; i < result.length; i++) {
prices[i] = result[i].price;
}
}
```
Our complete contract will then look like this:
```solidity src/Oracle.sol
// SPDX-License-Identifier: MIT
pragma solidity ^0.8.24;
interface IConnectOracle {
struct Price {
uint256 price;
uint256 timestamp;
uint64 height;
uint64 nonce;
uint64 decimal;
uint64 id;
}
function get_price(string memory pair_id) external view returns (Price memory);
function get_prices(string[] memory pair_ids) external view returns (Price[] memory);
}
contract Oracle {
IConnectOracle public connect;
constructor(address oracleAddress) {
connect = IConnectOracle(oracleAddress);
}
function oracle_get_price() external view returns (uint256 price, uint256 timestamp) {
IConnectOracle.Price memory p = connect.get_price("BTC/USD");
return (p.price, p.timestamp);
}
function oracle_get_prices() external view returns (uint256[] memory prices) {
string[] memory pair_ids = new string[](2);
pair_ids[0] = "BTC/USD";
pair_ids[1] = "ETH/USD";
IConnectOracle.Price[] memory result = connect.get_prices(pair_ids);
prices = new uint256[](result.length);
for (uint256 i = 0; i < result.length; i++) {
prices[i] = result[i].price;
}
return prices;
}
}
```
Running `forge compile` will fail unless we provide a test file that matches the `Oracle.sol` contract. Foundry expects a test file like `Oracle.t.sol` to exist and import the contract under test. To resolve this, we will rename the existing test file `Counter.t.sol` to `Oracle.t.sol`.
```sh
mv test/Counter.t.sol test/Oracle.t.sol
```
We will also replace the file contents with placeholder content.
```solidity test/Oracle.t.sol
// SPDX-License-Identifier: UNLICENSED
pragma solidity ^0.8.24;
import {Test, console} from "forge-std/Test.sol";
contract OracleTest is Test {
}
```
Now running `forge compile` should work without any errors.
```sh
forge compile;
# [Expected Output]:
# [⠢] Compiling...
# [⠰] Compiling 27 files with 0.8.21
# [⠃] Solc 0.8.21 finished in 6.25s
# Compiler run successful!
```
## Deploying the Contract
Now that our contract is compiled and ready, we can deploy it to the MiniEVM. To accomplish this, we will use Foundry's `forge script` command. First, we need to create a script file to handle the deployment. Create a new file named `Oracle.s.sol` in the `script` directory.
```solidity script/Oracle.s.sol
// SPDX-License-Identifier: UNLICENSED
pragma solidity ^0.8.24;
import {Script, console} from "forge-std/Script.sol";
import {Oracle} from "../src/Oracle.sol";
contract OracleScript is Script {
Oracle public oracle;
function setUp() public {}
function run() public {
address oracleAddress = 0x031ECb63480983FD216D17BB6e1d393f3816b72F;
vm.startBroadcast();
oracle = new Oracle(oracleAddress);
vm.stopBroadcast();
}
}
```
Set your environment variables and run the deployment. Be sure to replace `PRIVATE_KEY` with the deployer's private key, and `JSON_RPC_URL` with your rollup's JSON-RPC endpoint.
```sh
export PRIVATE_KEY=0x...
export JSON_RPC_URL=https://json-rpc.minievm-2.initia.xyz
forge script script/Oracle.s.sol:OracleScript \
--rpc-url $JSON_RPC_URL \
--private-key $PRIVATE_KEY \
--broadcast \
--via-ir \
--with-gas-price 0 \
--skip-simulation
```
Output should look like this:
```sh
[⠊] Compiling...
[⠊] Compiling 18 files with Solc 0.8.28
[⠒] Solc 0.8.28 finished in 918.49ms
Compiler run successful!
Script ran successfully.
SKIPPING ON CHAIN SIMULATION.
##### 4303131403034904
✅ [Success] Hash: 0x8d9c488d7599fd867e45eee3b3a6ede24fec8f6459433051c341ef1937026bcf
Contract Address: 0x505500221090Cd06400125B4f41A266B89Ffd62e
Block: 10493369
Gas Used: 290728
✅ Sequence #1 on 4303131403034904 | Total Paid: 0. ETH (290728 gas * avg 0 gwei)
```
To query the `oracle_get_price()` function, use Foundry’s cast call command.
```sh
cast call 0x505500221090Cd06400125B4f41A266B89Ffd62e "oracle_get_price()" --rpc-url $JSON_RPC_URL
```
Output should look like this:
```sh
0x00000000000000000000000000000000000000000000000000000002c3cd0d430000000000000000000000000000000000000000000000001856610b4b695788
```
The output is an ABI-encoded hexadecimal result containing the price and timestamp. The first 32 bytes represent the price, and the next 32 bytes represent the timestamp.
| Field | ABI-Encoded Value | Decoded Value |
| --------- | ------------------ | ------------------- |
| Price | 0x2c3cd0d43 | 11874929987 |
| Timestamp | 0x1856610b4b695788 | 1753695806045116296 |
# Token Denom Conversion
Source: https://docs.initia.xyz/developers/developer-guides/vm-specific-tutorials/evm/cosmos-coin-to-erc20
[Tutorial GitHub Repository](https://github.com/initia-labs/examples/tree/main/evm/cosmos-coin-to-erc20)
This tutorial demonstrates how to convert between an hex-based ERC20 token address and a Cosmos coin denom.
## Prerequisites
* [NodeJS](https://nodejs.org)
## Project Setup
First, we need to create a new directory for our project.
```sh
mkdir cosmos-coin-to-erc20
cd cosmos-coin-to-erc20
```
Next, we will initialize the project and create a `index.js` file in a `src` directory.
```sh
npm init
touch src/index.js
```
## Development
For this tutorial, we will assume that we have an ERC20 token address `0x5E5f1a92eECA58053E8364630b66763aa6265Ab0` that we want to convert to a Cosmos coin denom, and then convert it back to an ERC20 token address.
First, we initialize the variable for the chain's REST endpoint and the ERC20 token address.
```js src/index.js
const restUrl = `https://rest.minievm-2.initia.xyz`;
const erc20Address = "0x5E5f1a92eECA58053E8364630b66763aa6265Ab0"
```
### ERC20 to Cosmos Denom
To actually do the conversion, we will be using the REST's `/minievm/evm/v1/denoms/{contractAddress}` endpoint.
```js src/index.js
// previous code
async function erc20ToCoinDenom(contractAddress) {
const response = await fetch(`${restUrl}/minievm/evm/v1/denoms/${contractAddress}`);
const data = await response.json();
return data;
}
```
If the address is a valid ERC20 token address, the response just returns the token's Cosmos coin denom.
```sh
evm/5E5f1a92eECA58053E8364630b66763aa6265Ab0
```
### Cosmos Denom to ERC20 Address
To convert a Cosmos coin denom back to an ERC20 token address, we will be using the REST's `/minievm/evm/v1/contracts/by_denom?denom={denom}` endpoint.
```js src/index.js
// previous code
async function coinDenomToErc20(denom) {
const response = await fetch(`${restUrl}/minievm/evm/v1/contracts/by_denom?denom=${denom}`);
const data = await response.json();
return data;
}
```
If the denom is a valid Cosmos coin denom, the response just returns the token's ERC20 token address.
```sh
0x5E5f1a92eECA58053E8364630b66763aa6265Ab0
```
The full code for the script, including the section to actually call the function is as follows:
```js src/index.js
const restUrl = `https://rest.minievm-2.initia.xyz`;
const erc20Address = "0x5E5f1a92eECA58053E8364630b66763aa6265Ab0"
async function erc20ToCoinDenom(contractAddress) {
const response = await fetch(`${restUrl}/minievm/evm/v1/denoms/${contractAddress}`);
const data = await response.json();
return data;
}
async function coinDenomToErc20(denom) {
const response = await fetch(`${restUrl}/minievm/evm/v1/contracts/by_denom?denom=${denom}`);
const data = await response.json();
return data;
}
(async () => {
const coinDenomResponse = await erc20ToCoinDenom(erc20Address);
console.log(coinDenomResponse.denom);
const erc20Response = await coinDenomToErc20(coinDenomResponse.denom);
console.log(erc20Response.address);
})();
```
If we run this script, we should see the following output:
```sh
evm/5E5f1a92eECA58053E8364630b66763aa6265Ab0
0x5E5f1a92eECA58053E8364630b66763aa6265Ab0
```
# Creating Custom ERC20s
Source: https://docs.initia.xyz/developers/developer-guides/vm-specific-tutorials/evm/creating-erc20s/creating-custom-erc20s
[Tutorial GitHub Repository](https://github.com/initia-labs/examples/tree/main/evm/initia-custom-erc20)
## Prerequisites
### Foundry
For this tutorial, we will be using [Foundry](https://github.com/foundry-rs/foundry) toolkit to develop, compile, and deploy our contracts. If you do not have Foundry installed, follow the [Foundry installation instructions](https://getfoundry.sh/).
## Setup
First, we need to create a new directory for our project.
```sh
mkdir initia-erc20
cd initia-erc20
```
Next, we will initialize a new Foundry project side that directory.
```sh
forge init
```
Once the project is initialized, we can proceed to installing the required dependencies needed for this tutorial. In this case, we only need Initia's [EVM contracts](https://github.com/initia-labs/initia-evm-contracts).
```sh
forge install initia-labs/initia-evm-contracts
```
## Implementing the Contract
Before writing our contract, we first need to rename the template contract to `NewInitiaERC20.sol`
```sh
mv src/Counter.sol src/NewInitiaERC20.sol
```
We then update the contract from the template to be our custom ERC20 contract. Start by importing the `InitiaCustomERC20` contract from the `@initia/initia-evm-contracts` package.
```solidity src/NewInitiaERC20.sol
// SPDX-License-Identifier: MIT
pragma solidity ^0.8.24;
import "initia-evm-contracts/src/InitiaCustomERC20.sol";
```
Next, we need to extend the `InitiaCustomERC20` contract and add the constructor to initialize the contract with the name, symbol, and decimals of our custom ERC20. For this tutorial, we will simply customize the base contract by adding a logic to mint tokens to the contract deployer. during deployment.
```solidity src/NewInitiaERC20.sol
// SPDX-License-Identifier: MIT
pragma solidity ^0.8.24;
import "initia-evm-contracts/src/InitiaCustomERC20.sol";
/**
* @title NewInitiaERC20
* @dev Demo extension of InitiaERC20 token contract with initial minting functionality
*/
contract NewInitiaERC20 is InitiaCustomERC20 {
/**
* @dev Constructor for creating a new InitiaERC20 token with initial minted supply
* @param name_ The name of the token
* @param symbol_ The symbol of the token
* @param decimals_ The number of decimal places for token precision
* @param mintedTokens_ The initial amount of tokens to mint to the contract deployer
*/
constructor(string memory name_, string memory symbol_, uint8 decimals_, uint256 mintedTokens_) InitiaCustomERC20(name_, symbol_, decimals_) {
_mint(msg.sender, mintedTokens_);
}
}
```
Our contract implementation is now ready. However, if we try to compile the contract using `forge compile`, we will get an error.
This is because the default `Counter.t.sol` expects the original `Counter.sol` contract to be available. To fix this, we will rename `Counter.t.sol` to `NewInitiaERC20.t.sol`.
```sh
mv test/Counter.t.sol test/NewInitiaERC20.t.sol
```
We will also replace the file contents with placeholder content.
```solidity test/NewInitiaERC20.t.sol
// SPDX-License-Identifier: UNLICENSED
pragma solidity ^0.8.13;
import {Test, console} from "forge-std/Test.sol";
import {NewInitiaERC20} from "../src/NewInitiaERC20.sol";
contract NewInitiaERC20Test is Test {
}
```
Now running `forge compile` should work without any errors.
```sh
forge compile;
# [Expected Output]:
# [⠢] Compiling...
# [⠰] Compiling 27 files with 0.8.21
# [⠃] Solc 0.8.21 finished in 6.25s
# Compiler run successful!
```
## Deploying the Contract
Now that Our contract is compiled and ready, we can deploy it to the MiniEVM. To accomplish this, we will use Foundry's `forge create` command
```sh
export PRIVATE_KEY=0x...
export RPC_URL=http://...
forge create src/NewInitiaERC20.sol:NewInitiaERC20 --private-key $PRIVATE_KEY --rpc-url $RPC_URL --constructor-args "MyToken" "MTK" 18 100 --legacy
# [Expected Output]:
# No files changed, compilation skipped
# Deployer: 0xc5D26D0281e28599c7790aacc810226BBDf0E431
# Deployed to: 0x3cc54047D191eeeBDcde081D8708490F6df49Be8
# Transaction hash: 0xed1d23b69014ee066be9b761df3c1fb28bedc46cc1c3f2188960550dbf7862a1
```
To confirm that the contract was deployed successfully, we can try querying the balance of our deployer account using Foundry's `cast call` command.
```sh
cast call 0x3cc54047D191eeeBDcde081D8708490F6df49Be8 \
"balanceOf(address)(uint256)" 0xc5D26D0281e28599c7790aacc810226BBDf0E431 \
--rpc-url "https://json-rpc.minievm-2.initia.xyz"
# [Expected Output]:
# 100
```
# Creating Standard ERC20s via ERC20Factory
Source: https://docs.initia.xyz/developers/developer-guides/vm-specific-tutorials/evm/creating-erc20s/creating-standard-erc20s
[Tutorial GitHub Repository](https://github.com/initia-labs/examples/tree/main/evm/erc20-factory)
For developers looking to create standard ERC20 tokens on EVM rollups, we recommend using the [ERC20Factory](/resources/developer/contract-references/evm/erc20-factory) contract.
## Prerequisites
For this tutorial, we will be using [Viem](https://viem.sh/) to interact with the MiniEVM and ERC20Factory contract. If you do not have Viem installed, follow the [installation instructions](https://viem.sh/docs/installation).
## Project Setup
First, we need to create a new directory for our project.
```sh
mkdir erc20-factory
cd erc20-factory
```
Next, we will initialize the project and install the Viem package.
```sh
npm init
npm install viem
```
We then create two directories:
* `src`: For our contract source code
* `abis`: For our contract [ABIs](https://docs.alchemy.com/docs/smart-contract-abi)
```sh
mkdir src
mkdir abis
```
Once the two directories are created, we then add the ABI for the ERC20Factory and ERC20 contracts to the `abis` directory.
## Predeployed contract
The `ERC20Factory` contract is automatically deployed on all MiniEVM rollup as part of the chain's bootstrapping process
To obtain the address of the factory contract, query `{ROLLUP_REST_URL}/minievm/evm/v1/contracts/erc20_factory`.
`{ROLLUP_REST_URL}` refers to the REST endpoint URL of the rollup from which you want to retrieve the address.
For example, you can use the following curl command:
```bash
curl -X GET "https://rest.minievm-2.initia.xyz/minievm/evm/v1/contracts/erc20_factory" -H "accept: application/json"
```
The address field in the response body will contain the contract address:
```json
{
"address": "0xf36924c9C2aD25d73c43F6aC59BB6D06BC944D93"
}
```
## Development
### Creating the Chain Configuration File
To be able to interact with the MiniEVM via Viem, we need to create a chain configuration file. This file will contain various information about the chain, including the chain ID, name, native currency, and RPC URLs.
Let's create a new file called `chain.js` in the `src` directory.
```sh
touch src/chain.js
```
Next, we will add the following code to the file:
```js src/chain.js
const { defineChain } = require('viem');
const miniEVM = defineChain({
id: 2594729740794688,
name: 'MiniEVM',
nativeCurrency: {
decimals: 18,
name: 'Gas Token',
symbol: 'GAS',
},
rpcUrls: {
default: {
http: ['https://json-rpc.minievm-2.initia.xyz'],
},
},
})
module.exports = miniEVM;
```
### Interacting with the ERC20Factory Contract
Now that we have our chain configuration file, we can start writing the script to interact ERC20Factory contract. We will create a `index.js` in the `src` directory.
```sh
touch src/index.js
```
First, we make the necessary imports:
```js src/index.js
const { createPublicClient, createWalletClient, decodeEventLog, getContract, http } = require('viem');
const { privateKeyToAccount } = require('viem/accounts');
const erc20Abi = require('./abis/erc20Abi.json');
const erc20FactoryAbi = require('./abis/erc20factoryabi.json');
const miniEVM = require('./chain');
```
We then defined the constant variables
* `privateKey`: The private key of the account we will use to interact with the MiniEVM
* `erc20FactoryAddress`: The address of the ERC20Factory contract on the MiniEVM
You can find the address of the ERC20Factory contract on the different in the [Networks](/resources/developer/initia-l1) page, or by calling the `/minievm/evm/v1/contracts/erc20_factory` endpoint of any MiniEVM rollups node.
```js src/index.js
// imports
const privateKey = process.env.PRIVATE_KEY;
const erc20FactoryAddress = process.env.ERC20_FACTORY_ADDRESS;
```
To be able to interact and call methods to the chain and contract, we then need to create a public client and a wallet client.
```js src/index.js
// Create a wallet client
const client = createWalletClient({
account,
chain: miniEVM,
transport: http(),
});
// create a public client
const publicClient = createPublicClient({
chain: miniEVM,
transport: http(),
});
```
Finally, we can now create a new ERC20 token using the `createERC20` method of the ERC20Factory contract.
```js src/index.js
// Send the transaction
async function createERC20() {
try {
// call createERC20 function on the factory contract to create a new ERC20 token
const hash = await client.writeContract({
address: erc20FactoryAddress, // Factory address
abi: erc20FactoryAbi,
functionName: 'createERC20',
args: ['Test', 'TST', 18],
})
console.log('Transaction sent. Hash:', hash);
// Wait for the transaction to be confirmed
await new Promise(resolve => setTimeout(resolve, 500));
// Get the transaction receipt and parse the logs for the ERC20Created event
const receipt = await publicClient.getTransactionReceipt({
hash: hash
});
const erc20CreatedLog = receipt.logs.find(log =>
log.address.toLowerCase() === erc20FactoryAddress.toLowerCase() // Check if the log is from the factory address
);
// Check if the ERC20Created event was found in the logs and decode the created ERC20 address
if (erc20CreatedLog) {
const decodedLog = decodeEventLog({
abi: erc20FactoryAbi,
data: erc20CreatedLog.data,
topics: erc20CreatedLog.topics,
});
console.log('New ERC20 address:', decodedLog.args.erc20);
// Try reading the new ERC20 contract
const erc20 = await getContract({
address: decodedLog.args.erc20,
abi: erc20Abi,
client: {
public: publicClient,
wallet: client
}
});
console.log('ERC20 name:', await erc20.read.name());
console.log('ERC20 symbol:', await erc20.read.symbol());
console.log('ERC20 decimals:', await erc20.read.decimals());
} else {
console.log('ERC20Created event not found in the logs');
}
} catch (error) {
console.error('Error sending transaction:', error);
}
}
```
The final code for the script is as follows:
```js src/index.js
const { createPublicClient, createWalletClient, decodeEventLog, getContract, http } = require('viem');
const { privateKeyToAccount } = require('viem/accounts');
const erc20Abi = require('./abis/erc20Abi.json');
const erc20FactoryAbi = require('./abis/erc20factoryabi.json');
const miniEVM = require('./chain');
const privateKey = process.env.PRIVATE_KEY; // Load from environment variable
const erc20FactoryAddress = process.env.ERC20_FACTORY_ADDRESS; // Load from environment variable
// Create an account from the private key
const account = privateKeyToAccount(privateKey);
// Create a wallet client
const client = createWalletClient({
account,
chain: miniEVM,
transport: http(),
});
// create a public client
const publicClient = createPublicClient({
chain: miniEVM,
transport: http(),
});
// Send the transaction
async function createERC20() {
try {
// call createERC20 function on the factory contract to create a new ERC20 token
const hash = await client.writeContract({
address: erc20FactoryAddress, // Factory address
abi: erc20FactoryAbi,
functionName: 'createERC20',
args: ['Test', 'TST', 18],
})
console.log('Transaction sent. Hash:', hash);
// Wait for the transaction to be confirmed
await new Promise(resolve => setTimeout(resolve, 500));
// Get the transaction receipt and parse the logs for the ERC20Created event
const receipt = await publicClient.getTransactionReceipt({
hash: hash
});
const erc20CreatedLog = receipt.logs.find(log =>
log.address.toLowerCase() === erc20FactoryAddress.toLowerCase() // Check if the log is from the factory address
);
// Check if the ERC20Created event was found in the logs and decode the created ERC20 address
if (erc20CreatedLog) {
const decodedLog = decodeEventLog({
abi: erc20FactoryAbi,
data: erc20CreatedLog.data,
topics: erc20CreatedLog.topics,
});
console.log('New ERC20 address:', decodedLog.args.erc20);
// Try reading the new ERC20 contract
const erc20 = await getContract({
address: decodedLog.args.erc20,
abi: erc20Abi,
client: {
public: publicClient,
wallet: client
}
});
console.log('ERC20 name:', await erc20.read.name());
console.log('ERC20 symbol:', await erc20.read.symbol());
console.log('ERC20 decimals:', await erc20.read.decimals());
} else {
console.log('ERC20Created event not found in the logs');
}
} catch (error) {
console.error('Error sending transaction:', error);
}
}
createERC20();
```
### Running the Script
Finally, we can run the script to create a new ERC20 token.
```sh
node src/index.js
```
If everything went well, you should see an output similar of the following:
```sh
Transaction sent. Hash: 0x58b0b9326e9c877c0b966db112b3df8db710f986ba309345601ac222ddcb4c77
New ERC20 address: 0x9F363EB9649879b1C4993f9Ea9821d48346c3e04
ERC20 name: Test
ERC20 symbol: TST
ERC20 decimals: 18
```
And that's it! We have successfully created a new ERC20 token on the MiniEVM.
# EVM IBC Hooks
Source: https://docs.initia.xyz/developers/developer-guides/vm-specific-tutorials/evm/ibc-hooks
EVM hooks, implemented as IBC middleware, play a critical role in facilitating cross-chain contract calls that involve token transfers. This capability is particularly crucial for cross-chain swaps, providing a robust mechanism for decentralized trading across different blockchain networks. The key to this functionality is the `memo` field in the ICS20 and ICS721 transfer packets, as introduced in [IBC v3.4.0](https://medium.com/the-interchain-foundation/moving-beyond-simple-token-transfers-d42b2b1dc29b).
# EVM Contract Execution Format
Before we dive into the IBC metadata format, let's take a look at the hook data format and address which fields we need to be setting. The EVM `MsgCall` is defined [here](https://github.com/initia-labs/minievm/blob/main/x/evm/types/tx.pb.go) and other types are defined [here](https://github.com/initia-labs/minievm/blob/main/app/ibc-hooks/message.go).
```go
// HookData defines a wrapper for evm execute message
// and async callback.
type HookData struct {
// Message is a evm execute message which will be executed
// at `OnRecvPacket` of receiver chain.
Message evmtypes.MsgCall `json:"message"`
// AsyncCallback is a callback message which will be executed
// at `OnTimeoutPacket` and `OnAcknowledgementPacket` of
// sender chain.
AsyncCallback *AsyncCallback `json:"async_callback,omitempty"`
}
// AsyncCallback is data wrapper which is required
// when we implement async callback.
type AsyncCallback struct {
// callback id should be issued form the executor contract
Id uint64 `json:"id"`
ContractAddr string `json:"contract_addr"`
}
// MsgCall is a message to call an Ethereum contract.
type MsgCall struct {
// Sender is the that actor that signed the messages
Sender string `protobuf:"bytes,1,opt,name=sender,proto3" json:"sender,omitempty"`
// ContractAddr is the contract address to be executed.
// It can be cosmos address or hex encoded address.
ContractAddr string `protobuf:"bytes,2,opt,name=contract_addr,json=contractAddr,proto3" json:"contract_addr,omitempty"`
// Hex encoded execution input bytes.
Input string `protobuf:"bytes,3,opt,name=input,proto3" json:"input,omitempty"`
}
```
So we detail where we want to get each of these fields from:
* `Sender`: We cannot trust the sender of an IBC packet, the counter-party chain has full ability to lie about it. We cannot risk this sender being confused for a particular user or module address on Initia. So we replace the sender with an account to represent the sender prefixed by the channel and a evm module prefix. This is done by setting the sender to `Bech32(Hash(Hash("ibc-evm-hook-intermediary") + channelID/sender))`, where the channelId is the channel id on the local chain.
* `ContractAddr`: This field should be directly obtained from the ICS-20 packet metadata
* `Input`: This field should be directly obtained from the ICS-20 packet metadata.
So our constructed EVM call message that we execute will look like:
```go
msg := MsgCall{
// Sender is the that actor that signed the messages
Sender: "init1-hash-of-channel-and-sender",
// ContractAddr is the contract address to be executed.
// It can be cosmos address or hex encoded address.
ContractAddr: packet.data.memo["evm"]["message"]["contract_addr"],
// Hex encoded execution input bytes.
Input: packet.data.memo["evm"]["message"]["input"],
}
```
# ICS20 packet structure
So given the details above, we propagate the implied ICS20 packet data structure. ICS20 is JSON native, so we use JSON for the memo format.
```json
{
//... other ibc fields that we don't care about
"data": {
"denom": "denom on counterparty chain (e.g. uatom)", // will be transformed to the local denom (ibc/...)
"amount": "1000",
"sender": "addr on counterparty chain", // will be transformed
"receiver": "ModuleAddr::ModuleName::FunctionName",
"memo": {
"evm": {
// execute message on receive packet
"message": {
"contract_addr": "0x1",
"input": "hex encoded byte string",
},
// optional field to get async callback (ack and timeout)
"async_callback": {
"id": 1,
"contract_addr": "0x1"
}
}
}
}
}
```
An ICS20 packet is formatted correctly for evmhooks iff the following all hold:
* [x] `memo` is not blank
* [x] `memo` is valid JSON
* [x] `memo` has at least one key, with value `"evm"`
* [x] `memo["evm"]["message"]` has exactly five entries, `"contract_addr"` and `"input"`
* [x] `receiver` == "" || `receiver` == `"module_address::module_name::function_name"`
We consider an ICS20 packet as directed towards evmhooks iff all of the following hold:
* `memo` is not blank
* `memo` is valid JSON
* `memo` has at least one key, with name `"evm"`
If an ICS20 packet is not directed towards evmhooks, evmhooks doesn't do anything. If an ICS20 packet is directed towards evmhooks, and is formatted incorrectly, then evmhooks returns an error.
# Execution flow
Pre evm hooks:
* Ensure the incoming IBC packet is cryptogaphically valid
* Ensure the incoming IBC packet is not timed out.
In evm hooks, pre packet execution:
* Ensure the packet is correctly formatted (as defined above)
* Edit the receiver to be the hardcoded IBC module account
In evm hooks, post packet execution:
* Construct evm message as defined before
* Execute evm message
* if evm message has error, return ErrAck
* otherwise continue through middleware
# Async Callback
A contract that sends an IBC transfer, may need to listen for the ACK from that packet. To allow contracts to listen on the ack of specific packets, we provide Ack callbacks. The contract, which wants to receive ack callback, have to implement two functions.
* ibc\_ack
* ibc\_timeout
```go
interface IIBCAsyncCallback {
function ibc_ack(uint64 callback_id, bool success) external;
function ibc_timeout(uint64 callback_id) external;
}
```
Also when a contract make IBC transfer request, it should provide async callback data through memo field.
* `memo['evm']['async_callback']['id']`: the async callback id is assigned from the contract. so later it will be passed as argument of `ibc_ack` and `ibc_timeout`.
* `memo['evm']['async_callback']['contract_addr']`: The address of module which defines the callback function.
# Tutorials
This tutorial will guide you through the process of deploying a EVM contract and calling it from another chain using IBC hooks.
We will use IBC hook from Initia chain to call a EVM contract on MiniEVM chain in this example.
## Step 1. Deploy a contract on MiniEVM chain
Write and deploy a simple [counter contract](https://github.com/initia-labs/minievm/blob/main/x/evm/contracts/counter/Counter.sol) to Initia.
```soliditiy
contract Counter is IIBCAsyncCallback {
uint256 public count;
event increased(uint256 oldCount, uint256 newCount);
constructor() payable {}
function increase() external payable {
count++;
emit increased(count - 1, count);
}
function ibc_ack(uint64 callback_id, bool success) external {
if (success) {
count += callback_id;
} else {
count++;
}
}
function ibc_timeout(uint64 callback_id) external {
count += callback_id;
}
function query_cosmos(
string memory path,
string memory req
) external returns (string memory result) {
return COSMOS_CONTRACT.query_cosmos(path, req);
}
}
```
## Step 2. Update IBC hook ACL for the contract
IBC hook has strong power to execute any functions in counterparty chain and this can be used for fishing easily.
So, we need to set the ACL for the contract to prevent unauthorized access.
To update MiniEVM ACL, you need to use `MsgExecuteMessages` in OPchild module.
````typescript
const config = {
authority: 'init10d07y265gmmuvt4z0w9aw880jnsr700j55nka3',
contractAddress: 'init1436kxs0w2es6xlqpp9rd35e3d0cjnw4sv8j3a7483sgks29jqwgs9nxzw8'
}
const aclMsg = new MsgUpdateACL(
config.authority,
config.contractAddress,
true
)
const msgs = [
new MsgExecuteMessages(
proposer.key.accAddress,
[aclMsg]
)
]
const signedTx = await proposer.createAndSignTx({ msgs })
try {
const result = await proposer.rest.tx.broadcast(signedTx)
console.log('Transaction successful:', result)
} catch (error) {
console.error('Transaction failed:', error)
throw error
}
```bash
curl -X GET "https://rest.minievm-2.initia.xyz/initia/ibchooks/v1/acls" -H "accept: application/json"
````
Response:
```json
{
"acls": [
{
"address": "init1fj6uuyhrhwznfpu350xafhp6tdurvfcwmq655f", // 0x4cb5cE12e3bB85348791A3cDd4dc3A5b7836270e
"allowed": true
}
],
"pagination": {
"next_key": null,
"total": "1"
}
}
```
## Step 3. Execute IBC Hooks Message
After the contract is deployed and the ACL is set, we can execute the IBC hooks message to call the contract.
```typescript
import { Coin, Height, RESTClient, MnemonicKey, MsgTransfer, Wallet } from "@initia/initia.js";
import { ethers } from "ethers";
import * as fs from 'fs'
function createHook(params: object) {
const hook = { evm: { message: params } }
return JSON.stringify(hook)
}
async function main() {
const restClient = new RESTClient('https://rest.testnet.initia.xyz', {
gasAdjustment: '1.75',
gasPrices: '0.015uinit'
})
const sender = new Wallet(
restClient,
new MnemonicKey({
mnemonic: ''
})
)
const amount = "1000"
const contractInfo = JSON.parse(
fs.readFileSync('./bin/Counter.json').toString()
)
const abi = contractInfo.abi
const contractAddress = "0x4cb5cE12e3bB85348791A3cDd4dc3A5b7836270e"
const contract = new ethers.Contract(contractAddress, abi);
const methodName = "increase"
const args: any[] = []
const encodedData = contract.interface.encodeFunctionData(methodName, args)
const msgs = [
new MsgTransfer(
'transfer',
'channel-10',
new Coin("uinit", amount),
sender.key.accAddress,
contractAddress,
new Height(0, 0),
((new Date().valueOf() + 100000) * 1000000).toString(),
createHook({
contract_addr: contractAddress,
input: encodedData
})
)
]
const signedTx = await sender.createAndSignTx({ msgs });
await restClient.tx.broadcastSync(signedTx).then(res => console.log(res));
}
main()
```
# Update Fee with ERC20 Token
Source: https://docs.initia.xyz/developers/developer-guides/vm-specific-tutorials/evm/update-fee-token
## Prerequisites
* [NodeJS](https://nodejs.org)
## Update Fee Token with ERC20 Token
You may want to use an ERC20 token as the Fee Token instead of the tokens issued by the Cosmos Bank module.
To achieve this, you can update the chain parameter of the EVM module to set the Fee Token as an ERC20 token.
Use validator (admin) account to update the chain parameter.
The deployed ERC20 token must inherit the `InitiaERC20` contract.
```ts
import {
EvmParams,
RESTClient,
MnemonicKey,
MsgUpdateEvmParams,
Wallet,
MsgExecuteMessages,
} from "@initia/initia.js";
/**
* main() demonstrates how to update EVM-related chain parameters (such as fee denom, allowed publishers, etc.).
* Note: This requires the mnemonic for the chain’s operator(a.k.a validator), which you must obtain from the chain administrator.
*/
async function main() {
/**
* 1) Instantiate a RESTClient using the chain’s RPC endpoint.
* - The first argument is the base URL or RPC endpoint of your chain.
* - The second argument is an object providing client options like gas prices.
*
* For example:
* "https://maze-rpc-sequencer-fd70c395-4cfc-4624-ab8a-8e025af6a140.ane1-prod-nocsm.newmetric.xyz/"
* is a special endpoint in this context (provided by NewMetric).
*/
const client = new RESTClient(
"https://maze-rpc-sequencer-fd70c395-4cfc-4624-ab8a-8e025af6a140.ane1-prod-nocsm.newmetric.xyz/",
{
/**
* gasPrices: '0GAS'
* - This can be set to '0GAS' if the chain you’re using allows 0 gas prices or free transactions
* for certain operations (testnet or specific config).
* - In production or other networks, you usually set this to something like "0.025" or
* whatever fee denom and minimum gas price the network expects.
*/
gasPrices: '0GAS',
}
);
/**
* 2) Create a Wallet instance using the client and a MnemonicKey.
* - The MnemonicKey is derived from the chain operator's mnemonic (private key).
* - This wallet has permission to execute the EVM parameter update because it’s
* presumably the authorized validator or has the necessary roles on the chain.
*/
const wallet = new Wallet(
client,
new MnemonicKey({
/**
* Replace with the actual mnemonic of the chain operator or the account with
* the authority to update EVM params.
* Make sure you keep this mnemonic secret.
*/
mnemonic: "" // enter validator mnemonic
})
);
/**
* 3) Construct the MsgUpdateEvmParams message.
* - This message tells the chain which parameters to update in the EVM module.
* - The first argument is the "opchild module address" or "authority address" (in bech32 format).
* This is the authority that is allowed to update the EVM params on chain.
* This is obtained from `/cosmos/auth/v1beta1/module_accounts/opchild` endpoint.
*
* - Then we instantiate a new EvmParams object:
* @param extra_eip (array): Optional EIPs to enable
* @param allowed_publisher (array): Entities allowed to publish certain EVM data
* @param allow_custom_erc20 (boolean): Toggle for custom ERC20 tokens
* @param allowed_custom_erc20s (array): A list of allowed custom ERC20 addresses
* (could be 0x or bech32, depending on chain config)
* @param fee_denom (string): The fee denomination on-chain (e.g. 'umin').
* It typically should match the chain’s native fee token.
*/
const msgs = [
new MsgUpdateEvmParams(
"init1gz9n8jnu9fgqw7vem9ud67gqjk5q4m2w0aejne", // Authority/Opchild module address
new EvmParams(
[], // extra_eip - e.g. ["EIP1559"] if needed
[], // allowed_publisher - e.g. ['0x123...'] if you want certain publishers
/**
* allow_custom_erc20 (boolean)
* - Determines whether custom ERC20 tokens are allowed beyond the default token factory.
*
* - If true and allowed_custom_erc20s = []:
* => All custom ERC20 tokens are allowed.
*
* - If true and allowed_custom_erc20s = [addr1, addr2]:
* => Only the tokens specified in the list [addr1, addr2] are allowed.
*
* - If false and allowed_custom_erc20s = []:
* => Only tokens created by the chain's token factory are allowed; no arbitrary custom tokens.
*/
true,
/**
* allowed_custom_erc20s (string[])
* - A list of custom ERC20 addresses (0x or bech32, depending on your chain) that are permitted.
* - This array must be considered in conjunction with allow_custom_erc20 (above).
* - If allow_custom_erc20 = true but this is empty => all custom ERC20 tokens are allowed.
* - If allow_custom_erc20 = true and you specify addresses => only those addresses are allowed.
*/
[],
/**
* fee_denom (string)
* - Must be the chain's fee token; often in the format `evm/`
* on an EVM-compatible chain.
* - Example: "evm/9D9c32921575Fd98e67E27C0189ED4b750Cb17C5"
*/
"evm/9D9c32921575Fd98e67E27C0189ED4b750Cb17C5"
)
)
];
/**
* 4) Create a MsgExecuteMessages message to execute the EVM parameter update.
* - This message will include the MsgUpdateEvmParams message(s) we created above.
* - The first argument is the wallet’s (validator’s) account address.
* - The second argument is an array of messages to execute.
*/
const executeMsg = new MsgExecuteMessages(
wallet.key.accAddress, // must be admin address
msgs
)
/**
* 5) Create and sign the transaction with the Wallet.
* - This will create a transaction that includes the EVM param update message
* and then sign it using the wallet’s (validator’s) private key.
*/
const signedTx = await wallet.createAndSignTx({
msgs: [executeMsg],
});
/**
* 6) Broadcast the transaction to the chain’s REST endpoint.
* - This sends the signed transaction to be processed on-chain,
* where it will update the EVM parameters if everything is valid.
*/
await client.tx.broadcast(signedTx);
}
/**
* Finally, run the main() function.
*/
main();
```
# Using Connect Oracle
Source: https://docs.initia.xyz/developers/developer-guides/vm-specific-tutorials/movevm/connect-oracles
To query prices from Connect oracle on MoveVM, you need to use the `oracle` module in InitiaStdLib found at `0x1::oracle` ([explorer link](https://scan.testnet.initia.xyz/initiation-2/modules/0x1/oracle)).
This module provides a `get_price` function that you can use to fetch the price of an asset pair. The asset pair is specified using the `pair_id`, which is a string of the format `"ASSET1/ASSET2"`. For example, the example module below fetches the price of BTC/USD from Connect oracle.
```java
module example::examples {
use std::string::String;
use initia_std::oracle::get_price;
#[view]
public fun get_price_example(pair_id: String): (u256, u64, u64) {
let (price, timestamp, decimals) = get_price(pair_id);
(price, timestamp, decimals)
}
#[test]
public fun test_get_price_example(): (u256, u64, u64) {
let btc_usd_pair_id = string::utf8(b"BITCOIN/USD");
let (price, timestamp, decimals) = get_price_example(btc_usd_pair_id);
(price, timestamp, decimals)
}
}
```
The response from the `get_price` function is then a tuple of `(price, timestamp, decimals)`, where:
* `price` is the price of the asset pair multiplied by $10^{decimals}$
* `timestamp` is the timestamp of the last update
* `decimals` is the number of decimals in the price
# Creating Move Coin
Source: https://docs.initia.xyz/developers/developer-guides/vm-specific-tutorials/movevm/creating-move-coin
This tutorial guides you through the process of creating and minting your own coin using the `0x1::managed_coin` module on the Initia blockchain. It includes initializing your coin, obtaining metadata, minting coins, and checking the balances.
# Step 1: Initialize Your Coin
To initialize your coin, you must call the `0x1::managed_coin::initialize` function.
```move
public entry fun initialize(
account: &signer,
maximum_supply: Option,
name: String,
symbol: String,
decimals: u8,
icon_uri: String,
project_uri: String,
)
```
```bash
initiad tx move execute 0x1 managed_coin initialize \
--args '["option:null", "string:my_coin", "string:MYCOIN", "u8:6", "string:ICON_URI", "string:PROJECT_URI"]' \
--from [key-name] \
--gas auto --gas-adjustment 1.5 --gas-prices 0.015uinit \
--node [rpc-url]:[rpc-port] --chain-id [chain-id]
```
```ts
import {
bcs,
RESTClient,
MnemonicKey,
MsgExecute,
Wallet,
} from '@initia/initia.js';
async function createCoin() {
const restClient = new RESTClient('https://rest.testnet.initia.xyz', {
gasPrices: '0.015uinit',
gasAdjustment: '1.5',
});
const key = new MnemonicKey({
mnemonic: 'beauty sniff protect ...',
});
const wallet = new Wallet(restClient, key);
const msgs = [
new MsgExecute(
key.accAddress,
'0x1',
'managed_coin',
'initialize',
[],
[
// max supply, if you want to set max supply, insert number instead of null
bcs.option(bcs.u128()).serialize(null).toBase64(),
bcs.string().serialize('my_coin').toBase64(), // name
bcs.string().serialize('MYCOIN').toBase64(), // symbol
// decimal point (raw value 1 consider to 10 ** (- decimalPoint))
bcs.u8().serialize(6).toBase64(),
bcs.string().serialize('').toBase64(), // icon uri
bcs.string().serialize('').toBase64(), // project uri
]
),
];
// sign tx
const signedTx = await wallet.createAndSignTx({ msgs });
// send(broadcast) tx
restClient.tx.broadcastSync(signedTx).then(res => console.log(res));
// {
// height: 0,
// txhash: '40E0D5633D37E207B2463D275F5B479FC67D545B666C37DC7B121ED551FA18FC',
// raw_log: '[]'
// }
}
createCoin();
```
# Step 2: Mint Coin
To mint coins, you will use the `0x1::managed_coin::mint` function.
```move
public entry fun mint(
account: &signer,
dst_addr: address,
metadata: Object,
amount: u64,
)
```
Before minting, you need to obtain the metadata for your coin, which can be done through the `0x1::coin::metadata` view function or by using `sha3_256(creator+symbol+0xFE)`.
## Obtaining Metadata
```bash
initiad query move view 0x1 coin metadata \
--args '["address:0x...", "string:MYCOIN"]' \
--node [rpc-url]:[rpc-port]
# data: '"0x2d81ce0b6708fccc77a537d3d1abac8c9f1f674f4f76390e3e78a89a52d4aacb"'
```
```ts
import { bcs, RESTClient, MnemonicKey } from '@initia/initia.js';
import * as crypto from 'crypto';
async function getCoinMetadata() {
const restClient = new RESTClient('https://rest.testnet.initia.xyz', {
gasPrices: '0.015uinit',
gasAdjustment: '1.5',
});
const key = new MnemonicKey({
mnemonic: 'beauty sniff protect ...',
});
// Method 1: use view function
restClient.move
.viewFunction(
'0x1',
'coin',
'metadata',
[],
[
bcs.address().serialize(key.accAddress).toBase64(),
bcs.string().serialize('MYCOIN').toBase64(),
]
)
.then(console.log);
// 0xcf921815f2b4827930ac01b3116ed3caad08ccd443f9df6eb22cd5344a548660
// Method 2: use sha3-256
console.log(coinMetadata(key.accAddress, 'MYCOIN'));
// cf921815f2b4827930ac01b3116ed3caad08ccd443f9df6eb22cd5344a548660
}
getCoinMetadata();
function coinMetadata(creator: string, symbol: string): string {
const OBJECT_FROM_SEED_ADDRESS_SCHEME = 0xfe;
const addrBytes = bcs.address().serialize(creator).toBytes();
const seed = Buffer.from(symbol, 'ascii');
const bytes = [...addrBytes, ...seed, OBJECT_FROM_SEED_ADDRESS_SCHEME];
const hash = crypto.createHash('SHA3-256');
const digest = hash.update(Buffer.from(bytes)).digest();
return digest.toString('hex');
}
```
## Minting Coins
```bash
initiad tx move execute 0x1 managed_coin mint \
--args '["address:0x...", "object:0x2d81ce0b6708fccc77a537d3d1abac8c9f1f674f4f76390e3e78a89a52d4aacb", "u64:100000000"]' \
--from [key-name] \
--gas auto --gas-adjustment 1.5 --gas-prices 0.015uinit \
--node [rpc-url]:[rpc-port] --chain-id [chain-id]
```
```ts
import {
bcs,
RESTClient,
MnemonicKey,
MsgExecute,
Wallet,
} from '@initia/initia.js';
import * as crypto from 'crypto';
async function mintCoin() {
const restClient = new RESTClient('https://rest.testnet.initia.xyz', {
gasPrices: '0.015uinit',
gasAdjustment: '1.5',
});
const key = new MnemonicKey({
mnemonic: 'beauty sniff protect ...',
});
const wallet = new Wallet(restClient, key);
const msgs = [
new MsgExecute(
key.accAddress,
'0x1',
'managed_coin',
'mint',
[],
[
bcs.address().serialize(key.accAddress).toBase64(),
bcs
.object()
.serialize(coinMetadata(key.accAddress, 'MYCOIN'))
.toBase64(),
bcs.u64().serialize(100000000).toBase64(),
]
),
];
// sign tx
const signedTx = await wallet.createAndSignTx({ msgs });
// send(broadcast) tx
restClient.tx.broadcastSync(signedTx).then(res => console.log(res));
// {
// height: 0,
// txhash: '593827F58F3E811686EC6FFDAD2E27E91DA707965F0FF33093DC071D47A46786',
// raw_log: '[]'
// }
}
mintCoin();
function coinMetadata(creator: string, symbol: string): string {
const OBJECT_FROM_SEED_ADDRESS_SCHEME = 0xfe;
const addrBytes = bcs.address().serialize(creator).toBytes();
const seed = Buffer.from(symbol, 'ascii');
const bytes = [...addrBytes, ...seed, OBJECT_FROM_SEED_ADDRESS_SCHEME];
const hash = crypto.createHash('SHA3-256');
const digest = hash.update(Buffer.from(bytes)).digest();
return digest.toString('hex');
}
```
After minting, you can check the balances to verify the minting process.
# Move IBC Hooks
Source: https://docs.initia.xyz/developers/developer-guides/vm-specific-tutorials/movevm/ibc-hooks
The Move hook is an IBC middleware which is used to allow ICS-20 token transfers to initiate contract calls. This allows cross-chain contract calls, that involve token movement. This is useful for a variety of use cases. One of primary importance is cross-chain swaps, which is an extremely powerful primitive.
The mechanism enabling this is a `memo` field on every ICS20 and ICS721 transfer packet as of IBC v3.4.0. Move hooks is an IBC middleware that parses an ICS20 transfer, and if the memo field is of a particular form, executes a Move contract call. We now detail the memo format for Move contract calls, and the execution guarantees provided.
# Move Contract Execution Format
Before exploring the IBC metadata format, it is crucial to understand the hook data format. The Move `MsgExecute` is defined [here](https://github.com/initia-labs/initia/blob/main/x/move/types/tx.pb.go) and other types are defined [here](https://github.com/initia-labs/initia/blob/main/x/ibc-hooks/move-hooks/message.go) as the following type:
```go
// HookData defines a wrapper for Move execute message
// and async callback.
type HookData struct {
// Message is a Move execute message which will be executed
// at `OnRecvPacket` of receiver chain.
Message movetypes.MsgExecute `json:"message"`
// AsyncCallback is a callback message which will be executed
// at `OnTimeoutPacket` and `OnAcknowledgementPacket` of
// sender chain.
AsyncCallback *AsyncCallback `json:"async_callback,omitempty"`
}
// AsyncCallback is data wrapper which is required
// when we implement async callback.
type AsyncCallback struct {
// callback id should be issued form the executor contract
Id uint64 `json:"id"`
ModuleAddress string `json:"module_address"`
ModuleName string `json:"module_name"`
}
type MsgExecute struct {
// Sender is the that actor that signed the messages
Sender string `protobuf:"bytes,1,opt,name=sender,proto3" json:"sender,omitempty"`
// ModuleAddress is the address of the module deployer
ModuleAddress string `protobuf:"bytes,2,opt,name=module_address,json=moduleAddress,proto3" json:"module_address,omitempty"`
// ModuleName is the name of module to execute
ModuleName string `protobuf:"bytes,3,opt,name=module_name,json=moduleName,proto3" json:"module_name,omitempty"`
// FunctionName is the name of a function to execute
FunctionName string `protobuf:"bytes,4,opt,name=function_name,json=functionName,proto3" json:"function_name,omitempty"`
// TypeArgs is the type arguments of a function to execute
// ex) "0x1::BasicCoin::Initia", "bool", "u8", "u64"
TypeArgs []string `protobuf:"bytes,5,rep,name=type_args,json=typeArgs,proto3" json:"type_args,omitempty"`
// Args is the arguments of a function to execute
// - number: little endian
// - string: base64 bytes
Args [][]byte `protobuf:"bytes,6,rep,name=args,proto3" json:"args,omitempty"`
}
```
So we detail where we want to get each of these fields from:
* `Sender`: We cannot trust the sender of an IBC packet, the counter-party chain has full ability to lie about it. We cannot risk this sender being confused for a particular user or module address on Initia. So we replace the sender with an account to represent the sender prefixed by the channel and a Move module prefix. This is done by setting the sender to `Bech32(Hash(Hash("ibc-move-hook-intermediary") + channelID/sender))`, where the channelId is the channel id on the local chain.
* `ModuleAddress`: This field should be directly obtained from the ICS-20 packet metadata
* `ModuleName`: This field should be directly obtained from the ICS-20 packet metadata
* `FunctionName`: This field should be directly obtained from the ICS-20 packet metadata
* `TypeArgs`: This field should be directly obtained from the ICS-20 packet metadata
* `Args`: This field should be directly obtained from the ICS-20 packet metadata.
So our constructed move message that we execute will look like:
```go
msg := MsgExecuteContract{
// Sender is the that actor that signed the messages
Sender: "init1-hash-of-channel-and-sender",
// ModuleAddress is the address of the module deployer
ModuleAddress: packet.data.memo["move"]["message"]["module_address"],
// ModuleName is the name of module to execute
ModuleName: packet.data.memo["move"]["message"]["module_name"],
// FunctionName is the name of a function to execute
FunctionName: packet.data.memo["move"]["message"]["function_name"],
// TypeArgs is the type arguments of a function to execute
// ex) "0x1::BasicCoin::Initia", "bool", "u8", "u64"
TypeArgs: packet.data.memo["move"]["message"]["type_args"],
// Args is the arguments of a function to execute
// - number: little endian
// - string: base64 bytes
Args: packet.data.memo["move"]["message"]["args"]
}
```
# ICS20 Packet Structure
So given the details above, we propagate the implied ICS20 packet data structure. ICS20 is JSON native, so we use JSON for the memo format.
```json
{
//... other ibc fields that we don't care about
"data": {
"denom": "denom on counterparty chain (e.g. uatom)", // will be transformed to the local denom (ibc/...)
"amount": "1000",
"sender": "addr on counterparty chain", // will be transformed
"receiver": "ModuleAddr::ModuleName::FunctionName",
"memo": {
"move": {
// execute message on receive packet
"message": {
"module_address": "0x1",
"module_name": "dex",
"function_name": "swap",
"type_args": ["0x1::native_uinit::Coin", "0x1::native_uusdc::Coin"],
"args": ["base64 encoded bytes array"]
},
// optional field to get async callback (ack and timeout)
"async_callback": {
"id": 1,
"module_address": "0x1",
"module_name": "dex"
}
}
}
}
}
```
An ICS20 packet is formatted correctly for movehooks if the following all hold:
* [x] `memo` is not blank
* [x] `memo` is valid JSON
* [x] `memo` has at least one key, with value `"move"`
* [x] `memo["move"]["message"]` has exactly five entries, `"module_address"`, `"module_name"`, `"function_name"`, `"type_args"` and `"args"`
* [x] `receiver` == "" || `receiver` == `"module_address::module_name::function_name"`
We consider an ICS20 packet as directed towards movehooks if all of the following hold:
* [x] `memo` is not blank
* [x] `memo` is valid JSON
* [x] `memo` has at least one key, with name "move"
If an ICS20 packet is not directed towards movehooks, movehooks doesn't do anything. If an ICS20 packet is directed towards movehooks, and is formatted incorrectly, then movehooks returns an error.
# Execution Flow
Pre Move hooks:
* Ensure the incoming IBC packet is cryptographically valid
* Ensure the incoming IBC packet is not timed out.
In Move hooks, pre packet execution:
* Ensure the packet is correctly formatted (as defined above)
* Edit the receiver to be the hardcoded IBC module account
In Move hooks, post packet execution:
* Construct move message as defined before
* Execute move message
* if move message has error, return ErrAck
* otherwise continue through middleware
# Async Callback
A contract that sends an IBC transfer, may need to listen for the ACK from that packet. To allow contracts to listen on the ack of specific packets, we provide Ack callbacks. The contract, which wants to receive ack callback, have to implement two functions.
* ibc\_ack
* ibc\_timeout
```rust
public entry fun ibc_ack(
account: &signer,
callback_id: u64,
success: bool,
)
public entry fun ibc_timeout(
account: &signer,
callback_id: u64,
)
```
Also when a contract make IBC transfer request, it should provide async callback data through memo field.
* `memo['move']['async_callback']['id']`: the async callback id is assigned from the contract. so later it will be passed as argument of ibc\_ack and ibc\_timeout.
* `memo['move']['async_callback']['module_address']`: The address of module which defines the callback function.
* `memo['move']['async_callback']['module_name']`: The name of module which defines the callback function.
# Tutorials
This tutorial will guide you through the process of deploying a Move contract and calling it from another chain using IBC hooks.
We will use IBC hook from chain to call a Move contract on Initia chain in this example (L2 -> L1).
## Step 1. Deploy a Move contract
Write and deploy a simple token transfer contract to Initia.
```move
module deployer::example {
use initia_std::coin;
use initia_std::object::Object;
use initia_std::fungible_asset::Metadata;
public entry fun simple_transfer(
account: &signer,
receiver: address,
metadata: Object,
amount: u64
){
let token = coin::withdraw(account, metadata, amount);
coin::deposit(receiver, token);
}
}
```
## Step 2. Update IBC hook ACL for the contract
IBC hook has strong power to execute any functions in counterparty chain and this can be used for fishing easily.
So, we need to set the ACL for the contract to prevent unauthorized access.
```typescript
// for initia L1, you can update ACL by submitting a proposal
const aclMsg = new MsgUpdateACL(
'init10d07y265gmmuvt4z0w9aw880jnsr700j55nka3', // authority
'init14qcr2mczuzlav8z2uqm3d0zdw04nuhf2jgndc3', // contract address
true // allow
)
const msgs = [new MsgSubmitProposal(
[aclMsg],
'100000000uinit', // deposit
proposer.key.accAddress, // proposer
'uinit', // metadata
'awesome proposal', // title
'it is awesome', // summary
false // expedited
)]
const signedTx = await proposer.createAndSignTx({ msgs })
await proposer.rest.tx.broadcast(signedTx).then(res => console.log(res))
```
If you want to update MiniMove ACL, you need to use `MsgExecuteMessages` in OPchild module.
```typescript
const aclMsg = new MsgUpdateACL(
'init10d07y265gmmuvt4z0w9aw880jnsr700j55nka3', // authority
'init14qcr2mczuzlav8z2uqm3d0zdw04nuhf2jgndc3', // contract address
true // allow
)
const msgs = [
new MsgExecuteMessages(
proposer.key.accAddress,
[aclMsg]
)
]
const signedTx = await proposer.createAndSignTx({ msgs })
await proposer.rest.tx.broadcast(signedTx).then(res => console.log(res))
```
You can check the ACL list using the following command.
```bash
curl -X GET "https://rest.testnet.initia.xyz/initia/ibchooks/v1/acls" -H "accept: application/json"
```
Response:
```json
{
"acls": [
{
"address": "init14qcr2mczuzlav8z2uqm3d0zdw04nuhf2jgndc3",
"allowed": true
}
],
"pagination": {
"next_key": null,
"total": "1"
}
}
```
## Step 3. Execute IBC Hooks Message
After the contract is deployed and the ACL is set, we can execute the IBC hooks message to call the contract.
```typescript
import { bcs, Coin, Height, RESTClient, MnemonicKey, MsgTransfer, Wallet } from "@initia/initia.js";
function createHook(params: object) {
const hook = { move: { message: params } }
return JSON.stringify(hook)
}
async function main() {
const l1RestClient = new RESTClient('https://rest.testnet.initia.xyz', {
gasAdjustment: '1.75',
gasPrices: '0.015uinit'
})
const l2RestClient = new RESTClient('https://rest.minimove-2.initia.xyz', {
gasAdjustment: '1.75',
gasPrices: '0.15umin' // set l2 gas price
})
const sender = new Wallet(
l2RestClient,
new MnemonicKey({
mnemonic: 'power elder gather acoustic ...'
})
)
const recipientAddress = "init1wgl839zxdh5c89mvc4ps97wyx6ejjygxs4qmcx"
const tokenPair = await l1RestClient.ophost.tokenPairByL1Denom(1, "uinit") // { l1_denom: 'uinit', l2_denom: 'l2/771d639f30fbe45e3fbca954ffbe2fcc26f915f5513c67a4a2d0bc1d635bdefd' }
const ibcTrace = "transfer/" + "channel-0/" + tokenPair.l2_denom // IBC denom trace = `port_id/channel_id/denom`
const ibcDenomHash = await l1RestClient.ibcTransfer.denomHash(ibcTrace) // IBC denom = `ibc/${denom_hash}`
const tokenMetadata = await l1RestClient.move.metadata("ibc/" + ibcDenomHash) // 0x972188e32b2ccec557eed98bbea9d42a1a6dc270da9009926365deb7c49db7dd
const amount = 1000
const msgs = [
new MsgTransfer(
'transfer',
'channel-0',
new Coin(tokenPair.l2_denom, 10),
sender.key.accAddress,
"0xA830356F02E0BFD61C4AE03716BC4D73EB3E5D2A::example::simple_transfer", // IBC hook receiver = `ModuleAddress::ModuleName::FunctionName`
new Height(0, 0),
((new Date().valueOf() + 100000) * 1000000).toString(),
createHook({
module_address: "0xA830356F02E0BFD61C4AE03716BC4D73EB3E5D2A",
module_name: "example",
function_name: "simple_transfer",
type_args: [],
args: [
bcs.address().serialize(recipientAddress).toBase64(),
bcs.address().serialize(tokenMetadata).toBase64(),
bcs.u64().serialize(amount).toBase64(),
],
})
)
]
const signedTx = await sender.createAndSignTx({ msgs });
await l2RestClient.tx.broadcastSync(signedTx).then(res => console.log(res));
}
main()
```
# Multi Signature
Source: https://docs.initia.xyz/developers/developer-guides/vm-specific-tutorials/movevm/multisig
Multi Signature (multisig) allows multiple users to sign a transaction before it is broadcasted to the network.
This ensures that no single user can execute a transaction unilaterally, adding an extra layer of security and trust.
Multisig accounts are essential in environments where assets are managed collectively, such as corporate treasuries or joint accounts.
In this tutorial, we will explore how to create and manage multisignature accounts, proposals, and execute them using the `InitiaJS` library.
## Create Multisig Accounts
Creating a multisig account is the first step in setting up a multi-approval system.
This account will require a predefined number of approvals (threshold) to execute transactions.
```move
public entry fun create_non_weighted_multisig_account(
account: &signer,
name: String, // name for make deterministic multisig address (account_addr + name)
members: vector,
threshold: u64
)
```
* `account`: The signer creating the multisig account.
* `name`: A name to generate a unique multisig address.
* `members`: A vector of addresses that will be members of the multisig account.
* `threshold`: The minimum number of approvals required to execute a transaction.
```ts InitiaJS
const msgCreateNonWeightedMultisigAccount = new MsgExecute(
multisigCreator.key.accAddress,
'0x1',
'multisig_v2',
'create_non_weighted_multisig_account',
[],
[
bcs.string().serialize(multisigName), // name
bcs
.vector(bcs.address())
.serialize([multisigCreator.key.accAddress, multisigMember1.key.accAddress, multisigMember2.key.accAddress]), // members
bcs.u64().serialize(2) // threshold
].map((v) => v.toBase64())
)
```
## Create a Proposal
Once the multisig account is established, members can create proposals for actions that require collective approval.
A proposal outlines the intended transaction or changes that need to be approved by the members.
```move
public entry fun create_proposal(
account: &signer,
multisig_addr: address,
module_address_list: vector,
module_name_list: vector,
function_name_list: vector,
type_args_list: vector>,
args_list: vector>>,
expiry_duration: Option
)
```
* `multisig_addr`: The address of the multisig account where the proposal is created.
* `module_address_list`: module addresses to be executed in the proposal.
* `module_name_list`: module names to be executed in the proposal.
* `function_name_list`: function names to be executed in the proposal.
* `type_args_list`: Type arguments required for the functions.
* `args_list`: Arguments for the functions.
* `expiry_duration`: Optional expiration duration for the proposal.
In this example, we will create two proposals.
The first proposal sends tokens using the `0x1::cosmos::stargate` function, and the second proposal sends tokens using the `0x1::coin::transfer` function.
```ts InitiaJS
// Proposal 1. send token with `0x1::cosmos::stargate` function
const recipient = 'init1nu7ujl76zac4pkdck8r2zve5zkjaus2xuz8thx'
const msgMiultiSigProposal1 = new MsgSend(
AccAddress.fromHex(multisigAddress),
recipient,
new Coins({ uinit: 1_000_000 })
)
// Proposal 2. send token with `0x1::coin::transfer` function
const msgMiultiSigProposal2Args = [
bcs.address().serialize(recipient), // recipient
bcs.object().serialize('0x8e4733bdabcf7d4afc3d14f0dd46c9bf52fb0fce9e4b996c939e195b8bc891d9'), // coin metadata
bcs.u64().serialize(1_000_000) // amount
]
const msgCreateProposal = new MsgExecute(
multisigCreator.key.accAddress,
'0x1',
'multisig_v2',
'create_proposal',
[],
[
bcs.address().serialize(multisigAddress), // multisig address
bcs.vector(bcs.address()).serialize(['0x1', '0x1']), // module addresses
bcs.vector(bcs.string()).serialize(['cosmos', 'coin']), // module names
bcs.vector(bcs.string()).serialize(['stargate', 'transfer']), // function names
bcs.vector(bcs.vector(bcs.string())).serialize([[], []]), // function type args
bcs.vector(bcs.vector(bcs.vector(bcs.u8()))).serialize([
[
[
...bcs
.vector(bcs.u8())
.serialize(Buffer.from(JSON.stringify(msgMiultiSigProposal1.toData())))
.toBytes()
]
],
msgMiultiSigProposal2Args.map((v) => v.toBytes())
]), // function args
bcs.option(bcs.u64()).serialize(null) // expiry duration
].map((v) => v.toBase64())
)
```
## Vote Proposal
Members of the multisig account can vote on active proposals. Each member can choose to approve or reject a proposal.
The proposal passes once it receives the minimum number of approvals defined by the threshold.
```move
public entry fun vote_proposal(
account: &signer,
multisig_addr: address,
proposal_id: u64,
vote_yes: bool
)
```
```ts InitiaJS
const msgVoteProposal1 = new MsgExecute(
multisigMember1.key.accAddress,
"0x1",
"multisig_v2",
"vote_proposal",
[],
[
bcs.address().serialize(multisigAddress),
bcs.u64().serialize(1),
bcs.bool().serialize(true),
].map((v) => v.toBase64())
)
```
## Execute Proposal
After a proposal has received enough approvals, it can be executed.
This action carries out the transactions or changes specified in the proposal.
```move
public entry fun execute_proposal(
account: &signer, multisig_addr: address, proposal_id: u64
)
```
* `multisig_addr`: The address of the multisig account where the proposal is created.
* `proposal_id`: The ID of the approved proposal to execute.
```ts InitiaJS
const msgExecuteProposal = new MsgExecute(
multisigCreator.key.accAddress,
"0x1",
"multisig_v2",
"execute_proposal",
[],
[
bcs.address().serialize(AccAddress.toHex(multisigAddress)),
bcs.u64().serialize(proposalId),
].map((v) => v.toBase64())
)
```
## Full Example
Below are two summarized examples demonstrating how to create a multisig account, create a proposal, vote on it, and execute it using `InitiaJS`:
* Token Transfer: Focuses on creating and executing a proposal that transfers tokens from the multisig account.
* Move Module Upgrade: Showcases how to propose and publish (or upgrade) a Move module via a multisig proposal.
```ts InitiaJS
// This example demonstrates how to use InitiaJS to:
// 1. Create a multisig account
// 2. Create a proposal
// 3. Vote on the proposal
// 4. Execute the proposal
//
// Steps are annotated with comments for clarity.
import {
AccAddress,
bcs,
Coins,
MnemonicKey,
MsgExecute,
MsgSend,
RESTClient,
Tx,
WaitTxBroadcastResult,
Wallet
} from '@initia/initia.js'
import { sha3_256 } from '@noble/hashes/sha3'
// A helper function to deterministically derive a multisig address
export function getMultisigAddress(creator: string, name: string) {
// The address scheme used when generating from seed
const OBJECT_FROM_SEED_ADDRESS_SCHEME = 0xfe
// Serialize the creator address into bytes via BCS
const addrBytes = Buffer.from(bcs.address().serialize(creator).toBytes()).toJSON().data
// Build a seed from the 'multisig_v2' definition and the given name
const seed = Buffer.from(`0x1::multisig_v2::MultisigWallet${name}`, 'ascii').toJSON().data
// Concatenate the address bytes, the seed, and append the scheme byte
const bytes = addrBytes.concat(seed)
bytes.push(OBJECT_FROM_SEED_ADDRESS_SCHEME)
// Hash the combined bytes using sha3_256, then convert to hex string
const sum = sha3_256.create().update(Buffer.from(bytes)).digest()
return Buffer.from(sum).toString('hex')
}
// Configure the REST client for Initia, including gas price/adjustment
const restClient = new RESTClient('https://rest.testnet.initia.xyz', {
gasPrices: '0.015uinit',
gasAdjustment: '1.5'
})
// Example mnemonic keys: 3 participants (multisigCreator, multisigMember1, multisigMember2)
const keys = [
'lawn gentle alpha display brave luxury aunt spot resource problem attend finish clown tilt outer security strike blush inspire gallery mesh law discover mad', // multisig creator
'leisure minimum grow fringe hamster divide leaf evidence bread lift maple rather matrix budget loop envelope warrior hill exotic raven access prevent pottery this', // multisig member 1
'game gown scorpion discover erase various crash nut ill leisure candy resemble tissue roast close dizzy dune speak rug exhaust body boss trip cherry' // multisig member 2
]
// Convert each mnemonic key to a Wallet instance
const accounts = keys.map((mnemonic) => new Wallet(restClient, new MnemonicKey({ mnemonic })))
async function main() {
let signedTx: Tx
let res: WaitTxBroadcastResult
// Destructure the accounts array for convenience
const [multisigCreator, multisigMember1, multisigMember2] = accounts
//
// ===========================
// Step 1: CREATE MULTISIG ACCOUNT
// ===========================
//
const multisigName = 'multisig_name'
// Create a MsgExecute to call 'create_non_weighted_multisig_account'
const msgCreateNonWeightedMultisigAccount = new MsgExecute(
multisigCreator.key.accAddress,
'0x1',
'multisig_v2',
'create_non_weighted_multisig_account',
[],
[
// 1. Multisig name (used in deterministic address generation)
bcs.string().serialize(multisigName),
// 2. Vector of members (3 participants)
bcs
.vector(bcs.address())
.serialize([
multisigCreator.key.accAddress,
multisigMember1.key.accAddress,
multisigMember2.key.accAddress
]),
// 3. Threshold (e.g., require 2 out of 3 approvals)
bcs.u64().serialize(2)
].map((v) => v.toBase64())
)
// Sign and broadcast the TX
signedTx = await multisigCreator.createAndSignTx({
msgs: [msgCreateNonWeightedMultisigAccount]
})
res = await restClient.tx.broadcast(signedTx)
console.log('Multisig account created. Tx hash:', res.txhash)
// The actual multisig address can be obtained from 'CreateMultisigAccountEvent'
// or from the helper function getMultisigAddress:
const multisigAddress = getMultisigAddress(
AccAddress.toHex(multisigCreator.key.accAddress),
multisigName
)
//
// ===========================
// Step 2: CREATE PROPOSAL
// ===========================
//
// 1) First, fund the multisig so it has enough balance to execute future transactions
const msgFundtoMultisig = new MsgSend(
multisigCreator.key.accAddress,
AccAddress.fromHex(multisigAddress),
new Coins({ uinit: 5_000_000 })
)
signedTx = await multisigCreator.createAndSignTx({
msgs: [msgFundtoMultisig]
})
res = await restClient.tx.broadcast(signedTx)
console.log('Funded the multisig address. Tx hash:', res.txhash)
// 2) Create proposals
// Proposal 1: send tokens using `0x1::cosmos::stargate` function
const recipient = 'init1nu7ujl76zac4pkdck8r2zve5zkjaus2xuz8thx'
const msgMiultiSigProposal1 = new MsgSend(
AccAddress.fromHex(multisigAddress),
recipient,
new Coins({ uinit: 1_000_000 })
)
// Proposal 2: send tokens using `0x1::coin::transfer` function
// We need to serialize the arguments in BCS
const msgMiultiSigProposal2Args = [
bcs.address().serialize(recipient), // recipient
bcs.object().serialize('0x8e4733bdabcf7d4afc3d14f0dd46c9bf52fb0fce9e4b996c939e195b8bc891d9'), // coin metadata
bcs.u64().serialize(1_000_000) // amount
]
// Use create_proposal to bundle both proposals
const msgCreateProposal = new MsgExecute(
multisigCreator.key.accAddress,
'0x1',
'multisig_v2',
'create_proposal',
[],
[
bcs.address().serialize(multisigAddress), // multisig address
bcs.vector(bcs.address()).serialize(['0x1', '0x1']), // module addresses
bcs.vector(bcs.string()).serialize(['cosmos', 'coin']), // module names
bcs.vector(bcs.string()).serialize(['stargate', 'transfer']), // function names
bcs.vector(bcs.vector(bcs.string())).serialize([[], []]), // no type args
bcs.vector(bcs.vector(bcs.vector(bcs.u8()))).serialize([
[
[
// Arguments for the first proposal (stargate)
...bcs
.vector(bcs.u8())
.serialize(Buffer.from(JSON.stringify(msgMiultiSigProposal1.toData())))
.toBytes()
]
],
// Arguments for the second proposal (coin::transfer)
msgMiultiSigProposal2Args.map((v) => v.toBytes())
]),
bcs.option(bcs.u64()).serialize(null) // optional expiry duration (null)
].map((v) => v.toBase64())
)
// Broadcast the proposal creation
signedTx = await multisigCreator.createAndSignTx({
msgs: [msgCreateProposal]
})
res = await restClient.tx.broadcast(signedTx)
console.log('Proposal created. Tx hash:', res.txhash)
//
// ===========================
// Step 3: VOTE ON PROPOSAL
// ===========================
//
// Assume the proposal ID is 1
const proposalId = 1
const msgVoteProposal1 = new MsgExecute(
multisigMember1.key.accAddress,
'0x1',
'multisig_v2',
'vote_proposal',
[],
[
bcs.address().serialize(multisigAddress),
bcs.u64().serialize(proposalId),
bcs.bool().serialize(true) // yes vote
].map((v) => v.toBase64())
)
signedTx = await multisigMember1.createAndSignTx({
msgs: [msgVoteProposal1]
})
res = await restClient.tx.broadcast(signedTx)
console.log('Member 1 voted YES. Tx hash:', res.txhash)
// Member 2 also votes YES
const msgVoteProposal2 = new MsgExecute(
multisigMember2.key.accAddress,
'0x1',
'multisig_v2',
'vote_proposal',
[],
[
bcs.address().serialize(multisigAddress),
bcs.u64().serialize(proposalId),
bcs.bool().serialize(true)
].map((v) => v.toBase64())
)
signedTx = await multisigMember2.createAndSignTx({
msgs: [msgVoteProposal2]
})
res = await restClient.tx.broadcast(signedTx)
console.log('Member 2 voted YES. Tx hash:', res.txhash)
//
// ===========================
// Step 4: EXECUTE PROPOSAL
// ===========================
//
// Since we have 2 out of 3 votes, the threshold is met, so we can execute.
const msgExecuteProposal = new MsgExecute(
multisigCreator.key.accAddress,
'0x1',
'multisig_v2',
'execute_proposal',
[],
[
bcs.address().serialize(multisigAddress),
bcs.u64().serialize(proposalId)
].map((v) => v.toBase64())
)
signedTx = await multisigCreator.createAndSignTx({
msgs: [msgExecuteProposal]
})
res = await restClient.tx.broadcast(signedTx)
console.log('Proposal executed. Tx hash:', res.txhash)
}
main()
```
```ts InitiaJS
// This example also uses InitiaJS to demonstrate:
// 1. Creating a multisig account
// 2. Creating a proposal (in this case, publishing or upgrading a Move module)
// 3. Voting on the proposal
// 4. Executing the proposal
//
// Comments are included to clarify each step.
import {
bcs,
MnemonicKey,
MsgExecute,
RESTClient,
Wallet,
} from '@initia/initia.js';
import { SHA3 } from 'sha3';
import * as fs from 'fs';
// Configure the REST client
const restClient = new RESTClient('https://rest.testnet.initia.xyz', {
chainId: 'initiation-2',
gasPrices: '0.015uinit',
gasAdjustment: '2.0',
});
// Three sample keys (3 participants)
const keys = [
new MnemonicKey({
mnemonic: '0...',
}),
new MnemonicKey({
mnemonic: '1...',
}),
new MnemonicKey({
mnemonic: '2...',
}),
];
// Convert each to a Wallet
const wallets = keys.map(key => new Wallet(restClient, key));
// A readable name for the multisig
const multisigName = 'multisig account';
// ------------------------------------------------------------------------------------
// getMultisigAccountAddress: A helper to derive the multisig address deterministically
// ------------------------------------------------------------------------------------
function getMultisigAccountAddress(creator: string, name: string) {
const seed = [
...Buffer.from('0x1::multisig_v2::MultisigWallet'),
...Buffer.from(name),
];
// Combine the creator address (serialized) + seed + scheme(0xfe) and SHA3_256 hash them
const address = bcs.address().fromBase64(
sha3_256(
Buffer.from([
...bcs.address().serialize(creator).toBytes(),
...seed,
0xfe, // OBJECT_FROM_SEED_ADDRESS_SCHEME
])
).toString('base64')
);
return address;
}
// A simple wrapper for sha3_256 hashing
export function sha3_256(value: Buffer): Buffer {
return new SHA3(256).update(value).digest();
}
// ------------------------------------------------------------------------------------
// createMultisigAccount: Example of creating a non-weighted multisig
// ------------------------------------------------------------------------------------
async function createMultisigAccount() {
const msgs = [
new MsgExecute(
keys[0].accAddress, // The creator of the multisig
'0x1',
'multisig_v2',
'create_non_weighted_multisig_account', // Alternatively: create_weighted_multisig_account
[],
[
// 1. The multisig name (used for deterministic address)
bcs.string().serialize(multisigName).toBase64(),
// 2. All members in this multisig
bcs
.vector(bcs.address())
.serialize(keys.map(key => key.accAddress))
.toBase64(),
// 3. The threshold. e.g., 2 out of 3
bcs.u64().serialize(2).toBase64(),
]
),
];
// Sign and broadcast
const signedTx = await wallets[0].createAndSignTx({ msgs });
const broadcastRes = await restClient.tx.broadcastSync(signedTx);
console.log('[createMultisigAccount] broadcastRes:', broadcastRes);
// You can obtain the multisig address from the transaction event.
}
// ------------------------------------------------------------------------------------
// createProposal: Example of creating a proposal to publish/upgrade a Move module
// ------------------------------------------------------------------------------------
async function createProposal() {
const multisigAddr = getMultisigAccountAddress(
keys[0].accAddress,
multisigName
);
// Example: reading a compiled Move module file to be published
const codeBytes = fs.readFileSync('./test.mv'); // Replace with your actual module file
// Construct the MsgExecute for creating the proposal
const msgs = [
new MsgExecute(
keys[0].accAddress,
'0x1',
'multisig_v2',
'create_proposal',
[],
[
bcs.address().serialize(multisigAddr).toBase64(), // multisig address
bcs.vector(bcs.address()).serialize(['0x1']).toBase64(), // module addresses
bcs.vector(bcs.string()).serialize(['code']).toBase64(), // module names
bcs.vector(bcs.string()).serialize(['publish_v2']).toBase64(), // function names
bcs.vector(bcs.vector(bcs.string())).serialize([[]]).toBase64(), // type args
bcs
.vector(bcs.vector(bcs.vector(bcs.u8())))
.serialize([
[
// 1) The code bytes
bcs
.vector(bcs.vector(bcs.u8()))
.serialize([codeBytes]) // the actual compiled bytecode
.toBytes(),
// 2) The upgrade policy
bcs.u8().serialize(1).toBytes(),
],
])
.toBase64(),
bcs.option(bcs.u64()).serialize(null).toBase64(), // optional expiry
]
),
];
// Broadcast
const signedTx = await wallets[0].createAndSignTx({ msgs });
const broadcastRes = await restClient.tx.broadcastSync(signedTx);
console.log('[createProposal] broadcastRes:', broadcastRes);
// Retrieve the proposal ID from the transaction event or by querying `get_proposals`.
}
// ------------------------------------------------------------------------------------
// vote_proposal: Another member votes on the proposal
// ------------------------------------------------------------------------------------
async function vote_proposal() {
const multisigAddr = getMultisigAccountAddress(
keys[0].accAddress,
multisigName
);
// For example, we assume proposal ID = 1
const proposalId = 1;
// We need 2 votes to pass. The creator might have auto-voted. So one more vote from another member.
const msgs = [
new MsgExecute(
keys[1].accAddress, // The second member
'0x1',
'multisig_v2',
'vote_proposal',
[],
[
bcs.address().serialize(multisigAddr).toBase64(),
bcs.u64().serialize(proposalId).toBase64(),
bcs.bool().serialize(true).toBase64(), // vote YES
]
),
];
// Broadcast the vote
const signedTx = await wallets[1].createAndSignTx({ msgs });
const broadcastRes = await restClient.tx.broadcastSync(signedTx);
console.log('[vote_proposal] broadcastRes:', broadcastRes);
}
// ------------------------------------------------------------------------------------
// execute_proposal: Execute the proposal once the threshold is met
// ------------------------------------------------------------------------------------
async function execute_proposal() {
const multisigAddr = getMultisigAccountAddress(
keys[0].accAddress,
multisigName
);
// We'll execute proposal ID = 1
const msgs = [
new MsgExecute(
keys[0].accAddress, // The one executing
'0x1',
'multisig_v2',
'execute_proposal',
[],
[
bcs.address().serialize(multisigAddr).toBase64(), // multisig address
bcs.u64().serialize(1).toBase64(), // proposal ID
]
),
];
// Sign and broadcast
const signedTx = await wallets[0].createAndSignTx({ msgs });
const broadcastRes = await restClient.tx.broadcastSync(signedTx);
console.log('[execute_proposal] broadcastRes:', broadcastRes);
}
// Execute an example
execute_proposal();
```
# Using Connect Oracle
Source: https://docs.initia.xyz/developers/developer-guides/vm-specific-tutorials/wasmvm/connect-oracles
To query prices from Connect oracle on WasmVM, you need to utilize the queries provided by the [wasm-connect-query](https://github.com/initia-labs/wasm-connect-query) contract. Specifically, the contract provides 3 queries:
1. `GetAllCurrencyPairs`: Returns all of the currently supported asset pairs
2. `GetPrice`: Returns the price of a single asset pair
3. `GetPrices`: Returns the price of multiple asset pairs
## Integrating the Queries into Your Contract
To make the queries from your own contracts, you can copy the `packages` folder found in the wasm-connect-query contract repository into your own project. This folder contains the necessary files and definitions to make the queries from your own contracts.
See [here](https://github.com/initia-labs/examples/tree/main/wasmvm/examples) for an example contract that integrated the queries.
The way that you use each query and the response structure returned from each is then outlined below.
### GetAllCurrencyPairs
This query takes no arguments and returns the list of all of the currently supported asset pairs.
**Example Usage (Simplified)**
```rust
#[derive(Clone, Debug, PartialEq, Deserialize, Serialize, JsonSchema)]
pub struct GetAllCurrencyPairsResponse {
pub currency_pairs: Vec,
}
#[derive(Clone, Debug, PartialEq, Deserialize, Serialize, JsonSchema)]
#[allow(non_snake_case)]
pub struct CurrencyPairResponse {
pub Base: String,
pub Quote: String,
}
pub fn example_get_all_curreny_pairs(deps: Deps) -> StdResult {
let state = STATE.load(deps.storage)?;
let connect_addr = state.connect;
deps.querier.query(&QueryRequest::Wasm(WasmQuery::Smart {
contract_addr: connect_addr.to_string(),
msg: to_json_binary(&connect_wasm::oracle::QueryMsg::GetAllCurrencyPairs {})?,
}))
}
```
The response is of type `GetAllCurrencyPairsResponse` and is in the following form:
**Example Response**
```json
{
"data": {
"currency_pairs": [
{
"Base": "AAVE",
"Quote": "USD"
},
{
"Base": "ADA",
"Quote": "USD"
}
]
}
}
```
## GetPrice
This query takes two arguments: `base` and `quote`, which represent the base and quote asset symbol strings of the asset pair you want to query. Note that the `base` and `quote` pair must be supported by Connect and be included in the `GetAllCurrencyPairsResponse`. For example, "BTC" and "USD" is a valid pair, but "BTC" and "AAVE" is not.
**Example Usage (Simplified)**
```rust
#[derive(Clone, Debug, PartialEq, Deserialize, Serialize, JsonSchema)]
pub struct QuotePrice {
pub price: Uint256,
pub block_timestamp: Timestamp,
pub block_height: u64,
}
#[derive(Clone, Debug, PartialEq, Deserialize, Serialize, JsonSchema)]
pub struct GetPriceResponse {
pub price: QuotePrice,
pub nonce: u64,
pub decimals: u64,
pub id: u64,
}
pub fn example_get_price(deps: Deps) -> StdResult {
let state = STATE.load(deps.storage)?;
let connect_addr = state.connect;
let base_asset = "BTC";
let quote_asset = "USD";
deps.querier.query(&QueryRequest::Wasm(WasmQuery::Smart {
contract_addr: connect_addr.to_string(),
msg: to_json_binary(&connect_wasm::oracle::QueryMsg::GetPrice {
base: base_asset.to_string(),
quote: quote_asset.to_string(),
})?,
}))
}
```
**Example Response**
```json
{
"data": {
"price": {
"price": "5719601000",
"block_timestamp": "1720511108184124288",
"block_height": 2924966
},
"nonce": 1195438,
"decimals": 5,
"id": 2
}
}
```
## GetPrices
This query takes a list of asset pair IDs and returns the prices of the asset pairs. Unlike for `GetPrice`, the pair IDs are not an object symbol, but instead a single string in the format `{base}/{quote}`. For example, `BTC/USD` or `ETH/USD`.
**Example Usage (Simplified)**
```rust
#[derive(Clone, Debug, PartialEq, Deserialize, Serialize, JsonSchema)]
pub struct QuotePrice {
pub price: Uint256,
pub block_timestamp: Timestamp,
pub block_height: u64,
}
#[derive(Clone, Debug, PartialEq, Deserialize, Serialize, JsonSchema)]
pub struct GetPriceResponse {
pub price: QuotePrice,
pub nonce: u64,
pub decimals: u64,
pub id: u64,
}
#[derive(Clone, Debug, PartialEq, Deserialize, Serialize, JsonSchema)]
pub struct GetPricesResponse {
pub prices: Vec,
}
pub fn example_get_prices(deps: Deps) -> StdResult {
let state = STATE.load(deps.storage)?;
let connect_addr = state.connect;
let pair_ids = vec!["BTC/USD".to_string(), "ETH/USD".to_string()];
deps.querier.query(&QueryRequest::Wasm(WasmQuery::Smart {
contract_addr: connect_addr.to_string(),
msg: to_json_binary(&connect_wasm::oracle::QueryMsg::GetPrices { pair_ids })?,
}))
}
```
**Example Response**
```json
{
"data": {
"prices": [
{
"price": {
"price": "5720974000",
"block_timestamp": "1720511618058897916",
"block_height": 2925527
},
"nonce": 1195719,
"decimals": 5,
"id": 2
},
{
"price": {
"price": "3065580000",
"block_timestamp": "1720511618058897916",
"block_height": 2925527
},
"nonce": 1195719,
"decimals": 6,
"id": 59
}
]
}
}
```
# WasmVM IBC Hooks
Source: https://docs.initia.xyz/developers/developer-guides/vm-specific-tutorials/wasmvm/ibc-hooks
The Wasm hook is an IBC middleware which is used to allow ICS20 token transfers to initiate contract calls. This allows cross-chain contract calls, that involve token movement. This is useful for a variety of usecases. One of primary importance is cross-chain swaps, which is an extremely powerful primitive.
The mechanism enabling this is a `memo` field on every ICS20 or ICS721 transfer packet as of [IBC v3.4.0](https://medium.com/the-interchain-foundation/moving-beyond-simple-token-transfers-d42b2b1dc29b). Wasm hooks is an IBC middleware that parses an ICS20 transfer, and if the memo field is of a particular form, executes a wasm contract call. We now detail the memo format for wasm contract calls, and the execution guarantees provided.
# Cosmwasm Contract Execution Format
Before we dive into the IBC metadata format, we show the CosmWasm execute message format, so the reader has a sense of what are the fields we need to be setting in. The CosmWasm `MsgExecuteContract` is defined [here](https://github.com/CosmWasm/wasmd/blob/4fe2fbc8f322efdaf187e2e5c99ce32fd1df06f0/x/wasm/types/tx.pb.go#L340-L349) as the following type:
```go
// HookData defines a wrapper for wasm execute message
// and async callback.
type HookData struct {
// Message is a wasm execute message which will be executed
// at `OnRecvPacket` of receiver chain.
Message *wasmtypes.MsgExecuteContract `json:"message,omitempty"`
// AsyncCallback is a contract address
AsyncCallback string `json:"async_callback,omitempty"`
}
type MsgExecuteContract struct {
// Sender is the actor that committed the message in the sender chain
Sender string
// Contract is the address of the smart contract
Contract string
// Msg json encoded message to be passed to the contract
Msg RawContractMessage
// Funds coins that are transferred to the contract on execution
Funds sdk.Coins
}
```
So we detail where we want to get each of these fields from:
* `Sender`: We cannot trust the sender of an IBC packet, the counterparty chain has full ability to lie about it. We cannot risk this sender being confused for a particular user or module address on Osmosis. So we replace the sender with an account to represent the sender prefixed by the channel and a wasm module prefix. This is done by setting the sender to Bech32(Hash("ibc-wasm-hook-intermediary" || channelID || sender)), where the channelId is the channel id on the local chain.
* `Contract`: This field should be directly obtained from the ICS-20 packet metadata
* `Msg`: This field should be directly obtained from the ICS-20 packet metadata.
* `Funds`: This field is set to the amount of funds being sent over in the ICS 20 packet. One detail is that the denom in the packet is the counterparty chains representation of the denom, so we have to translate it to Osmosis' representation.
Due to a [bug](https://x.com/SCVSecurity/status/1682329758020022272) in the packet forward middleware, we cannot trust the sender from chains that use PFM. Until that is fixed, we recommend chains to not trust the sender on contracts executed via IBC hooks.
```go
msg := MsgExecuteContract{
// Sender is the that actor that signed the messages
Sender: "init1-hash-of-channel-and-sender",
// Contract is the address of the smart contract
Contract: packet.data.memo["wasm"]["contract"],
// Msg json encoded message to be passed to the contract
Msg: packet.data.memo["wasm"]["msg"],
// Funds coins that are transferred to the contract on execution
Funds: sdk.NewCoin{Denom: ibc.ConvertSenderDenomToLocalDenom(packet.data.Denom), Amount: packet.data.Amount}
}
```
# ICS20 packet structure
So given the details above, we propagate the implied ICS20 packet data structure. ICS20 is JSON native, so we use JSON for the memo format.
```json
{
//... other ibc fields that we don't care about
"data":{
"denom": "denom on counterparty chain (e.g. uatom)", // will be transformed to the local denom (ibc/...)
"amount": "1000",
"sender": "addr on counterparty chain", // will be transformed
"receiver": "contract addr or blank",
"memo": {
"wasm": {
"contract": "init1contractAddr",
"msg": {
"raw_message_fields": "raw_message_data",
},
"funds": [
{"denom": "ibc/denom", "amount": "100"}
]
}
}
}
}
```
An ICS20 packet is formatted correctly for wasmhooks iff the following all hold:
* [x] `memo` is not blank
* [x] `memo` is valid JSON
* [x] `memo` has at least one key, with value `"wasm"`
* [x] `memo["wasm"]["message"]` has exactly two entries, `"contract"`, `"msg"` and `"fund"`
* [x] `memo["wasm"]["message"]["msg"]` is a valid JSON object
* [x] `receiver` == "" || `receiver` == `memo["wasm"]["contract"]`
We consider an ICS20 packet as directed towards wasmhooks iff all of the following hold:
* [x] `memo` is not blank
* [x] `memo` is valid JSON
* [x] `memo` has at least one key, with name `"wasm"`
If an ICS20 packet is not directed towards wasmhooks, wasmhooks doesn't do anything. If an ICS20 packet is directed towards wasmhooks, and is formatted incorrectly, then wasmhooks returns an error.
# Execution flow
Pre Wasm hooks:
* Ensure the incoming IBC packet is cryptographically valid
* Ensure the incoming IBC packet is not timed out.
In Wasm hooks, pre packet execution:
* Ensure the packet is correctly formatted (as defined above)
* Edit the receiver to be the hardcoded IBC module account
In Wasm hooks, post packet execution:
* Construct wasm message as defined before
* Execute wasm message
* if wasm message has error, return ErrAck
* otherwise continue through middleware
# Ack callbacks
A contract that sends an IBC transfer, may need to listen for the ACK from that packet. To allow contracts to listen on the ack of specific packets, we provide Ack callbacks.
## Design
The sender of an IBC transfer packet may specify a callback for when the ack of that packet is received in the memo field of the transfer packet.
Crucially, only the IBC packet sender can set the callback.
## Use case
The crosschain swaps implementation sends an IBC transfer. If the transfer were to fail, we want to allow the sender to be able to retrieve their funds (which would otherwise be stuck in the contract). To do this, we allow users to retrieve the funds after the timeout has passed, but without the ack information, we cannot guarantee that the send hasn't failed (i.e.: returned an error ack notifying that the receiving change didn't accept it)
# Implementation
## Callback information in memo
For the callback to be processed, the transfer packet's memo should contain the following in its JSON:
```json
{
"wasm": {
"async_callback": "init1contractAddr"
}
}
```
When an ack is received, it will notify the specified contract via a sudo message.
## Interface for receiving the Acks and Timeouts
The contract that awaits the callback should implement the following interface for a sudo message:
```rust
#[cw_serde]
pub enum IBCLifecycleComplete {
#[serde(rename = "ibc_ack")]
IBCAck {
/// The source channel (miniwasm side) of the IBC packet
channel: String,
/// The sequence number that the packet was sent with
sequence: u64,
/// String encoded version of the ack as seen by OnAcknowledgementPacket(..)
ack: String,
/// Weather an ack is a success of failure according to the transfer spec
success: bool,
},
#[serde(rename = "ibc_timeout")]
IBCTimeout {
/// The source channel (miniwasm side) of the IBC packet
channel: String,
/// The sequence number that the packet was sent with
sequence: u64,
},
}
/// Message type for `sudo` entry_point
#[cw_serde]
pub enum SudoMsg {
#[serde(rename = "ibc_lifecycle_complete")]
IBCLifecycleComplete(IBCLifecycleComplete),
}
```
# Tutorials
This tutorial will guide you through the process of deploying a Wasm contract and calling it from another chain using IBC hooks.
We will use IBC hook from Initia chain to call a Wasm contract on MiniWasm chain in this example.
## Step 1. Deploy a Wasm contract
```rust
// ...
#[entry_point]
pub fn execute(deps: DepsMut, env: Env, info: MessageInfo, msg: ExecuteMsg) -> StdResult {
match msg {
ExecuteMsg::SimpleTransfer { amount, denom, receiver } => simple_transfer(deps, env, info, amount, denom, receiver),
}
}
pub fn simple_transfer(
_deps: DepsMut,
_env: Env,
_info: MessageInfo,
amount: u128,
denom: String,
receiver: String,
) -> StdResult {
let mut messages: Vec = vec![];
messages.push(CosmosMsg::Bank(BankMsg::Send {
to_address: receiver,
amount: coins(amount, denom)
}));
Ok(Response::new().add_messages(messages))
}
// ...
```
## Step 2. Update IBC hook ACL for the contract
IBC hook has strong power to execute any functions in counterparty chain and this can be used for fishing easily.
So, we need to set the ACL for the contract to prevent unauthorized access.
To update MiniWasm ACL, you need to use `MsgExecuteMessages` in OPchild module.
```typescript
const aclMsg = new MsgUpdateACL(
'init10d07y265gmmuvt4z0w9aw880jnsr700j55nka3', // authority
'init1436kxs0w2es6xlqpp9rd35e3d0cjnw4sv8j3a7483sgks29jqwgs9nxzw8', // contract address
true // allow
)
const msgs = [
new MsgExecuteMessages(
proposer.key.accAddress,
[aclMsg]
)
]
const signedTx = await proposer.createAndSignTx({ msgs })
await proposer.rest.tx.broadcast(signedTx).then(res => console.log(res))
```
```bash
curl -X GET "https://rest.miniwasm-2.initia.xyz/initia/ibchooks/v1/acls" -H "accept: application/json"
```
Response:
```json
{
"acls": [
{
"address": "init1436kxs0w2es6xlqpp9rd35e3d0cjnw4sv8j3a7483sgks29jqwgs9nxzw8",
"allowed": true
}
],
"pagination": {
"next_key": null,
"total": "1"
}
}
```
## Step 3. Execute IBC Hooks Message
After the contract is deployed and the ACL is set, we can execute the IBC hooks message to call the contract.
```typescript
import { Coin, Height, RESTClient, MnemonicKey, MsgTransfer, sha256, Wallet } from "@initia/initia.js";
function createHook(params: object) {
const hook = { wasm: { message: params } }
return JSON.stringify(hook)
}
function ibcDenom(channelId: string, denom: string) {
const fullTrace = `transfer/${channelId}/${denom}`;
const shaSum = sha256(Buffer.from(fullTrace));
const hash = Buffer.from(shaSum).toString('hex').toUpperCase();
return `ibc/${hash}`;
}
async function main() {
const l1RestClient = new RESTClient('https://rest.testnet.initia.xyz', {
gasAdjustment: '1.75',
gasPrices: '0.015uinit' // set l1 gas price
})
const sender = new Wallet(
l1RestClient,
new MnemonicKey({
mnemonic: 'power elder gather acoustic ...'
})
)
const recipientAddress = "init1wgl839zxdh5c89mvc4ps97wyx6ejjygxs4qmcx"
const tokenPair = await l1RestClient.ophost.tokenPairByL1Denom(2, "uinit") // { l1_denom: 'uinit', l2_denom: 'l2/2588fd87a8e081f6a557f43ff14f05dddf5e34cb27afcefd6eaf81f1daea30d0' }
const denom = ibcDenom("channel-0", tokenPair.l1_denom) // use IBC channel on MiniWasm side
const amount = "1000"
const msgs = [
new MsgTransfer(
'transfer',
'channel-2',
new Coin(tokenPair.l1_denom, amount),
sender.key.accAddress,
"init1436kxs0w2es6xlqpp9rd35e3d0cjnw4sv8j3a7483sgks29jqwgs9nxzw8", // IBC hook receiver = `ModuleAddress::ModuleName::FunctionName`
new Height(0, 0),
((new Date().valueOf() + 100000) * 1000000).toString(),
createHook({
contract: "init1436kxs0w2es6xlqpp9rd35e3d0cjnw4sv8j3a7483sgks29jqwgs9nxzw8",
msg : {
"simple_transfer": {
amount: Number(amount),
denom: denom,
receiver: recipientAddress,
}
},
funds: [
{"denom": denom, "amount": amount}
]
})
)
]
const signedTx = await sender.createAndSignTx({ msgs });
await l1RestClient.tx.broadcastSync(signedTx).then(res => console.log(res));
}
main()
```
# Introduction
Source: https://docs.initia.xyz/developers/introduction
This section outlines the basic of developing on Initia and the various Interwoven Rollups.
# Introduction
Source: https://docs.initia.xyz/home/core-concepts/enshrined-liquidity/introduction
Enshrined Liquidity is Initia’s solution to address some inherent challenges of the Proof of Stake (PoS) and rollup models. These challenges include:
1. Trade-offs between chain security and liquidity
2. Lack of capital efficiency
3. Liquidity fragmentation
This solution allows governance-whitelisted InitiaDEX INIT-TOKEN liquidity positions to be used as staking assets with validators, in addition to the native INIT token. This approach helps alleviate the aforementioned issues in several ways.
## Maximizing Chain Security and Liquidity
In traditional PoS models, token holders can stake their assets with validators to secure the chain and earn rewards. However, this creates a tradeoff: the more assets staked, the more secure the chain, but fewer assets are available as liquidity within the application layer. This tradeoff impacts both chain security and liquidity.
By enabling liquidity positions to be staked, users can simultaneously increase the chain’s security and promote liquidity growth while earning rewards from both staking and liquidity provision.
## Enhancing Capital Efficiency
From a user perspective, having to choose between staking assets and providing liquidity also means sacrificing either trading fees or staking rewards. Users aiming to earn both rewards then needs to split their capital into multiple positions, reducing their overall capital efficiency.
By being able to used liquidity positions as staking assets, Enshrined Liquidity eliminates the need to choose between staking and liquidity provision. Users can now earn both staking rewards and trading fees from a single position, leading to improved capital efficiency and a streamlined approach to capital allocation.
# Whitelisting and Rewards
Source: https://docs.initia.xyz/home/core-concepts/enshrined-liquidity/whitelisting-and-rewards
## Eligibility
To be eligible for staking and earning rewards on InitiaDEX, an LP pair must be whitelisted through L1 governance. Before whitelisting, the LP token must meet the following prerequisites:
1. The LP token must include INIT as part of its pair.
2. For Balancer pool positions, the INIT weight within the pool must be equal to or greater than 50%.
## Determining Rewards and Reward Weights
When a new LP token $a$ is whitelisted, the proposal must also include a suggested reward weight $w_a$ for the token. This weight represents the relative amount of rewards allocated to the token per block compared to the overall distribution among all whitelisted tokens. This weight can be later adjusted by governance once the asset is whitelisted..
To determine the distribution of rewards per token per block for a stakable asset $a$ among $N$ total stakable assets, we use the following formula that incorporates individual reward weights:
$$
r_a = \frac{w_a \cdot r_{\text{total}}}{\sum_{i=1}^{N} w_i}
$$
where:
* $r_a$ represents the inflationary INIT rewards for the asset $a$.
* $r_{\text{total}}$ denotes the total INIT rewards allocated for a given block.
* $w_a$ is the governance-set reward weight parameter for the asset $a$.
* $\sum_{i=1}^{N} w_i$ is the sum of reward weights for all $N$ whitelisted tokens.
# Tokenomics
Source: https://docs.initia.xyz/home/core-concepts/init-token/tokenomics
## Introduction
Initia's native token, \$INIT, has a fixed supply of 1 billion (1,000,000,000) tokens. These tokens are split across eight major categories as outlined below.
| Category | Amount | % of Supply | Vesting |
| ----------------------------- | ------ | ----------- | -------------------------------------------------------------------------------------------------------------------------------------------------------------------------------------------------------------------------- |
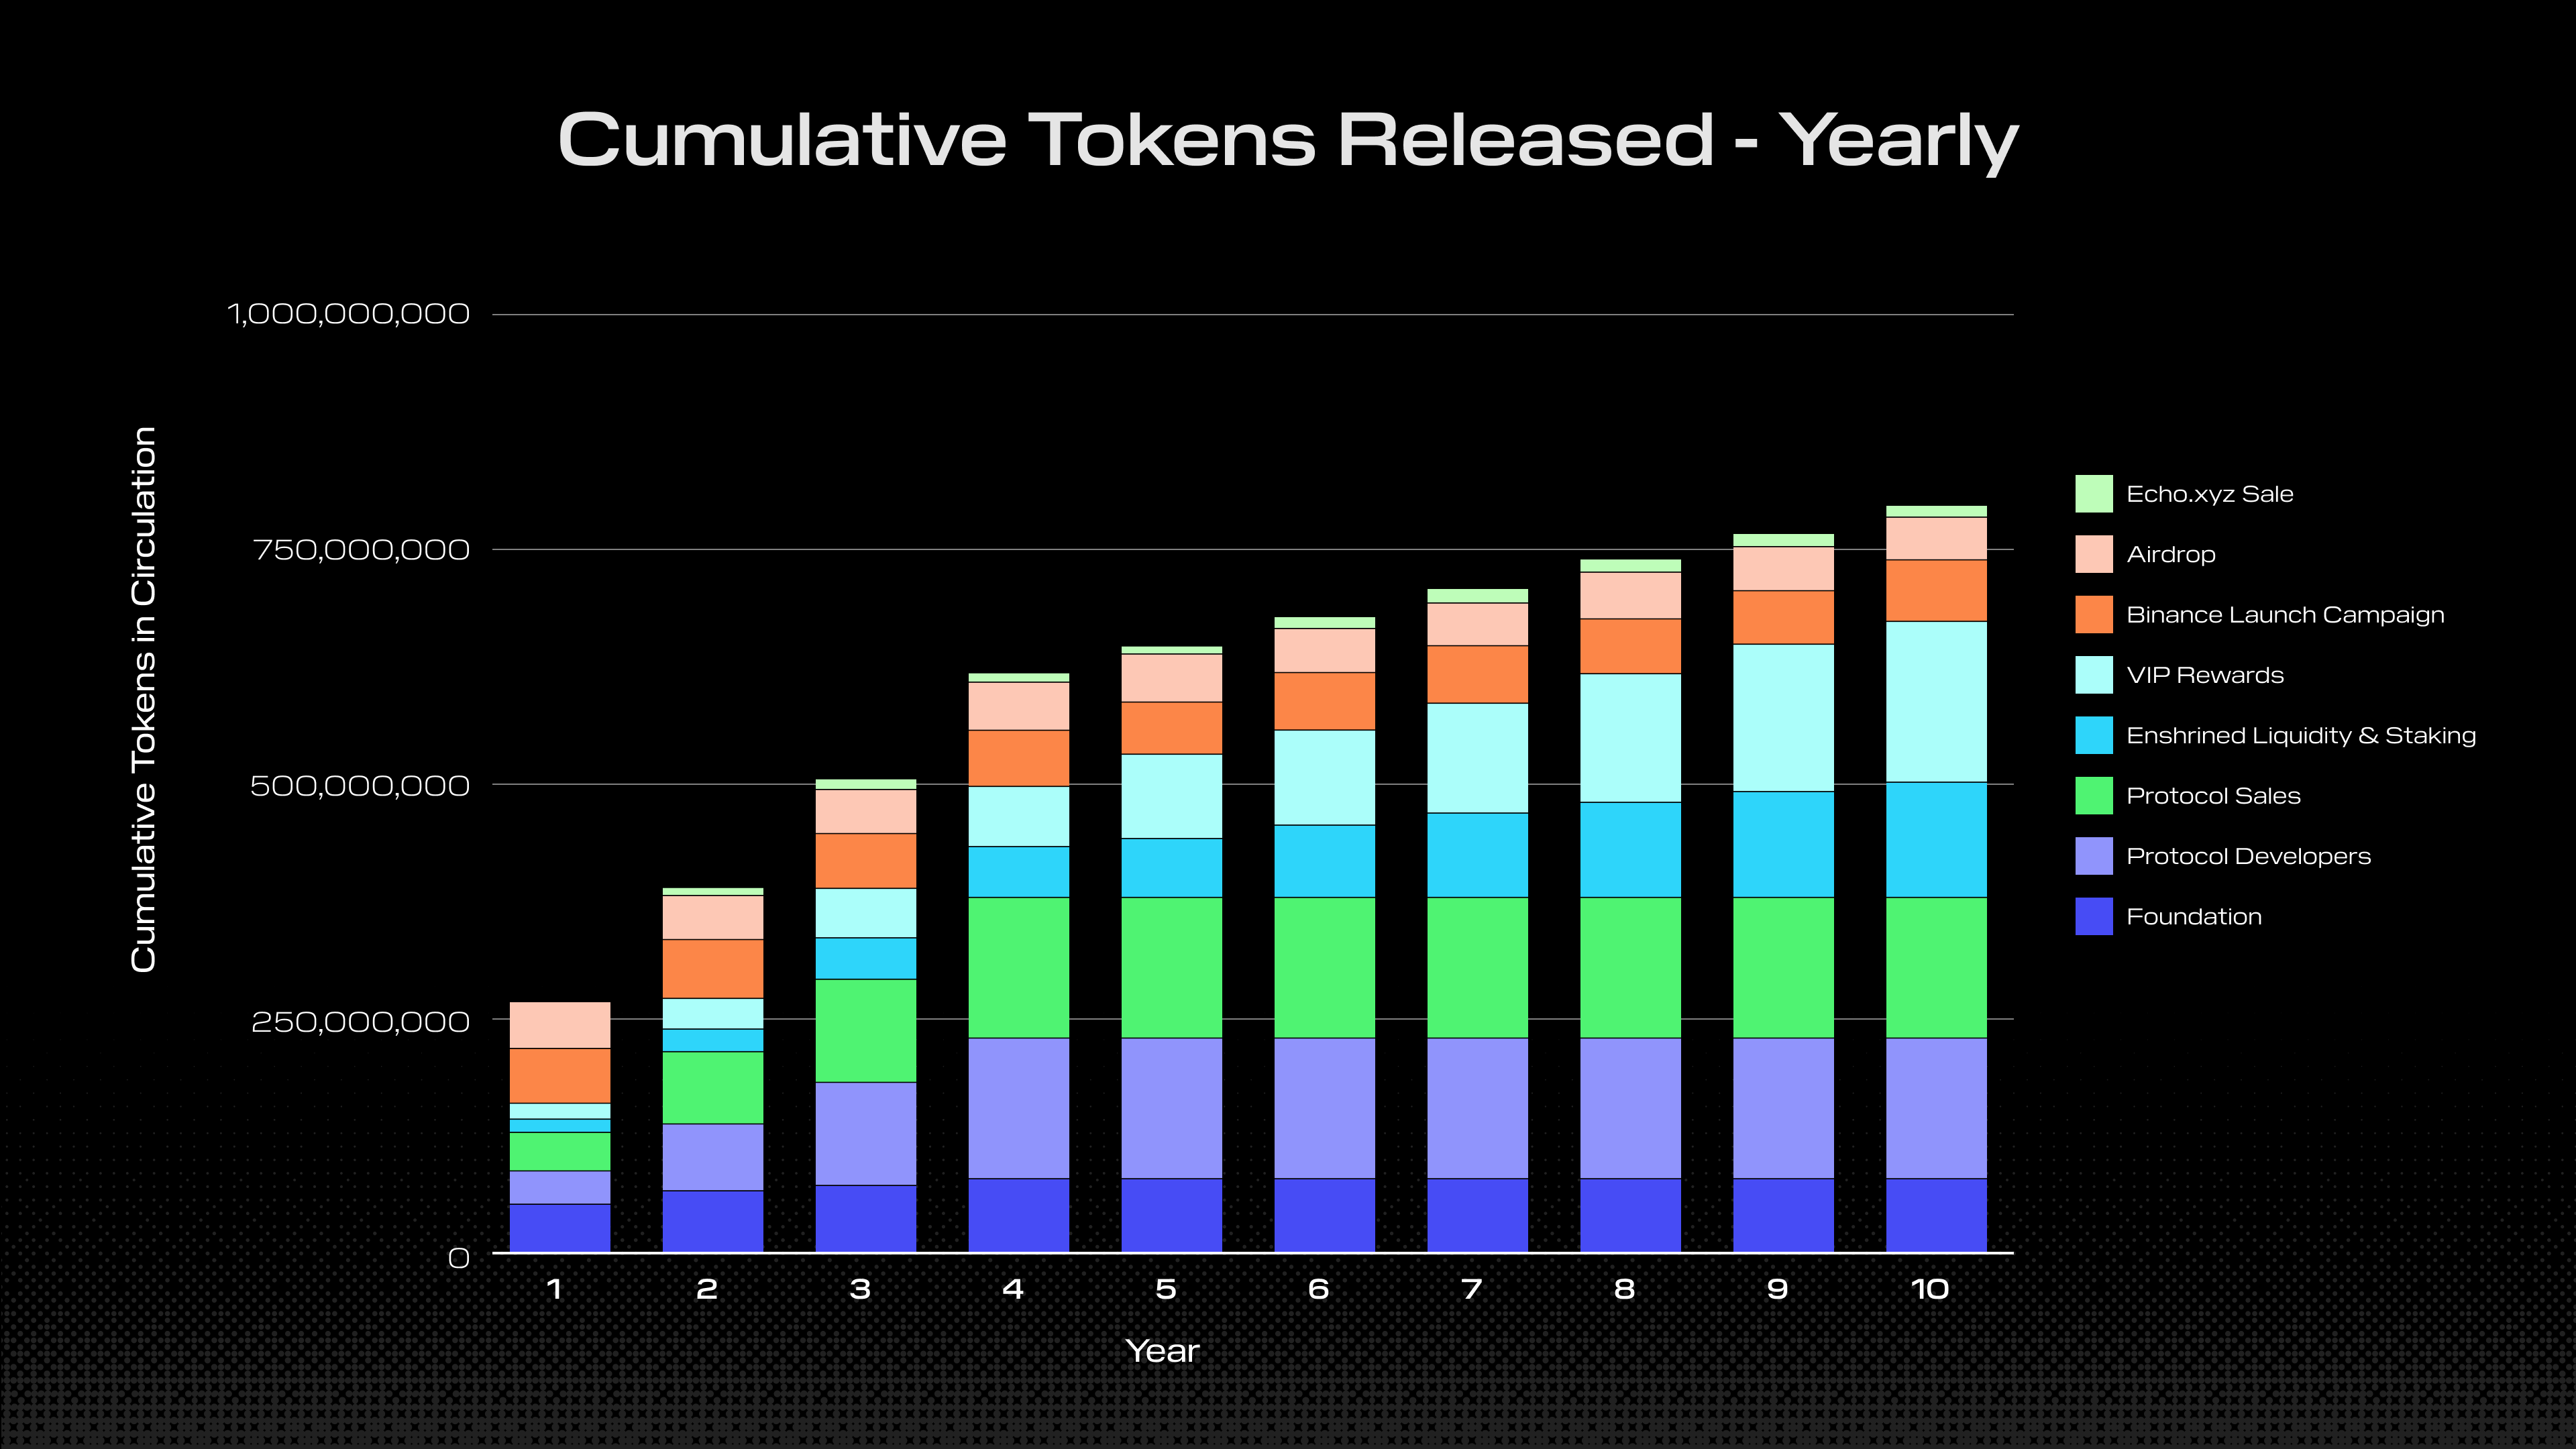
| Foundation | 77.5M | 7.75% | 50% upfront, remaining 50% vested every 6 months over 48 months |
| Protocol Developers | 150M | 15.00% | 25% after 12 month cliff, remaining 75% linearly vested over 36 months |
| Protocol Sales (Investors) | 152.5M | 15.25% | 25% after 12 month cliff, remaining 75% linearly vested over 36 months |
| Enshrined Liquidity & Staking | 250M | 25.00% | 5% will be released each year on a block-by-block basis, with a slightly shortened schedule due to [accelerated emissions](https://forum.initia.xyz/t/inflation-correction-and-unstaking-subsidy-plan) in the first month. |
| VIP Rewards | 250M | 25.00% | 7% released per year, linearly distributed over 12 months |
| Binance Launch Campaign | 60M | 6.00% | 100% unlocked |
| Airdrop | 50M | 5.00% | 100% unlocked |
| Echo.xyz Community Sale | 10M | 1.00% | 25% of the total amount on the 12/15/18/24th month post THE |
## Breakdown
### Foundation
**77,500,000 INIT (7.75% of total supply)**
The Initia Foundation's main goal is to advance the Interwoven Economy, help redefine the boundaries of multichain capabilities, and ensure a vibrant ecosystem of diverse applications. To this end, 7.75% of the total token supply is set aside towards the Initia Foundation for a variety of endeavors—including initial liquidity bootstrapping for Enshrined Liquidity, genesis validator delegations, and future strategic initiatives and ecosystem grants.
### Protocol Developers (Team)
**150,000,000 INIT (15% of total supply)**
Protocol developers, including current and future Initia team members and contributors, have been allocated 15% of the supply in aggregate. All recipients of tokens from this category are subject to a 4 year vesting period that includes a 12 month lock and a 36 month unlocking period.
### Protocol Sales (Investors)
**Amount: 152,500,000 INIT (15.25% of total supply)**
The Interwoven Economy's progress would have not been possible without the early backing of Initia by its investors. Across three total rounds of fundraises, Initia has been able maintain dilution to investors by 15.25% of the total supply, marking a distinct departure from many other L1 chains with high investor allocations. Similar to tokens allocated to Protocol Developers, tokens in the Protocol Sales category are subject to a 4 year vesting period that includes a 12 month lock and a 36 month unlocking period.
### Enshrined Liquidity & Staking Rewards
**250,000,000 INIT (25% of total supply)**
At the core of the Interwoven Ecosystem is Initia's Enshrined Liquidity mechanism, which replaces the typical L1 PoS system. In Enshrined Liquidity, capital is put to effective use through liquidity provision and allows users to simultaneously provide L1 economic security while earning staking rewards, trading fees, and external ecosystem incentives allocated for voting in VIP gauge votes. Initially, EL & staking rewards have a block-by-block release rate of 5% per year (12,500,000 INIT per year).
Due to a [governance proposal](https://forum.initia.xyz/t/inflation-correction-and-unstaking-subsidy-plan/201/10) to fix inflation rate, the overall emission schedule has been shortened slightly to stay within the 250M INIT cap.
### Vested Interest Program (VIP) Rewards
**250,000,000 INIT (25% of total supply)**
Vested Interest Program is Initia's novel and dominant incentive mechanism that is used to align the interests of all the participants in the Interwoven Economy, including application end users, application builders, and L1 stakeholders. These rewards are wholly allocated to the community of users. VIP rewards are distributed in escrowed form and can be vested through maintaining VIP KPIs over several epochs. Similar to staking rewards, VIP rewards have an initial release rate of 7% per year (17,500,000 INIT per year).
### Binance Launch Campaign
**60,000,000 INIT (6% of total supply)**
For the initial CEX liquidity bootstrapping, 6% of the total supply is allocated towards Binance's Launch Campaign.
### Airdrop
**50,000,000 INIT (5% of total supply)**
Initia's airdrop will initially distribute 50,000,000 INIT tokens (5% of the total network supply) to network testers, advocates, and users of the technology who have helped make Initia's vision of an interwoven multichain world possible. These tokens will be immediately available on genesis for eligible participants to claim.
### Echo.xyz Community Sale
**10,000,000 INIT (1% of total supply)**
Tokens in this category have been allocated to the community of users who participated in Echo.xyz's investment round. Tokens in this category unlock in four equal tranches 12/15/18/24 months post-genesis.
## Release Schedule
The monthly and annual release schedules for the Initia token for the first four years are shown below.
**Annual Release Schedule**
**Monthly Release Schedule**
# High Level Architecture
Source: https://docs.initia.xyz/home/core-concepts/initia-and-rollups/high-level-architecture
Initia's architecture is composed of three main components:
* **Initia L1**: The Initia L1 is the base layer and central liquidity hub for all Interwoven rollups
* **Interwoven Rollups**: An ecosystem of blockchain rollups built atop Initia L1
* **Interwoven Stack**: Initia's framework for easily and painlessly building rollups and applications
## Components
### Initia L1
Initia L1 is a Layer 1 blockchain designed to serve as the coordination layer and central hub for all Initia rollups. This layer provides essential services to Rollups, including:
* Network Security
* Governance
* Liquidity Solutions
* Bridging and Interoperability
### Interwoven Rollups
Interwoven Rollups are an ecosystem of Layer 2 blockchains built atop Initia L1, offering a scalable, customizable, and secure infrastructure for any application. Developers have the flexibility to deploy and customize their own rollup, tailoring various aspects such as:
* Smart Contract Virtual Machine
* Gas Tokens
* Other Customizable Features
### The Interwoven Stack
The [Interwoven Stack](/home/core-concepts/interwoven-stack) is Initia's framework for building rollups and applications. It offers a seamless, integrated experience for developers.
The Stack aims to simplify the process of building and operating blockchain applications by providing native, out-of-the-box solutions for common tasks. All the tools and features that appchain developers typically need are built directly into the core Interwoven Stack, making them accessible from day one.
By reducing choice overload, Initia minimizes fragmentation and allows teams to concentrate on creating the best applications.
# Initia L1
Source: https://docs.initia.xyz/home/core-concepts/initia-and-rollups/initia-l1
## Overview
The Initia L1 is a custom-built Layer 1 blockchain that serves as the central coordination layer for all Interwoven Rollups. The L1 is built on the [Cosmos SDK](https://docs.cosmos.network) and is responsible for:
1. **Security**: Rollups leverage Initia L1's security for various purposes including token bridging, state commitments, and fraud proofs
2. **Liquidity**: The [InitiaDEX](/home/core-concepts/initiadex) on L1 acts as a central liquidity hub for the ecosystem, providing a seamless experience for token liquidity and cross-rollup bridging and swaps
3. **Interoperability**: L1 functions as a central hub and router for rollups, enabling seamless communication and state transitions both between rollups and with the broader blockchain ecosystem
4. **Incentives**: L1 powers various incentive schemes including the [Vested Interest Program (VIP)](/home/core-concepts/vip/introduction) and the [Enshrined Liquidity](/home/core-concepts/enshrined-liquidity/introduction)
# Introduction
Source: https://docs.initia.xyz/home/core-concepts/initia-and-rollups/rollups/introduction
Interwoven Rollups are Layer 2 rollups built using Initia's [Interwoven Stack](/home/core-concepts/interwoven-stack/introduction). These rollups are designed to be scalable, highly interoperable, and fully customizable.
* **Virtual Machines**: Rollup teams can choose between EVM, Move, or Wasm as the virtual machine for their rollup to best suit their application and needs
* **Gas Tokens & Fees**: Each rollup can choose its own gas token and fee structure. This can include INIT, stablecoins, their native token, or even multiple tokens.
* **Transaction Ordering**: If needed, rollups can also implement their own transaction ordering mechanism.
# EVM Compatibility
Source: https://docs.initia.xyz/home/core-concepts/initia-and-rollups/rollups/vms/minievm/evm-compatibility-and-changes
## Compatibility
The MiniEVM framework is compatible with all standard EVM developer workflows, tooling, and libraries that developers are already familiar. This includes popular tools like [Foundry](https://github.com/foundry-rs/foundry), [Hardhat](https://hardhat.org/), and [Remix IDE](https://remix.ethereum.org/). However, there are minor differences in the way the MiniEVM operates that may require some adjustments to your existing development workflows.
## Changes
### General
**EIP-1559 Transactions**
MiniEVM currently does not support EIP-1559 transactions. This means that when using tools like Foundry to deploy or interact with contracts, or to generally send transactions, you will need to use the legacy transaction type.
### Cosmos SDK Integrations
#### Token Representation
By default, any new Cosmos coins created on the chain, whether they are fee denomination tokens, tokens minted via IBC, or other tokens created at genesis will also have an ERC20 representation on the MiniEVM. This allows developers and users to interact with these tokens using both the Cosmos Coin interface and messages, as well as the EVM ERC20 interface.
#### Fee Tokens
While the Cosmos SDK and rollup design supports multiple fee denominations on a single network, the MiniEVM's EVM module uses a single fee token denomination for all transactions. This denomination must be one of those set on the Cosmos side.
Once set, the EVM fee denomination effectively becomes the equivalent of native tokens (e.g. ETH) on other EVM networks. This denomination will then be used for transaction fees sent via the EVM's JSON-RPC, as well as for any funds attached to EVM transactions via `msg.value`.
However, as mentioned above, unlike other EVM networks, the MiniEVM's native token is also represented by an ERC20 interface. This means that for any transaction or logic, you can also interact with it using the ERC20 interface.
## Tool Compatibility
### Foundry
**EIP 1559 Transactions**
When using Foundry to deploy or interact with contracts, or to generally send transactions, you will need to use the legacy transaction type. This can be done by using the `--legacy` flag.
**Precompiles and Foundry Scripts**
Foundry's forge script feature always simulates all script transactions on a local standard EVM (without precompiles), and there is currently [no way to skip this simulation](https://github.com/foundry-rs/foundry/issues/5776). Consequently, any contract deployment or transaction that relies on MiniEVM precompiles will fail.
# MiniEVM Introduction
Source: https://docs.initia.xyz/home/core-concepts/initia-and-rollups/rollups/vms/minievm/introduction
## Overview
The MiniEVM is a variant of Initia's rollup framework with Ethereum Virtual Machine ([EVM](https://ethereum.org/en/developers/docs/evm/)) integration. With the MiniEVM, developers can deploy and interact with Solidity and other EVM-based smart contracts just as they would on other EVM networks. All of the tools such as wallets, explorers, and developer tools that users are familiar with also work out of the box with the MiniEVM.
In addition to EVM compatibility, the MiniEVM provides a number of unique features, including:
* **Cosmos Integration**
* **Single Token Standard**
* **IBC Compatibility**
## Cosmos Integration
The MiniEVM interacts with the Cosmos blockchain through a set of custom precompiles. This integration allows the EVM to:
* **Read the Underlying Cosmos Chain State**: Access and read the state of the Cosmos blockchain directly from the EVM.
* **Send Cosmos Transactions**: Initiate and send transactions on the Cosmos blockchain.
### Notable Features
* **Query Native Connect Price Data**: Retrieve price data from the native Connect oracle.
* **Query All Tokens Held by an Account**: Obtain a comprehensive list of tokens held by a specific account.
## Single Token Standard
The MiniEVM revolves around a single token standard by implementing a custom Bank Interface that provides an ERC20 interface for all tokens on the chain. This includes:
* **Native Tokens**: Tokens that are native to the Cosmos blockchain.
* **Fee Denom Tokens**: Tokens used for transaction fees.
* **Tokens Bridged via IBC**: Tokens transferred through the Inter-Blockchain Communication (IBC) protocol.
* **ERC20 Tokens Created on the Rollup**: Standard ERC20 tokens created within the rollup framework.
### Benefits
* **Unified Balance Querying**: Ability to query all tokens held by an account in a single query.
* **Simplified Token Handling**: No need to handle different token standards in smart contracts, making development more straightforward.
***
For more detailed information, please refer to the specific sections of this documentation.
# MiniMove Introduction
Source: https://docs.initia.xyz/home/core-concepts/initia-and-rollups/rollups/vms/minimove/introduction
## Overview
The MiniMove is a [MoveVM](https://move-language.github.io/move)-based variant of Initia's rollup framework, designed to support deployment and interaction with MoveVM smart contracts.
Specifically, our MoveVM is based on the [Aptos variant](https://aptos.dev/en/build/smart-contracts) of the MoveVM, with additions and changes to improve performance and enable compatibility with the rollup's underlying Cosmos SDK stack and the wider Initia ecosystem.
# MiniWasm Introduction
Source: https://docs.initia.xyz/home/core-concepts/initia-and-rollups/rollups/vms/miniwasm/introduction
## Overview
The MiniWasm is a variant of Initia's rollup framework with [CosmWasm](https://cosmwasm.com/) integration, enabling developers to deploy and interact with CosmWasm smart contracts.
# InitiaDEX
Source: https://docs.initia.xyz/home/core-concepts/initiadex
The InitiaDEX is a decentralized exchange (DEX) built on the Initia L1. It serves as a Balancer-style weighted pool for diverse asset pairs and a StableSwap pool for assets with closely correlated prices. This design ensures an optimal trading experience across various asset types.
The DEX aims to be the central liquidity hub for all Interwoven Rollups, facilitating daily trading and more complex cross-rollup interactions and swaps. The InitiaDEX is essential for promoting the growth, stability, and alignment of the entire Initia ecosystem.
To support these goals, the DEX features [Enshrined Liquidity](/home/core-concepts/enshrined-liquidity/introduction). This allows certain liquidity pairs, whitelisted by the Initia L1 governance, to be used as staking assets for the Initia L1.
# Introduction
Source: https://docs.initia.xyz/home/core-concepts/interwoven-stack/introduction
## Overview
The **Interwoven Stack** is Initia's comprehensive, all-in-one solution designed to empower developers and teams in building and deploying rollups with unmatched ease and efficiency.
Historically, building a rollup requires developers to research, select, and piece together numerous components and services. These include:
* Choosing the right scaling solution while considering VM compatibility for each option.
* Sourcing or building wallets, explorers, bridges, and other essential tools.
* Integrating various services such as oracles, bridges, fiat on-ramps, and more.
All of these tasks divert time and resources from developers, preventing them from focusing on building their applications.
The Interwoven Stack aims to address these challenges by focusing on the following key areas:
1. **Comprehensive Product Suite:** The Stack provides developers and teams with everything needed to launch and operate a rollup, including bridges, wallets, explorers, and a multi-VM compatible [rollup framework](/home/core-concepts/interwoven-stack/opinit-framework).
2. **Seamless Interoperability:** The tools built into the Stack facilitate easy communication for the rollup, whether it's between rollups, with Initia L1, or with other blockchain ecosystems.
3. **Enhanced Security:** Robust security measures are integrated into the Stack, providing a solid foundation for building secure and trustworthy applications.
With this approach, developers can focus solely on building, improving, and shipping their applications, while the Interwoven Stack manages the heavy lifting of selecting the right tools and components for a performant and secure rollup, ensuring a smooth and optimal developer and user experience.
# Challenger
Source: https://docs.initia.xyz/home/core-concepts/interwoven-stack/opinit-framework/components/challenger
The Challenger is a process distinct from the Executor, responsible for monitoring the Executor's output proposals and challenging any invalid submissions. This ensures the integrity of rollup's state and prevents malicious actions by the Executor.
The primary responsibilities of the Challenger include:
1. **Verifying Deposits**:
* Ensure that the `MsgInitiateTokenDeposit` event is relayed correctly to the `MsgFinalizeTokenDeposit` event.
* Check if `MsgInitiateTokenDeposit` was relayed within the required time frame.
2. **Verifying Oracle Updates**:
* Confirm that Oracle data is correctly relayed to `MsgUpdateOracle`.
* Ensure that Oracle updates are processed on time.
3. **Validating Outputs**:
* Check that the `OutputRoot` submitted with `MsgProposeOutput` is accurate.
* Ensure that the next `MsgProposeOutput` is submitted within the expected time frame.
## Detailed Architecture
The Challenger architecture is designed to ensure that interactions between Initia (L1) and rollup (L2) are correctly validated, securing internal processes within the Initia ecosystem. Each part of the architecture is tailored to handle specific challenges while maintaining the security and reliability of the Initia-rollup interactions.
### Deposit Challenges
Deposits from L1 to L2 must follow a strict verification process to ensure that tokens are correctly transferred between chains.
The Challenger plays a critical role in this by confirming that `MsgInitiateTokenDeposit` is not only correctly triggered but also completed within a specific timeframe by matching it to `MsgFinalizeTokenDeposit`.
This prevents potential discrepancies or fraud, ensuring that deposits are secure.
When a `MsgInitiateTokenDeposit` event is detected on the L1 chain, it is recorded as a **Deposit** challenge.
The system checks if it matches the `MsgFinalizeTokenDeposit` event for the same sequence.
```go
// Deposit is the challenge event for deposit data
type Deposit struct {
EventType string `json:"event_type"`
Sequence uint64 `json:"sequence"`
L1BlockHeight uint64 `json:"l1_block_height"`
From string `json:"from"`
To string `json:"to"`
L1Denom string `json:"l1_denom"`
Amount string `json:"amount"`
Time time.Time `json:"time"`
Timeout bool `json:"timeout"`
}
```
## Output Challenges
**Outputs**, which represent state changes in the L2 chain, must be correctly submitted to maintain the synchronization between L1 and L2.
The Challenger ensures that the OutputRoot of the submitted `MsgProposeOutput` matches the system’s expectations and that future proposals are made within the designated timeframe.
This process prevents any incorrect or malicious outputs from being finalized, ensuring the integrity of the system.
When a `MsgProposeOutput` event is detected on the L1 chain, it triggers an **Output** challenge.
The system replays up to the L2 block number and verifies whether the `OutputRoot` matches the one submitted.
```go
// Output is the challenge event for output data
type Output struct {
EventType string `json:"event_type"`
L2BlockNumber uint64 `json:"l2_block_number"`
OutputIndex uint64 `json:"output_index"`
OutputRoot []byte `json:"output_root"`
Time time.Time `json:"time"`
Timeout bool `json:"timeout"`
}
```
### Oracle Challenges
Oracles serve as external data providers for the blockchain, and any failure in updating their data can lead to inaccuracies within the system.
The Challenger ensures that oracle updates happen in a timely manner and are properly relayed from L1 to L2 through `MsgUpdateOracle`, safeguarding the accuracy of external data within the Initia ecosystem.
If the `oracle_enable` setting is turned on in bridge config, the 0th transaction's bytes are saved as an **Oracle** challenge event.
This data is verified against the `MsgUpdateOracle` for the same L1 height.
```go
// Oracle is the challenge event for oracle data
type Oracle struct {
EventType string `json:"event_type"`
L1Height uint64 `json:"l1_height"`
Data []byte `json:"data"`
Time time.Time `json:"time"`
Timeout bool `json:"timeout"`
}
```
## Rollback Challenges (TBA)
If a challenge is created and the event is not finalized within the timeout period, it is possible to rollback before the challenge is finalized. This feature will be announced in a future release.
# Executor
Source: https://docs.initia.xyz/home/core-concepts/interwoven-stack/opinit-framework/components/executor
The OPinit Bot Executor is a critical component in maintaining the communication and operational integrity between the Initia L1 and rollup blockchains. It handles and automates key tasks related to the OPinit Bridge, which facilitates cross-chain interactions and ensures that both blockchains remain synchronized and secure.
The primary responsibilities of the Executor include:
1. **Executing Token Transfers:** Executing token transfers between Initia L1 and rollup
2. **Submitting Output Proposals:** Submitting output proposals to the Initia L1
3. **Transaction Batch DA Submission:** Submitting rollup transaction batches to the DA layer
4. **Relaying Oracle Update (Optional):** Relaying oracle price feed updates to the rollup
## Detailed Architecture
### Transfer Token from L1 to L2 (Deposit)
The token deposit process begins when a user submits a deposit transaction on the Initia L1 chain. Once the transaction is confirmed, the Bridge Executor retrieves the latest block data (including the deposit) from the L1 node. It then submits a message to the rollup node to finalize the deposit. After the L2 node confirms the finalized deposit, it mints the corresponding opINIT tokens on the specified rollup.
```mermaid
sequenceDiagram
participant User
participant IL1 as Initia L1
participant OPH as OPhost Module
participant OPB as OPinit Bot
participant OPC as OPchild Module
participant R as Rollup
User->>IL1: Initiate token deposit
IL1->>OPH: Process deposit
OPH->>OPB: Emit deposit event
OPB->>OPB: Process deposit event
OPB->>OPC: Relay deposit transaction
OPC->>R: Finalize deposit
R->>R: Mint tokens to user on L2
```
### Transfer Token from L2 to L1 (Withdrawal)
The token withdrawal process begins when a user submits a withdrawal transaction on the rollup. Once the transaction is confirmed, the Bridge Executor retrieves the latest block data (including the withdrawal) from the L2 node. It then submits a message to the Initia L1 node to finalize the withdrawal. After the L1 node confirms the finalized withdrawal, it burns the corresponding opINIT tokens on the specified rollup.
The withdrawal then enters a withdrawal period during which the transaction can be challenged and potentially canceled. If no challenge is submitted by the end of this period, the user can claim the withdrawal on Initia L1.
```mermaid
sequenceDiagram
participant User
participant R as Rollup
participant OPC as OPchild Module
participant OPB as OPinit Bot
participant OPH as OPhost Module
participant IL1 as Initia L1
User->>R: Initiate token withdrawal
R->>OPC: Process withdrawal request
OPC->>OPC: Lock tokens and emit event
OPC->>OPB: Notify of withdrawal event
OPB->>OPB: Update Merkle tree
OPB->>OPH: Submit updated L2 output root
OPH->>IL1: Store L2 output root
Note over OPB,IL1: Wait for finalization period
User->>OPB: Request withdrawal proof
OPB->>OPB: Generate Merkle proof
OPB->>User: Provide withdrawal proof
User->>IL1: Submit proof & finalize withdrawal
IL1->>OPH: Verify proof
OPH->>IL1: Approve token release
IL1->>User: Transfer withdrawn tokens
```
The withdrawal period is designed to allow for a challenge period during which any malicious activity can be detected and addressed. If a challenge is submitted, the withdrawal is canceled. If no challenge is submitted, the transaction is finalized and the tokens are released to the user on Initia L1.
### Oracle Updates
The executor process is, when enabled on the rollup, also responsible for relaying the latest [Connect](https://github.com/skip-mev/connect) oracle data to the rollup. When relayed, the bot submits a `MsgUpdateOracle` to the L2 node.
```mermaid
sequenceDiagram
participant SO as Connect Oracle
participant ORM as Oracle Module (L1)
participant IL1 as Initia L1
participant OPB as OPinit Bot
participant OPC as OPchild Module
participant R as Rollup
loop Continuous update cycle
SO->>ORM: Update oracle data
ORM->>IL1: Store updated data
IL1->>OPB: Emit oracle update event
OPB->>ORM: Read new oracle data
OPB->>OPC: Relay oracle data
OPC->>R: Update L2 oracle state
end
```
### DA Batch Submission
Lastly, the Executor is responsible for batching and submitting transaction data to Celestia.
```mermaid
sequenceDiagram
participant R as Rollup
participant OPC as OPchild Module
participant OPB as OPinit Bot
participant DA as Data Availability Layer
participant IL1 as Initia L1
loop For each L2 block
R->>OPC: Generate block
OPC->>OPB: Provide block data
OPB->>OPB: Compress and batch data
OPB->>DA: Submit batched data
DA->>DA: Store data and generate proof
OPB->>IL1: Submit DA proof (if required)
end
```
# Introduction
Source: https://docs.initia.xyz/home/core-concepts/interwoven-stack/opinit-framework/components/introduction
The OPinit Framework consists of three main components: the OPinit Bridge, the Executor, and the Challenger.
## OPinit Bridge
The [OPinit Bridge](/home/core-concepts/interwoven-stack/opinit-framework/components/opinit-bridge) is a set of Cosmos SDK modules that enable the transfer of INIT and other tokens between the Initia L1 and rollup L2 using an optimistic bridge model.
## OPinit Bots
The OPinit Bots are a set of processes responsible for executing and monitoring the various actions necessary to operate and secure the rollup. Currently, there are two bots in this system: the Executor and the Challenger.
### Executor
The [Executor](/home/core-concepts/interwoven-stack/opinit-framework/components/executor) is a set of processes responsible for executing the various actions necessary to operate and secure the rollup. These include:
* **Token Transfers**: The Executor handles the OPinit Bridge token deposits and withdrawals between Initia L1 and the various rollup.
* **Output Submission**: The Executor submits the rollup's transaction outputs to the Initia L1 to finalize the rollup's state.
* **DA Batch Submission**: The Executor submits the rollup's transaction batches to the Celestia DA layer.
* **Oracle Data**: The Executor can be configured to relay the Connect oracle price data on the Initia L1 to the rollup L2 for its applications to use.
### Challenger
The [Challenger](/home/core-concepts/interwoven-stack/opinit-framework/components/challenger) is a process separate from the Executor, responsible for monitoring the Executor's output proposals and challenging any invalid proposals. This helps maintain the integrity of the rollup's state and ensures that the Executor is not acting maliciously.
# OPinit Bridge
Source: https://docs.initia.xyz/home/core-concepts/interwoven-stack/opinit-framework/components/opinit-bridge
## Overview
The OPinit Bridge is an implementation of the optimistic rollup bridge, implemented as two Cosmos SDK modules; the **OPchild Module** and the **OPhost Module**.
## OPhost Module
The OPhost Module is integrated into the Initia L1 chain. This module is responsible for:
* **Bridge Management:** Creating, updating, and managing bridges between Initia L1 and rollups.
* **Output Proposal Handling:** Managing and finalizing L2 output proposals.
## OPchild Module
The OPchild Module acts as a counter-party to the OPhost Module and is integrated into all Interwoven Rollup implementations. This module is responsible for:
* **Operator Management:** Adding, removing, and managing operators for a given rollup.
* **Bridge Message Execution:** Processing messages received from the Initia L1.
* **Oracle Updates:** Managing oracle price feed updates relayed by the OPinit Executor.
Actions related to both of these two modules are normally handled by the [OPinit Bot Executor](/home/core-concepts/interwoven-stack/opinit-framework/components/executor).
# Minitswap Architecture
Source: https://docs.initia.xyz/home/core-concepts/minitswap/architecture
export const Flexibility = "A governance-controlled variable that modifies the Peg Keeper's tolerance towards imbalance. A higher flexibility means that a low target ratio can be maintained even with a high imbalance. When the flexibility is low, the Peg Keeper will interfere less frequently compared to high flexibility, ceteris paribus.";
export const MaxRatio = "A governance-controlled value that dictates the largest Fully Recovered Ratio value allowed.";
export const FullyRecoveredRatio = "Defines the ideal proportion of IbcOpInit vs. INIT in the virtual pool. For example, a ratio of 0.6 implies that the ratio of IbcOpInit to INIT is 6:4. When a user performs a swap, the pool ratio is compared to the Fully Recovered Ratio. If the current pool is greater, the Peg Keeper will swap the IbcOpInit tokens for INIT tokens.";
export const IbcOpINIT = "The variation of the INIT token that was bridged from Initia L1 to the rollup m through OP Bridge, then subsequently back to the L1 through IBC";
export const INIT = "The vanilla Initia INIT tokens on the Initia L1";
## Goals
* **Manipulation Resistance**: The architecture of the rollup and related systems themselves already has safeguards in place to prevent various forms of manipulation from malicious actors. The Minitswap DEX is further designed to ensure that, in unforeseen events, any subsequent damages are minimized.
* **Capital Efficiency**: As the number of rollups continue to increase, naively, the same number of DEX pairs must also exists. This results in liquidity fragmentation, high slippage and volatility, and subpar user experience.
## Design
Minitswap itself is designed as a virtual pool DEX between INIT and the various IbcOpINIT tokens for each of the rollups. The exchange rates on each swap are determined by the [StableSwap](https://docs.curve.fi/references/whitepapers/stableswap/#how-it-works) formula.
To achieve the above goals, two main improvements are made to the base StableSwap pool design:
* **Rate Limiting**: To protect against manipulation, the net amount of IbcOpINIT tokens that can be swapped back into INIT tokens is limited. This means that even if a malicious actor manages to acquire or create a large amount of IbcOpINIT tokens on their rollup, the number of tokens that can be swapped back into regular INIT tokens remains restricted.
* **Single INIT Token Pool**: To minimize liquidity fragmentation, there is a single INIT token pool that can be paired with multiple IbcOpINIT token pools, instead of having separate INIT token pools for each rollups.
## Swap Mechanisms
### Initia L1 to Rollups
In this scenario, a user wants to efficiently bridge their $INIT$ tokens on the Initia L1 to a rollup $m$ and ends up with the $OpINIT_m$ token for that rollup.
And while bridging from Initia L1 to a rollup is instantaneous, users may occasionally be able to obtain a more favorable rate by utilizing Minitswap as part of the bridging process as shown below.
1. **Initiate Swap on Minitswap DEX**: The user sends a transaction to the Minitswap DEX to swap their $INIT$ tokens into $IbcOpINIT_m$ tokens.
2. **Simulate Swap**: The DEX simulates swapping the user’s $INIT$ tokens into $IbcOpINIT_m$ tokens.
3. **Compare Swap and Direct Bridging**: The DEX compares the simulated amount of $IbcOpINIT_m$ tokens with the amount the user would receive if they bridged directly through the OP Bridge.
4. **Perform Optimal Action**
* If the amount of $IbcOpINIT_m$ tokens from the swap is greater, the DEX performs the swap. The output $IbcOpINIT_m$ tokens are then bridged to the destination L2 through IBC.
* If the direct bridging through the OP bridge provides a better amount, the DEX initiates a direct transfer to the destination rollup $m$ for the user using the OP bridge.
5. **Minitswap Swap Process**
* **Calculate $IbcOpINIT_m$ Received**: Minitswap calculates how much $IbcOpINIT_m$ the user will receive based on the current Virtual Pool state, updating the state in the process.
* **Fee Deduction**: Minitswap deducts a fee based on a predefined value and an additional fee from any extra $IbcOpINIT_m$ that the user receives.
* **Peg Keeper Swap Check**: Once the user’s swap action and fee calculation are complete, Minitswap checks if a [Peg Keeper Swap](#peg-keeper-swaps) should be performed based on the latest Virtual Pool state.
* **Internal Rebalancing Check**: After completing the Peg Keeper Swap, Minitswap checks if [Internal Rebalancing](#internal-rebalancing) is possible based on the Peg Keeper’s $IbcOpINIT$ balance. If balancing is possible, it is initiated.
6. **Final Outcome**: In both cases, once the OP Bridge or IBC transfer is complete, the user receives the most amount of $OpINIT_m$ tokens in their wallet on the destination rollup possible.
### Rollup to Initia L1
When bridging from a rollup to Initia L1, the user is currently holding $OpINIT_m$ tokens on a rollup $m$ and would like to bridge it back to $INIT$ tokens on the Initia L1.
In this scenario, utilizing Minitswap will enable them to bridging their INIT back to the Initia L1 instantaneously without waiting for the challenge period to expire.
1. **Transfer to Initia L1 via IBC**: The user begins by transferring their $OpINIT_m$ tokens on the rollup $m$ back to Initia L1 using IBC. As a result, they receive $IbcOpINIT_m$ tokens on the Initia L1.
2. **Swap on Minitswap DEX**: Once the IBC transfer is complete and the user has $IbcOpINIT_m$ tokens on Initia L1, they initiate a swap transaction on the Minitswap DEX to convert their $IbcOpINIT_m$ tokens into $INIT$ tokens.
3. **Minitswap Swap Process**
* **Peg Keeper Swap Check**: Minitswap first checks if a Peg Keeper Swap can be performed. If this is possible, the swap is executed directly through the Peg Keeper.
* **Calculate $INIT$ Received**: If the Peg Keeper Swap is not applicable, Minitswap calculates the amount of $INIT$ the user will receive based on the updated state of the Virtual Pool.
* **Fee Deduction**: Minitswap deducts a predefined fee amount from the transaction.
* **Internal Rebalancing Check**: After completing the user’s swap transaction, Minitswap checks if [Internal Rebalancing](#internal-rebalancing) is possible based on the Peg Keeper’s $IbcOpINIT$ balance. If balancing is possible, it is executed to maintain market stability.
4. **Final Outcome**: If the swap is successful, the user receives $INIT$ tokens in their wallet on Initia L1.
### Direct Swap
In addition to the standard directional swap explained above, Minitswap also offers a unique **Direct Swap** option. As more [Peg Keeper Swaps](#peg-keeper-swaps) are performed, the Peg Keeper's $INIT$ balance decreases. The Direct Swap aims to incentivize users to help replenish the Peg Keeper's $INIT$ token balance, which gets depleted over time. This serves as an additional method of replenishing the Peg Keeper's $INIT$ balance alongside the [Internal Rebalancing](#internal-rebalancing).
The Direct Swap allows any user to directly exchange their $INIT$ tokens for the Peg Keeper’s $IbcOpINIT$ tokens. This exchange occurs at the average price at which the Peg Keeper has purchased $INIT$ tokens, which could sometimes be lower than the price obtained through the traditional swap process. Initially, the Direct Swap might not seem attractive due to the Target Ratio being close to 0.5. However, as the Peg Keeper’s balance of OP-bridged tokens increases, the Direct Swap option becomes more appealing to users.
## Swap Logic
### Parameters
* **Max Ratio**: The Max Ratio, $R_{max}$, is a Initia L1 governance-controlled parameter that dictates the maximum pool ratio between IbcOpINIT and regular INIT
* **Fully Recovered Ratio**: The Fully Recovered Ratio, $R_{fr}$ then uses the Max Ratio and the Flexibility to calculate the final target IbcOpINIT:INIT ratio for the pool. The ratio is calculated as follows
$$
R_{fr}=0.5+(R_{max}-0.5) \cdot \frac{(fI)^3}{(1+|fI|^3)}
$$
### Mechanisms
#### Peg Keeper Swaps
The Peg Keeper Swap is a mechanism designed to keep the exchange rate between $INIT$ and $IbcOpINIT$ close to 1:1. This ensures that users always receive the best swap rates.
When users move their INIT tokens from a rollup back to Initia L1 using Minitswap, they are essentially selling their $IbcOpINIT$ tokens for $INIT$ tokens. As more users do this, the supply of $IbcOpINIT$ increases relative to $INIT$, which raises the price of future rollup -> Initia L1 swaps.
To address this, the Peg Keeper Swap executes a ($INIT$ -> $IbcOpINIT$) swap to balance the effect. When a user makes a swap, Minitswap checks the Fully Recovered Ratio against the current pool ratio. If the current ratio exceeds the Fully Recovered Ratio, a Peg Keeper Swap is triggered to restore balance.
When run, the Peg Keeper swap follows the following procedure:
1. Calculate the current $R_{fr}$ and the `max_recover_amount`, which defines the maximum size of the Peg Keeper Swap that can be performed in this swap. This is to prevent a huge Peg Keeper Swap from happening.
2. Check if another Peg Keeper Swap has been run in the same block. Continue if no swaps have been run.
3. Calculate the $INIT$ amount the Peg Keeper needs to reach $R_{fr}$. Let's call this `swap_amount_to_reach_fr`.
4. Check if `swap_amount_to_reach_fr > max_recover_amount`
* If true, swap only `max_recover_amount`.
* If false, swap `swap_amount_to_reach_fr`
Note that the Peg Keeper Swap check is done
* *before* a L2 -> L1 swap to make sure the user gets the best rate possible
* *after* a L1 -> L2 swap to make sure the user's swap rate doesn't get affected by the Peg Keeper Swap
#### Internal Rebalancing
As more Peg Keeper Swaps are performed, the $INIT$ balance of the Peg Keeper gradually decreases. To replenish its $INIT$ balance, the system has an internal rebalancing procedure that converts the Peg Keeper's $IbcOpINIT$ back into $INIT$ using IBC and OP Bridge.
The rebalancing process follows these steps:
1. Bridge the Peg Keeper's $IbcOpINIT_m$ back to the rollup $m$ using IBC, converting it into $OpINIT_m$.
2. Use the OP Bridge to convert $OpINIT_m$ back into $INIT$.
This process, combined with the [Direct Swap](#direct-swap), ensures that the Peg Keeper's $INIT$ balance is replenished, allowing it to continue performing Peg Keeper Swaps.
# Minitswap Introduction
Source: https://docs.initia.xyz/home/core-concepts/minitswap/introduction
export const OPinitBridge = "Initia's implementation of an optimistic bridge to be used as the primary bridge between the Initia L1 and all rollups. Deposits into rollups are instantaneous, but withdrawals have a waiting period.";
export const IbcOpINIT = "The variation of the INIT token that was bridged from Initia L1 to the rollup m through OP Bridge, then subsequently back to the L1 through IBC";
export const OpINIT = "The variation of the INIT tokens bridged directly from the Initia L1 to the destination rollup m";
export const m = "The destination rollup that the user wants to bridge to";
export const INIT = "The vanilla Initia INIT tokens on the Initia L1";
Minitswap is Initia's proprietary solution to address the user experience challenges posed by the lengthy withdrawal [challenge periods](https://docs.optimism.io/builders/app-developers/bridging/messaging#understanding-the-challenge-period) of [optimistic bridges](https://medium.com/connext/optimistic-bridges-fb800dc7b0e0). Furthermore, while a longer challenge period increases the duration in which a challenge can be made, it simultaneously increases the wait time required for withdrawals.
## Motivation
While optimistic token bridges between a Layer 1 (L1) and a Layer 2 (L2) chain provides a secure way of transferring assets between chains, it comes with various downsides
* **Long Withdrawal Times**: Transferring tokens from L1 to L2 is usually instantaneous, but the reverse direction involves long wait times, often days, before receiving assets on L1.
* **Single Sequencer Risks**: Creating a DEX pair between the original token on L1 and the bridged tokens can mitigate long withdrawal times. However, most L2s currently operate with a single sequencer, raising security, reliability, and centralization concerns for liquidity providers.
* **Lack of Liquidity**: The sequencer risk issues can result in insufficient liquidity in the token pool, leading to unfavorable swap prices, high volatility, and significant [slippage](https://www.coinbase.com/learn/crypto-glossary/what-is-slippage-in-crypto-and-how-to-minimize-its-impact#:~:text=Understanding%20Slippage%20in%20Crypto\&text=It%20refers%20to%20the%20difference,placed%20and%20when%20it's%20executed.) for users bridging tokens back to L1.
## Solution
The Minitswap DEX is then to designed to allow users to freely, quickly, and efficiently bridge tokens between Initia L1 and rollups. Users looking to bridge back to Initia L1 from a rollup can simply utilize Minitswap (along with IBC) to swap their tokens back to INIT without waiting for the challenge period to expire.
The full architecture, design decisions, and how the above risks issues are mitigated are detailed in the following section.
# Minitswap Terminology
Source: https://docs.initia.xyz/home/core-concepts/minitswap/terminology
export const Flexibility = "A governance-controlled variable that modifies the Peg Keeper's tolerance towards imbalance. A higher flexibility means that a low target ratio can be maintained even with a high imbalance. When the flexibility is low, the Peg Keeper will interfere less frequently compared to high flexibility, ceteris paribus.";
export const MaxRatio = "A governance-controlled value that dictates the largest Fully Recovered Ratio value allowed.";
export const FullyRecoveredRatio = "Defines the ideal proportion of IbcOpInit vs. INIT in the virtual pool. For example, a ratio of 0.6 implies that the ratio of IbcOpInit to INIT is 6:4. When a user performs a swap, the pool ratio is compared to the Fully Recovered Ratio. If the current pool is greater, the Peg Keeper will swap the IbcOpInit tokens for INIT tokens.";
export const VirtualPoolImbalance = "This is defined to be the ratio of the Virtual Pool size V and the Peg Keeper balance B. The ratio measures how far the virtual pool currently deviates from the initial state. When there is a large volume of swaps in only one direction, the ratio increases.";
export const PegKeeperBalance = "Peg Keeper's IbcOpINIT token balance: This balance increases when a user swaps IbcOpINIT tokens for INIT and sometimes decreases when a transfer and swap in the opposite direction occurs.";
export const VirtualPoolSize = "Virtual Pool size: An on-chain governance-set parameter that defines the size of the virtual liquidity pool. A larger value increases the total available swap liquidity for Minitswap and helps facilitate a larger swap volume, all else being equal.";
export const User = "The end user using the Minitswap DEX who seeks to swap IbcOpINIT tokens into INIT.";
export const PegKeeper = "A virtual market participant implemented into the DEX that automatically swaps INIT tokens for IbcOpINIT tokens directly before or after all user swaps. The aim of the peg keeper is to maintain a swap price close to 1 before fees.";
export const LiquidityProvider = "A user that provides INIT token liquidity to the Minitswap DEX. Unlike conventional DEXes, Minitswap only allows for single-sided INIT token deposits.";
export const VirtualPool = "The liquidity pool used to facilitate the swaps. Initially, the pool starts at a size V, with a virtual IbcOpINIT balance of V and a virtual INIT balance of V. The exchange rate for swaps through the pool is determined by the StableSwap formula. The Virtual Pool does not allow the amount of IbcOpINIT tokens to be less than V because, in such cases, it is more economical for the user to use the OP Bridge directly.";
export const IbcOpINIT = "The variation of the INIT token that was bridged from Initia L1 to the rollup m through OP Bridge, then subsequently back to the L1 through IBC";
export const OpINIT = "The variation of the INIT tokens bridged directly from the Initia L1 to the destination rollup m";
export const m = "The destination rollup that the user wants to bridge to";
export const INIT = "The vanilla Initia INIT tokens on the Initia L1";
export const IBCBridge = "The Inter-Blockchain Communication Protocol used as a bridging solution between rollups. Bridging in both directions is instantaneous.";
export const OPinitBridge = "Initia's implementation of an optimistic bridge to be used as the primary bridge between the Initia L1 and all rollups. Deposits into rollups are instantaneous, but withdrawals have a waiting period.";
## INIT Token Variants
| Term | Definition |
| ----------- | ----------- |
| $INIT$ | {INIT} |
| $m$ | {m} |
| $OpINIT$ | {OpINIT} |
| $IbcOpINIT$ | {IbcOpINIT} |
## Bridges
| Term | Description |
| ------------- | -------------- |
| IBC Bridge | {IBCBridge} |
| OPINIT Bridge | {OPinitBridge} |
## Actors
| **Term** | **Description** |
| ---------------------- | ------------------- |
| **Virtual Pool** | {VirtualPool} |
| **Liquidity Provider** | {LiquidityProvider} |
| **Peg Keeper** | {PegKeeper} |
| **User** | {User} |
## Parameters
| Symbol | Term | Description |
| --------- | -------------------------------------- | ---------------------- |
| $V$ | Virtual Pool size | {VirtualPoolSize} |
| $B$ | Peg Keeper's $IbcOpINIT$ token balance | {PegKeeperBalance} |
| $I$ | Virtual Pool imbalance | {VirtualPoolImbalance} |
| $R_{fr}$ | Fully Recovered Ratio | {FullyRecoveredRatio} |
| $R_{max}$ | Max Ratio | {MaxRatio} |
| $f$ | Flexibility | {Flexibility} |
# VIP Architecture
Source: https://docs.initia.xyz/home/core-concepts/vip/architecture
At genesis, a portion of the total INIT token supply will be set aside as rewards for the VIP program, which will be distributed over several years. Let's call this portion of the supply $R$. These rewards are given out at regular intervals, or **stage** $t$, throughout the distribution period.
The total rewards are first distributed to each rollup, then subsequently to the rollup's users and operators.
Before a rollup can qualify for VIP rewards, it must first achieve a minimum INIT TVL and then be whitelisted by the Initia L1 governance through an on-chain proposal. See the [VIP Eligibility](/home/core-concepts/vip/eligibility) page for more details.
For details on the specific VIP parameters such as stage and cycle duration, see the [VIP Parameters](/resources/developer/initia-l1#vip-parameters) section.
## Rewards Distribution
At each rewards distribution stage $t$, the total VIP rewards for that stage $R_t$ are distributed amongst each rollup ecosystem. The distribution is split into multiple steps:
1. Splitting the total rewards allocated for that stage, $R_t$, between all whitelisted rollups.
2. Distributing the rewards to each rollup's users.
3. Distributing the rewards to each rollup's operators.
### Rewards Split Between Rollups
At each stage $t$, the total VIP rewards for that stage $R_t$ are distributed amongst each rollup ecosystem. The total rewards are then split into two pools: the **Balance Pool $R_B$** and the **Weight Pool $R_W$**.
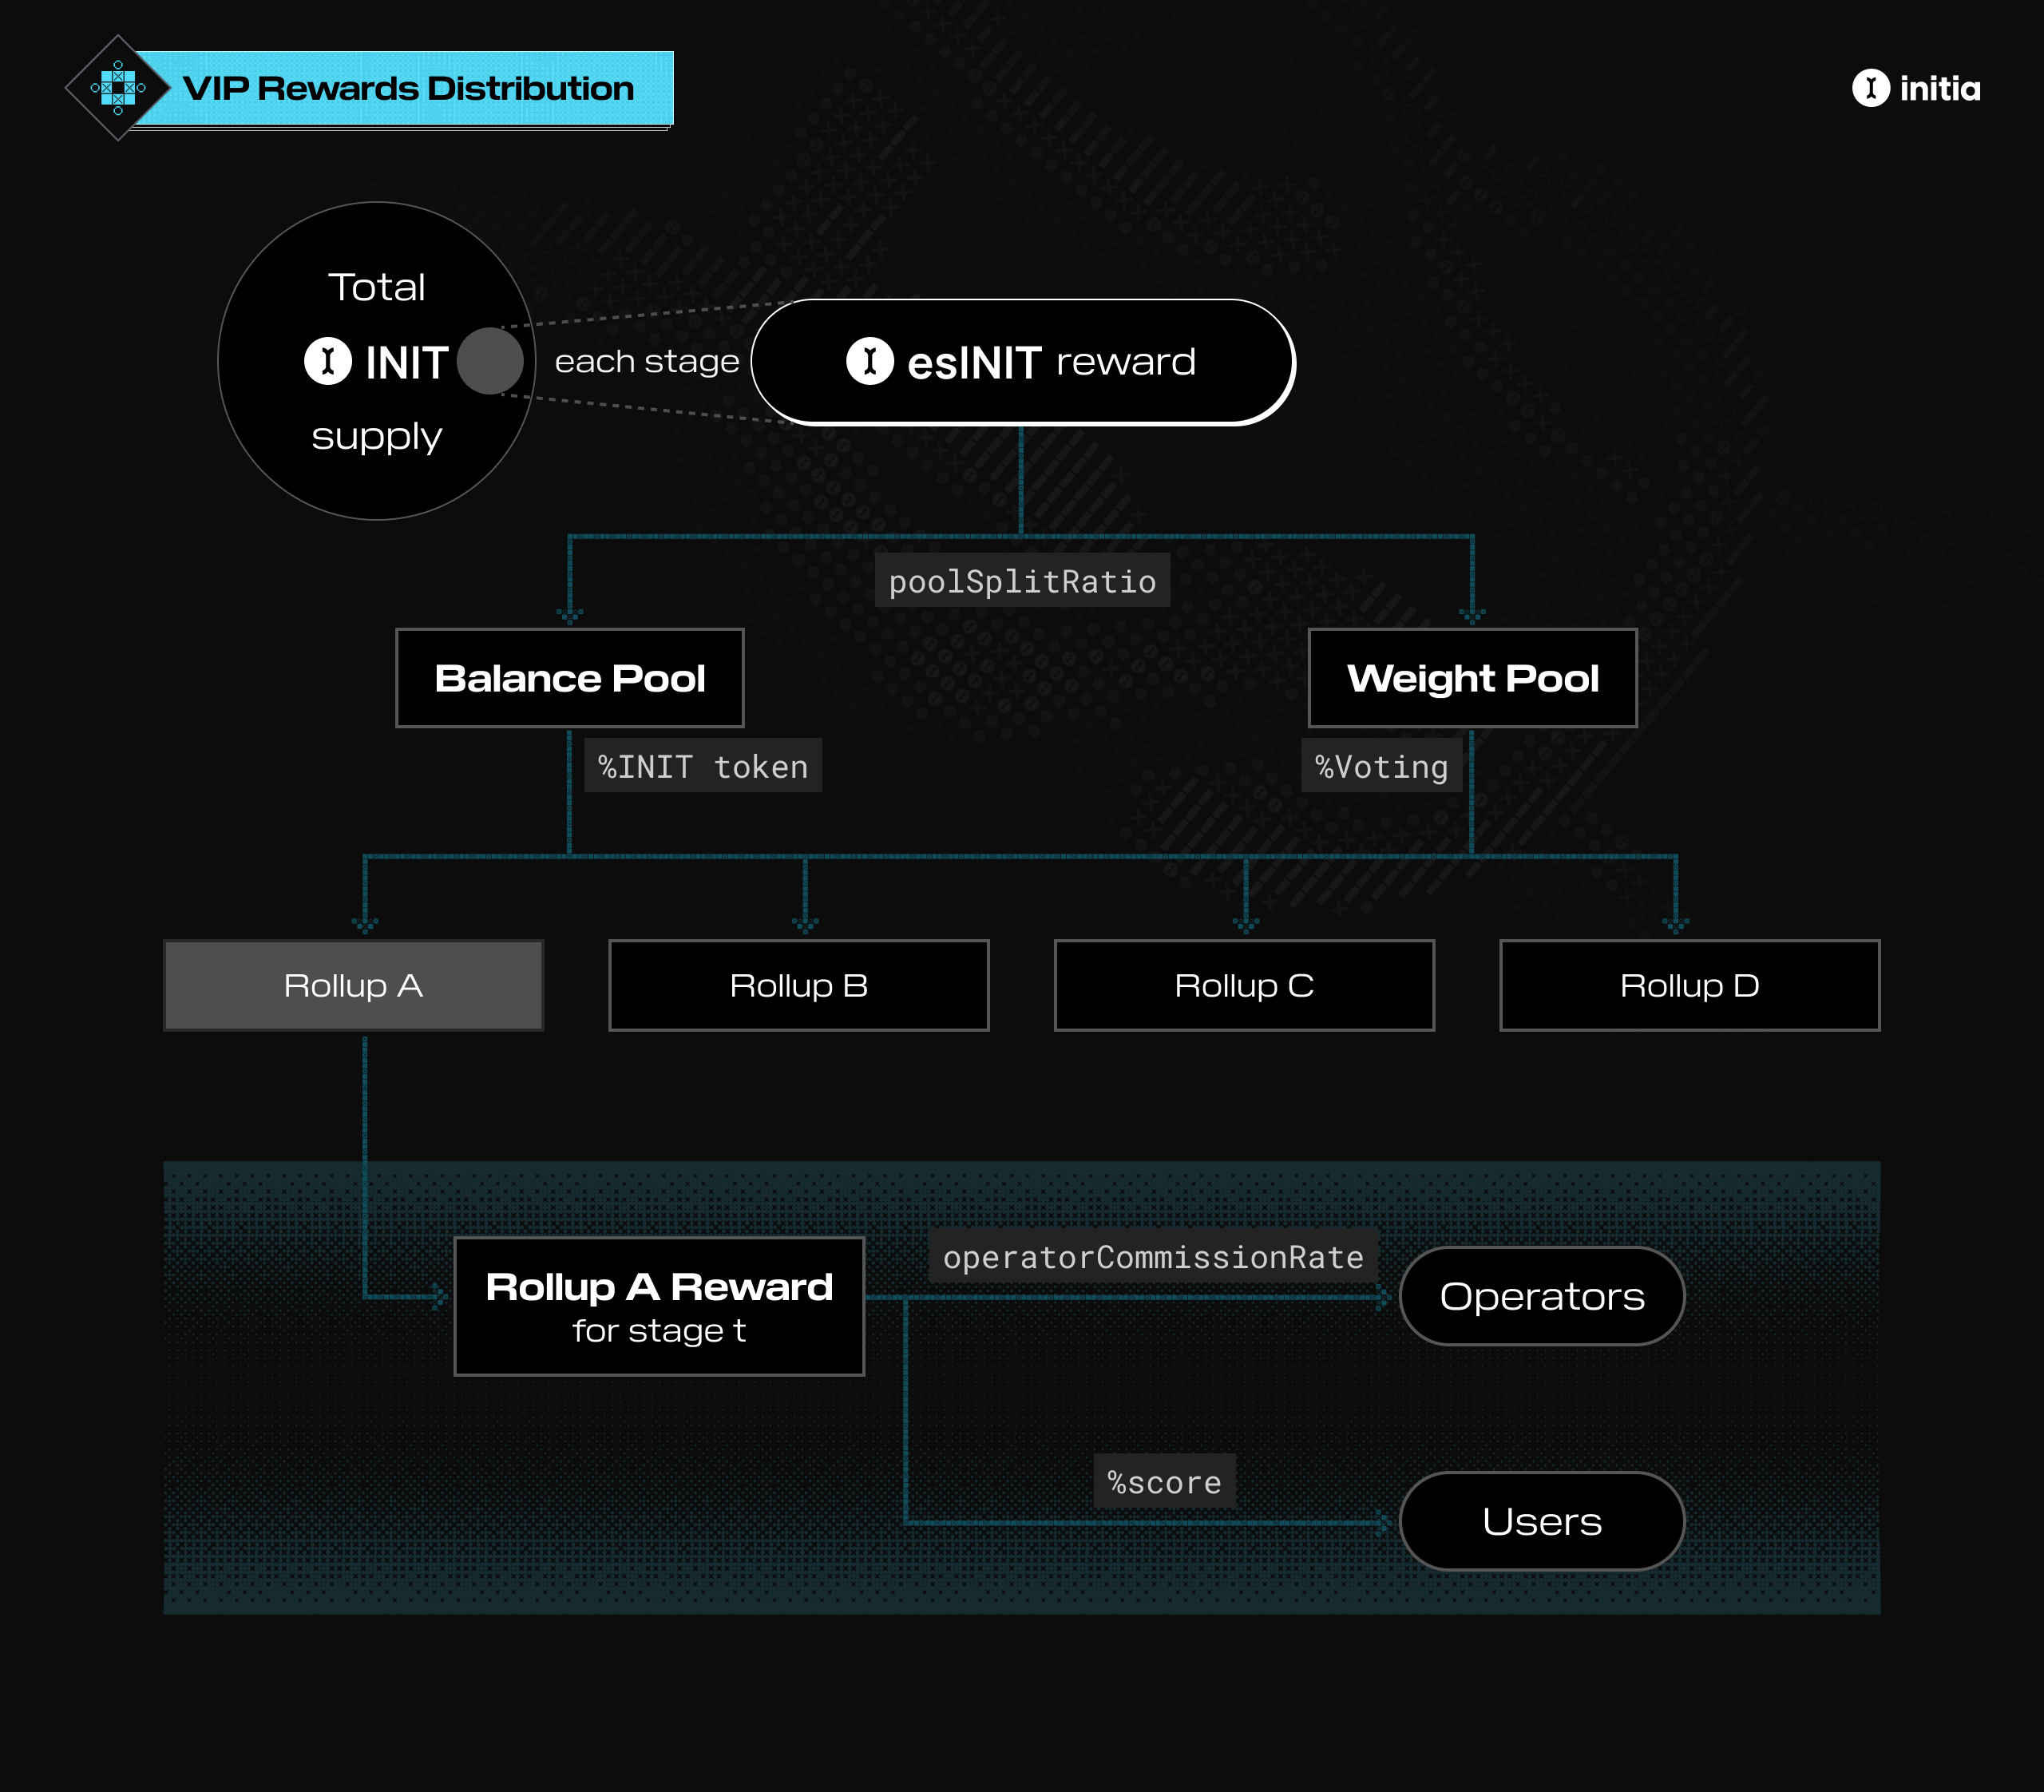
These two pools aim to incentivize and reward different aspects of rollup operations. The ratio between $R_B$ and $R_W$, called `poolSplitRatio`, is set by the Initia L1 governance and can be changed through on-chain proposals. The sum follows the equation:
$$
R_t = R_B + R_W
$$
The rewards for each rollup $m$ are then calculated as follows:
$$
R_{m,t} = R_{B,m,t} + R_{W,m,t}
$$
Where:
* $R_{B,m,t}$ represents the portion of rewards from the Balance Pool $R_B$ allocated to rollup $m$ at stage $t$.
* $R_{W,m,t}$ represents the portion of rewards from the Weight Pool $R_W$ allocated to rollup $m$ at stage $t$.
#### Balance Pool
The Balance Pool aims to encourage rollups to find new and interesting uses for the INIT token by distributing rewards based on the proportion of INIT supply on the rollup. Specifically, at each stage $t$, the rewards are allocated according to the amount of INIT locked on each rollup's OPinit bridge address $m$ relative to the total amount locked across all rollups.
$$
R_{B,m,t} = R_{B,t} \frac{I_{m,t}}{\sum_{i=1}^{N,t} I_{i,t}}
$$
Where:
* $R_{B,t}$ is the total rewards from the Balance Pool for the stage.
* $I_{m,t}$ is the amount of INIT tokens locked by rollup $m$ during the stage.
* $N_{t}$ is the total number of rollups in the stage.
#### Weight Pool
The Weight Pool ($R_W$) rewards rollups based on their weight value, which is determined by a gauge weight voting process similar to protocols such as Curve's.
$$
R_{W,m,t} = R_{W,t} \frac{W_{m,t}}{\sum_{i=1}^{N,t} W_{i,t}}
$$
Where:
* $R_{W,t}$ is the total rewards from the Weight Pool for the stage.
* $W_{m,t}$ is the weight of rollup $m$ during the stage.
* $N_{t}$ is the total number of rollups in the stage.
### Distribution to Rollup Users
Once we know how much rewards each rollup receives for a given stage, we then further distribute these rewards to the users of the rollup. The amount of VIP rewards to each user is defined by a scoring methodology decided by the rollup team. The scoring method could be based on factors such as:
* Number of transactions a user makes on the rollup.
* Value of assets a user borrows.
* Trading volume or liquidity provided by the user.
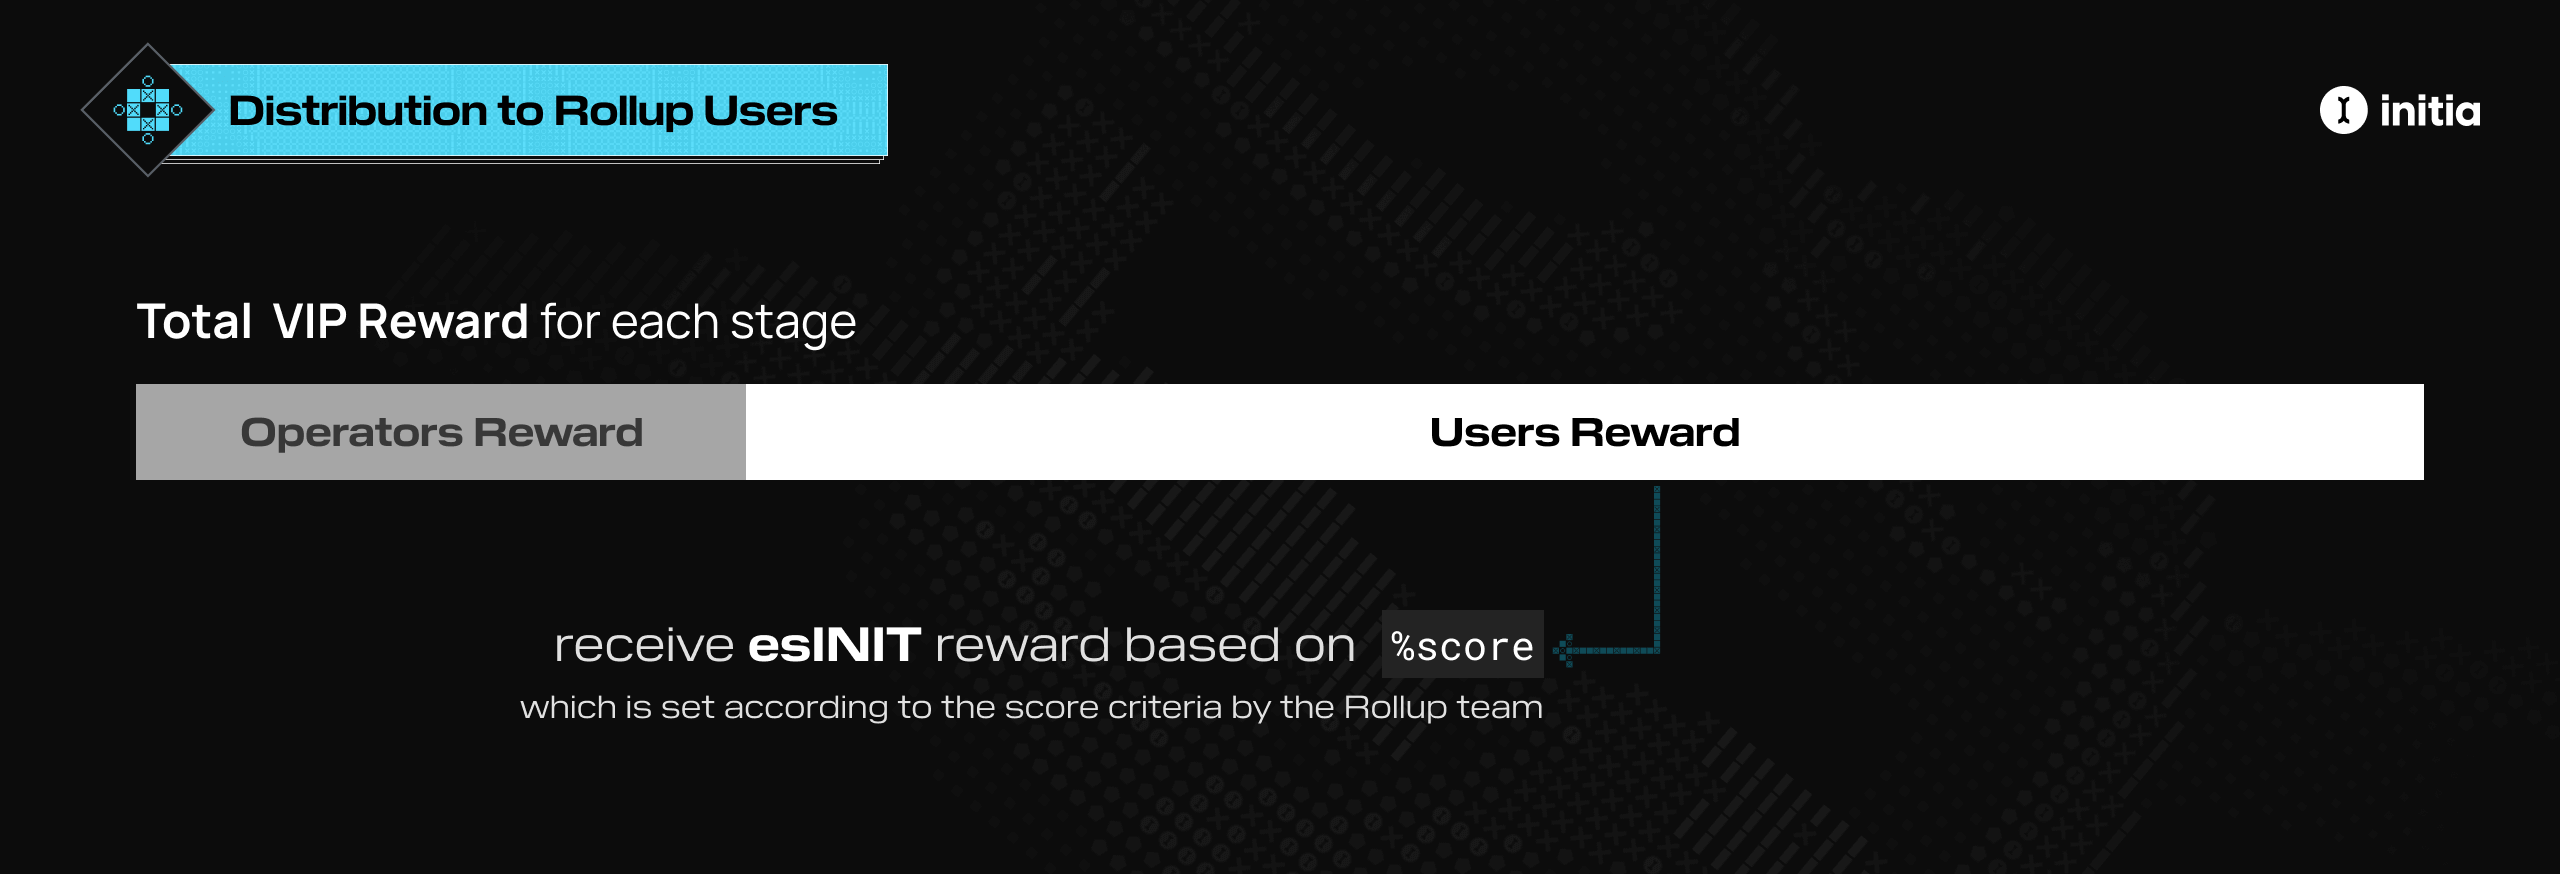
At the end of each stage, the rewards for each user are calculated and stored. Once the rewards for each rollup are known, the rewards are then directly distributed to the users of the rollup.
If a user $u$ on rollup $m$ has a score of $S_{u,m,t}$, their rewards are:
$$
R_{u,m,t} = R_{m,t} \frac{S_{u,m,t}}{\sum_{i=1}^{N_{u,m,t}} S_{i,m,t}}
$$
Where:
* $R_{m,t}$ is the total rewards from the VIP program for the stage.
* $S_{u,m,t}$ is the score of the user on rollup $m$ during stage $t$.
* $N_{u,m,t}$ is the total number of users on rollup $m$ during stage $t$.
### Distribution to Rollup Operators
To ensure that rollup operators are also incentivized to keep their rollups active and useful, they can set an `operatorCommissionRate`, $c$. This rate allows them to take a portion of the rewards for their rollup.
The rewards for an operator $o$ of rollup $m$ during a stage are:
$$
R_{o,m,t} = R_{m,t} c_{m}
$$
The commission rate is set when the rollup is first approved for VIP rewards and can be changed later, but only by a fixed amount each stage to prevent abuse.
Taking into account the operator commissions, the total rewards distributed to a user on a rollup is then:
$$
R_{u,m,t} = (1-c_{m}) R_{m,t} \frac{S_{u,m,t}}{\sum_{i=1}^{N_{u,m,t}} S_{i,m,t}}
$$
## Rewards Vesting
Rewards from the VIP program are given in the form of escrowed INIT tokens (esINIT). These tokens are initially non-transferable and can be vested in multiple ways depending on whether the receiver is the user or rollup operator.
### User Vesting
These tokens are initially non-transferable and can be vested in two ways:
1. **Maintain a VIP Score:** Keep a certain score over a number of `vestingPeriod`, with each period lasting `stageDuration`.
2. **Convert into LP Lock-Staked Position:** Convert the escrowed tokens into a whitelisted INIT:TOKEN staking position.
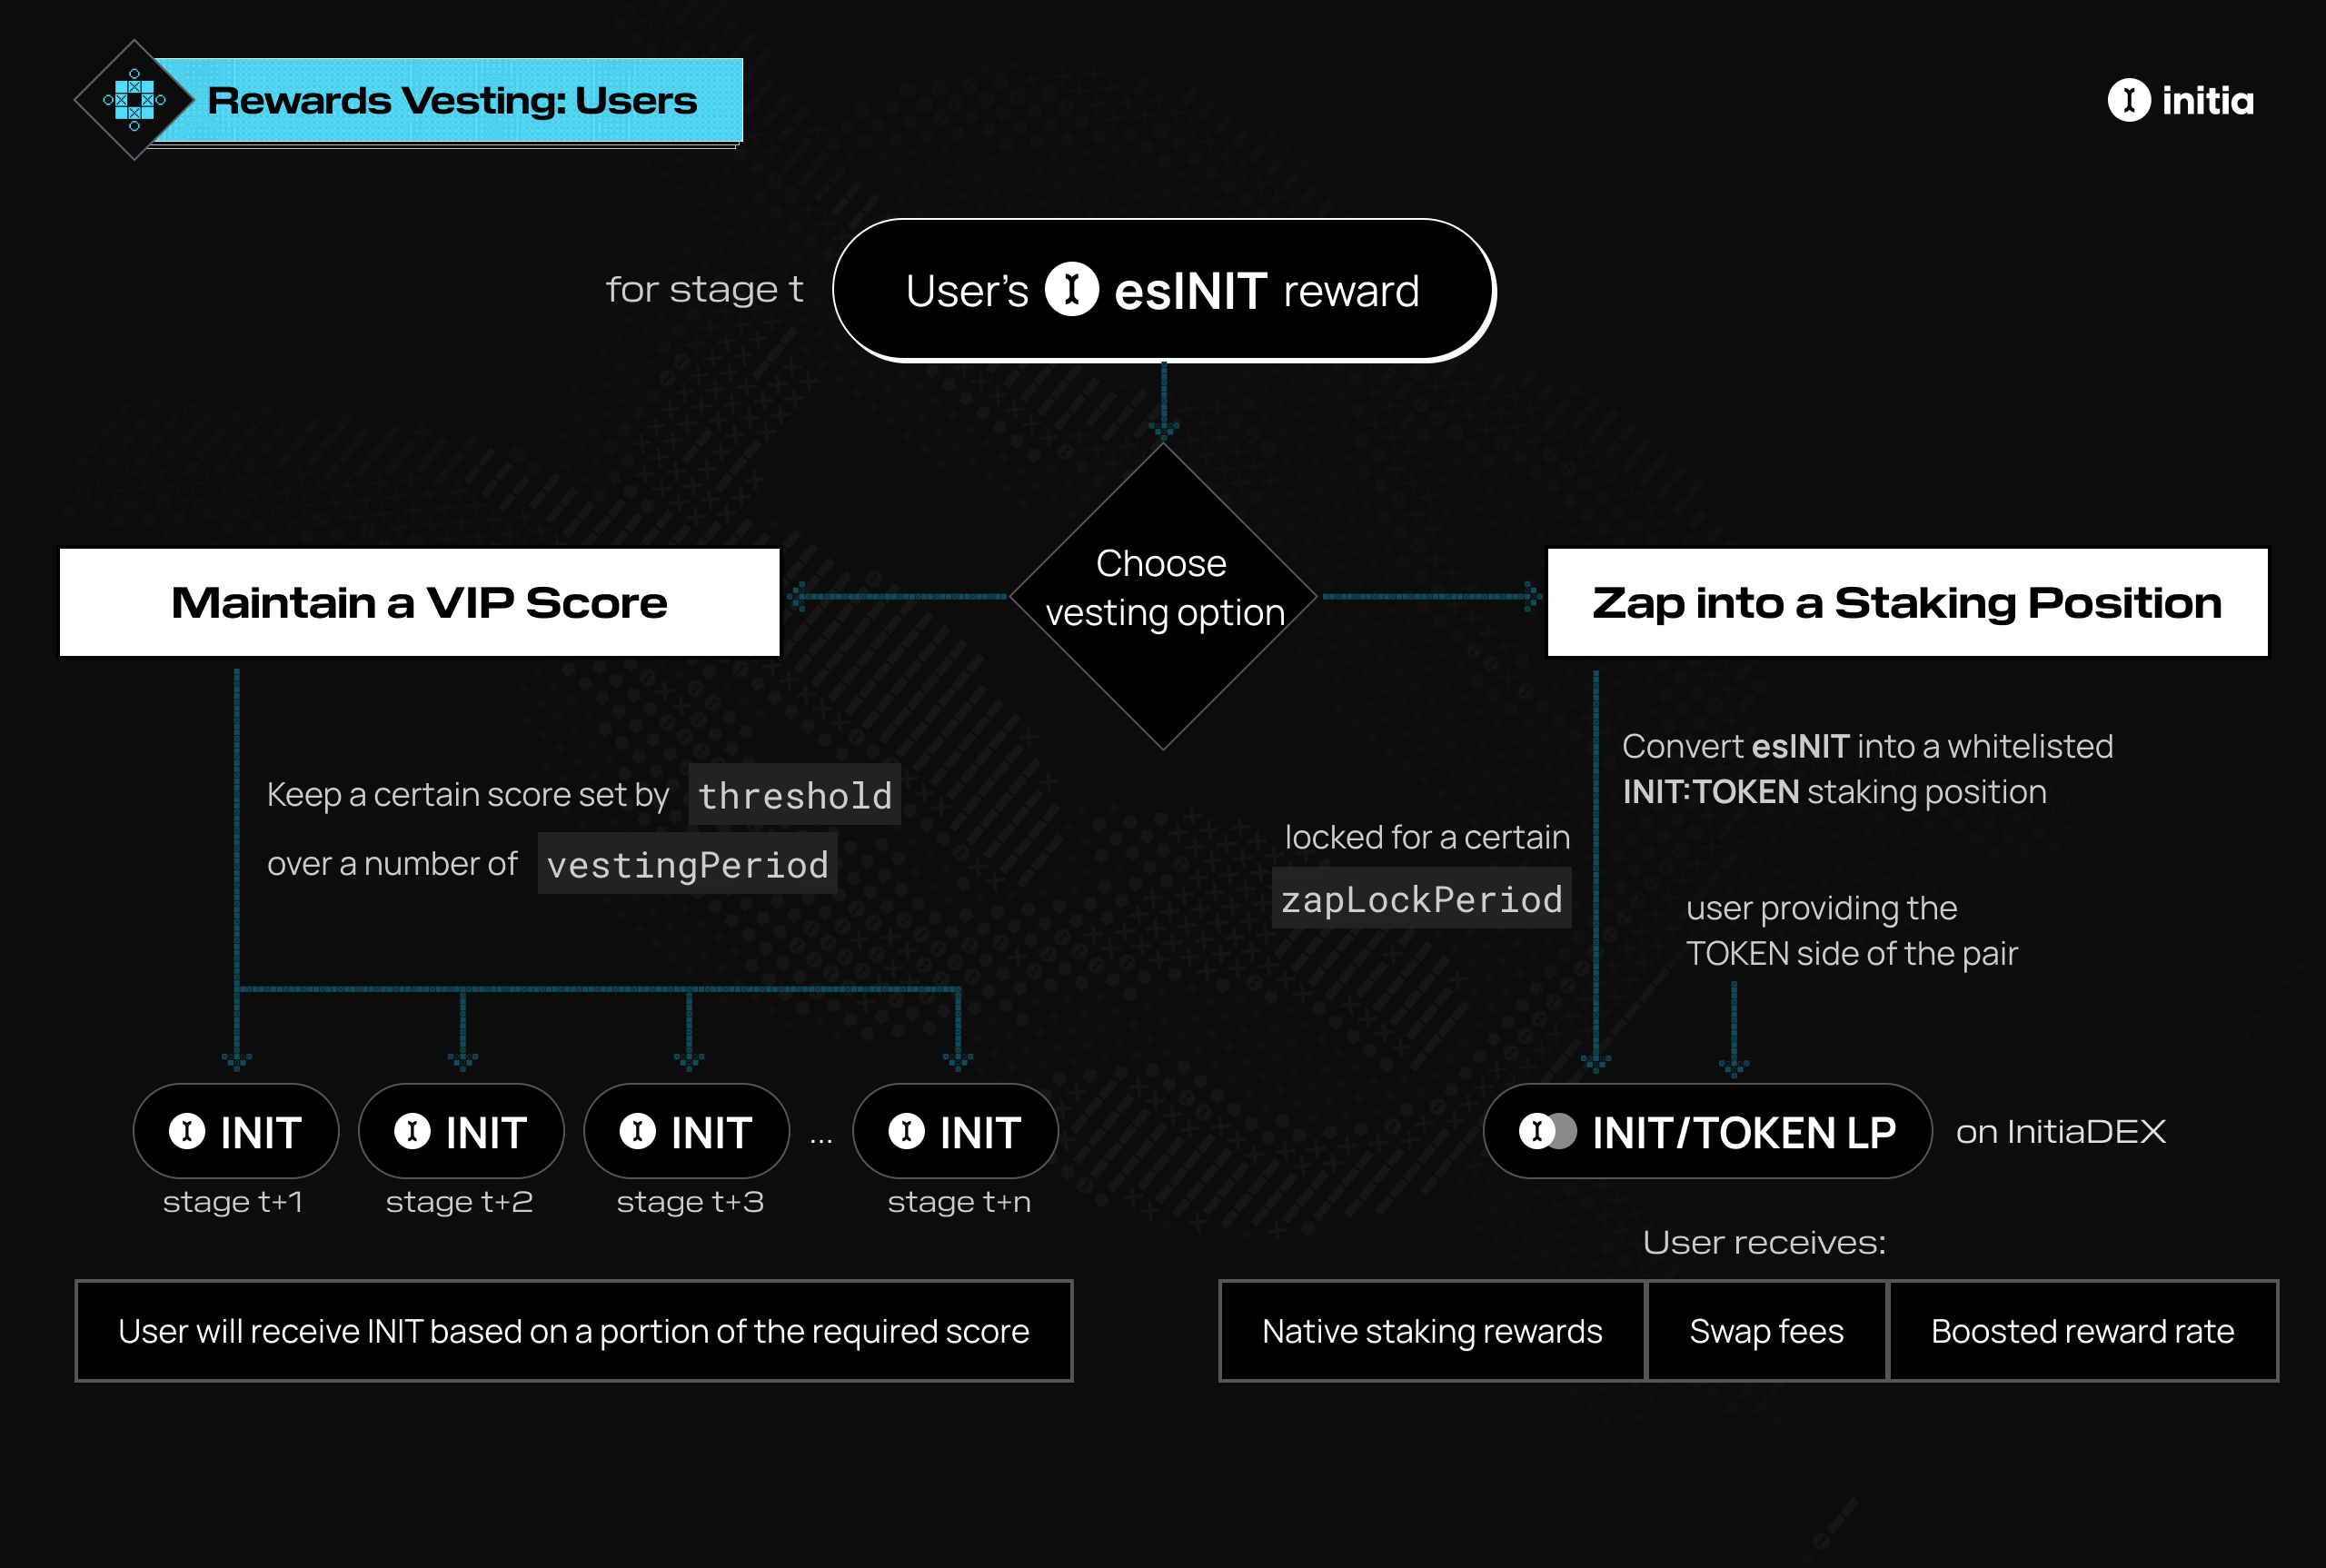
#### Maintaining a VIP Score
**Vesting Process**
VIP esINIT rewards are converted into regular INIT tokens over multiple `vestingPeriod`, denoted as $p$, with each period lasting one stage. For instance, if the vesting period is 26 stages, the user will receive $\frac{1}{26}$ of their esINIT at each stage.
**Achieving the Required Score**
To fully convert their rewards into INIT tokens, users must maintain a certain score over the vesting periods, $p$, as determined by Initia L1 governance. The minimum required score is set by a `threshold` factor $f$, also determined by the L1 governance. The score calculation is as follows:
$$
S_{\text{target},m,t} = S_{u,m,t} \cdot f
$$
Where:
* $S_{u,m,t}$ is the user's score on rollup $m$ during stage $t$.
* $S_{\text{target},m,t}$ is the target score for rollup $m$ during stage $t$.
**Calculating the Target Score**
The target score $S_{\text{target},m,t}$ is the user's score for stage $t$ multiplied by the factor $f$. For example, if a user $u$ has a score of 100 at stage $t$, their target score to fully vest their esINIT after $p$ stages is $100 \cdot f$.
**Failing to Meet Target Score**
If a user fails to meet the target score at a certain stage $t$, they will only vest and receive a portion of their esINIT, calculated by the formula:
$$
c_{\text{user}} = \frac{S_{u,m,t}}{S_{\text{target},m,t}}
$$
For instance, if $f$ is 0.5, a user with a score of 100 must maintain a score of at least $S_{\text{target},m,t} = 100 \cdot 0.5 = 50$ for the next $p$ stages to fully vest their esINIT. If after $p$ stages, their score $S_{u,m,t}$ is only 30, their $c_{\text{user}}$ will be $\frac{30}{50} = 0.6$, and they will only be able to vest 60% of their esINIT.
**Example Scenario**
Parameters
* **Vesting Period ((p))**: 50 stages
* **Minimum Score Factor ((f))**: 0.5
Stage 1 ((t = 1))
* **User Score**: 100
* **esINIT Received for Stage 1**: 100
* **Vesting Rate**: $\frac{100 \text{ esINIT}}{50 \text{ stages}} = 2 \text{ INIT per stage}$
Stage 2 ((t = 2))
* **Minimum Score Needed from Stage 1**: $100 \times 0.5 = 50$
* **User Score**: 60
* **Vesting from Stage 1**: Since $60 \geq 50$, the user vests the full 2 INIT
* **Vesting Rate for Stage 2**: $\frac{60 \text{ esINIT}}{50 \text{ stages}} = 1.2 \text{ INIT per stage}$
* **esINIT Received for Stage 2**: 60
Stage 3 ((t = 3))
* **Minimum Score Needed from Stage 1**: $100 \times 0.5 = 50$
* **Minimum Score Needed from Stage 2**: $60 \times 0.5 = 30$
* **User Score**: 40
* **Vesting from Stage 1**: Since $40 < 50$, the user vests $\frac{40}{50} \times 2 = 1.6 \text{ INIT}$
* **Vesting from Stage 2**: Since $40 \geq 30$, the user vests the full 1.2 INIT
* **Total Vesting for Stage 3**: $1.6 \text{ INIT (from Stage 1)} + 1.2 \text{ INIT (from Stage 2)} = 2.8 \text{ INIT}$
Summary Table
| Stage | User Score | esINIT Received | Vesting Rate (per stage) | Min Score Needed | Actual Vesting |
| ----- | ---------- | --------------- | ------------------------ | -------------------------- | -------------------- |
| 1 | 100 | 100 | 2 INIT | - | - |
| 2 | 60 | 60 | 1.2 INIT | 50 (Stage 1) | 2 INIT |
| 3 | 40 | - | - | 50 (Stage 1), 30 (Stage 2) | 1.6 + 1.2 = 2.8 INIT |
Explanation
1. **Stage 1**: The user scores 100 and receives 100 esINIT, which will be unlocked at a rate of 2 INIT per stage over 50 stages.
2. **Stage 2**: The user needs to score at least 50 to unlock the full 2 INIT from Stage 1. They score 60, so they unlock the full 2 INIT and receive 60 esINIT for Stage 2, which will be unlocked at a rate of 1.2 INIT per stage.
3. **Stage 3**: The user needs to score at least 50 to unlock the full 2 INIT from Stage 1 and at least 30 to unlock the full 1.2 INIT from Stage 2. They score 40, so they unlock 1.6 INIT from Stage 1 and the full 1.2 INIT from Stage 2, totaling 2.8 INIT.
#### Converting to LP Lock-Staked Position
Maintaining the score over several periods can be challenging for some users. Therefore, VIP allows users to convert their esINIT into a locked, stake-locked INIT:TOKEN LP position on the InitiaDEX for pairs whitelisted on Enshrined Liquidity, with the user providing the TOKEN side of the pair.
When creating a lock-staked position, users can choose the duration for locking their LP position. The length of this lock will determine their voting power on VIP gauge votes. However, when lock-staking through VIP, a minimum lock duration of 26 weeks is enforced.
### Operator Vesting
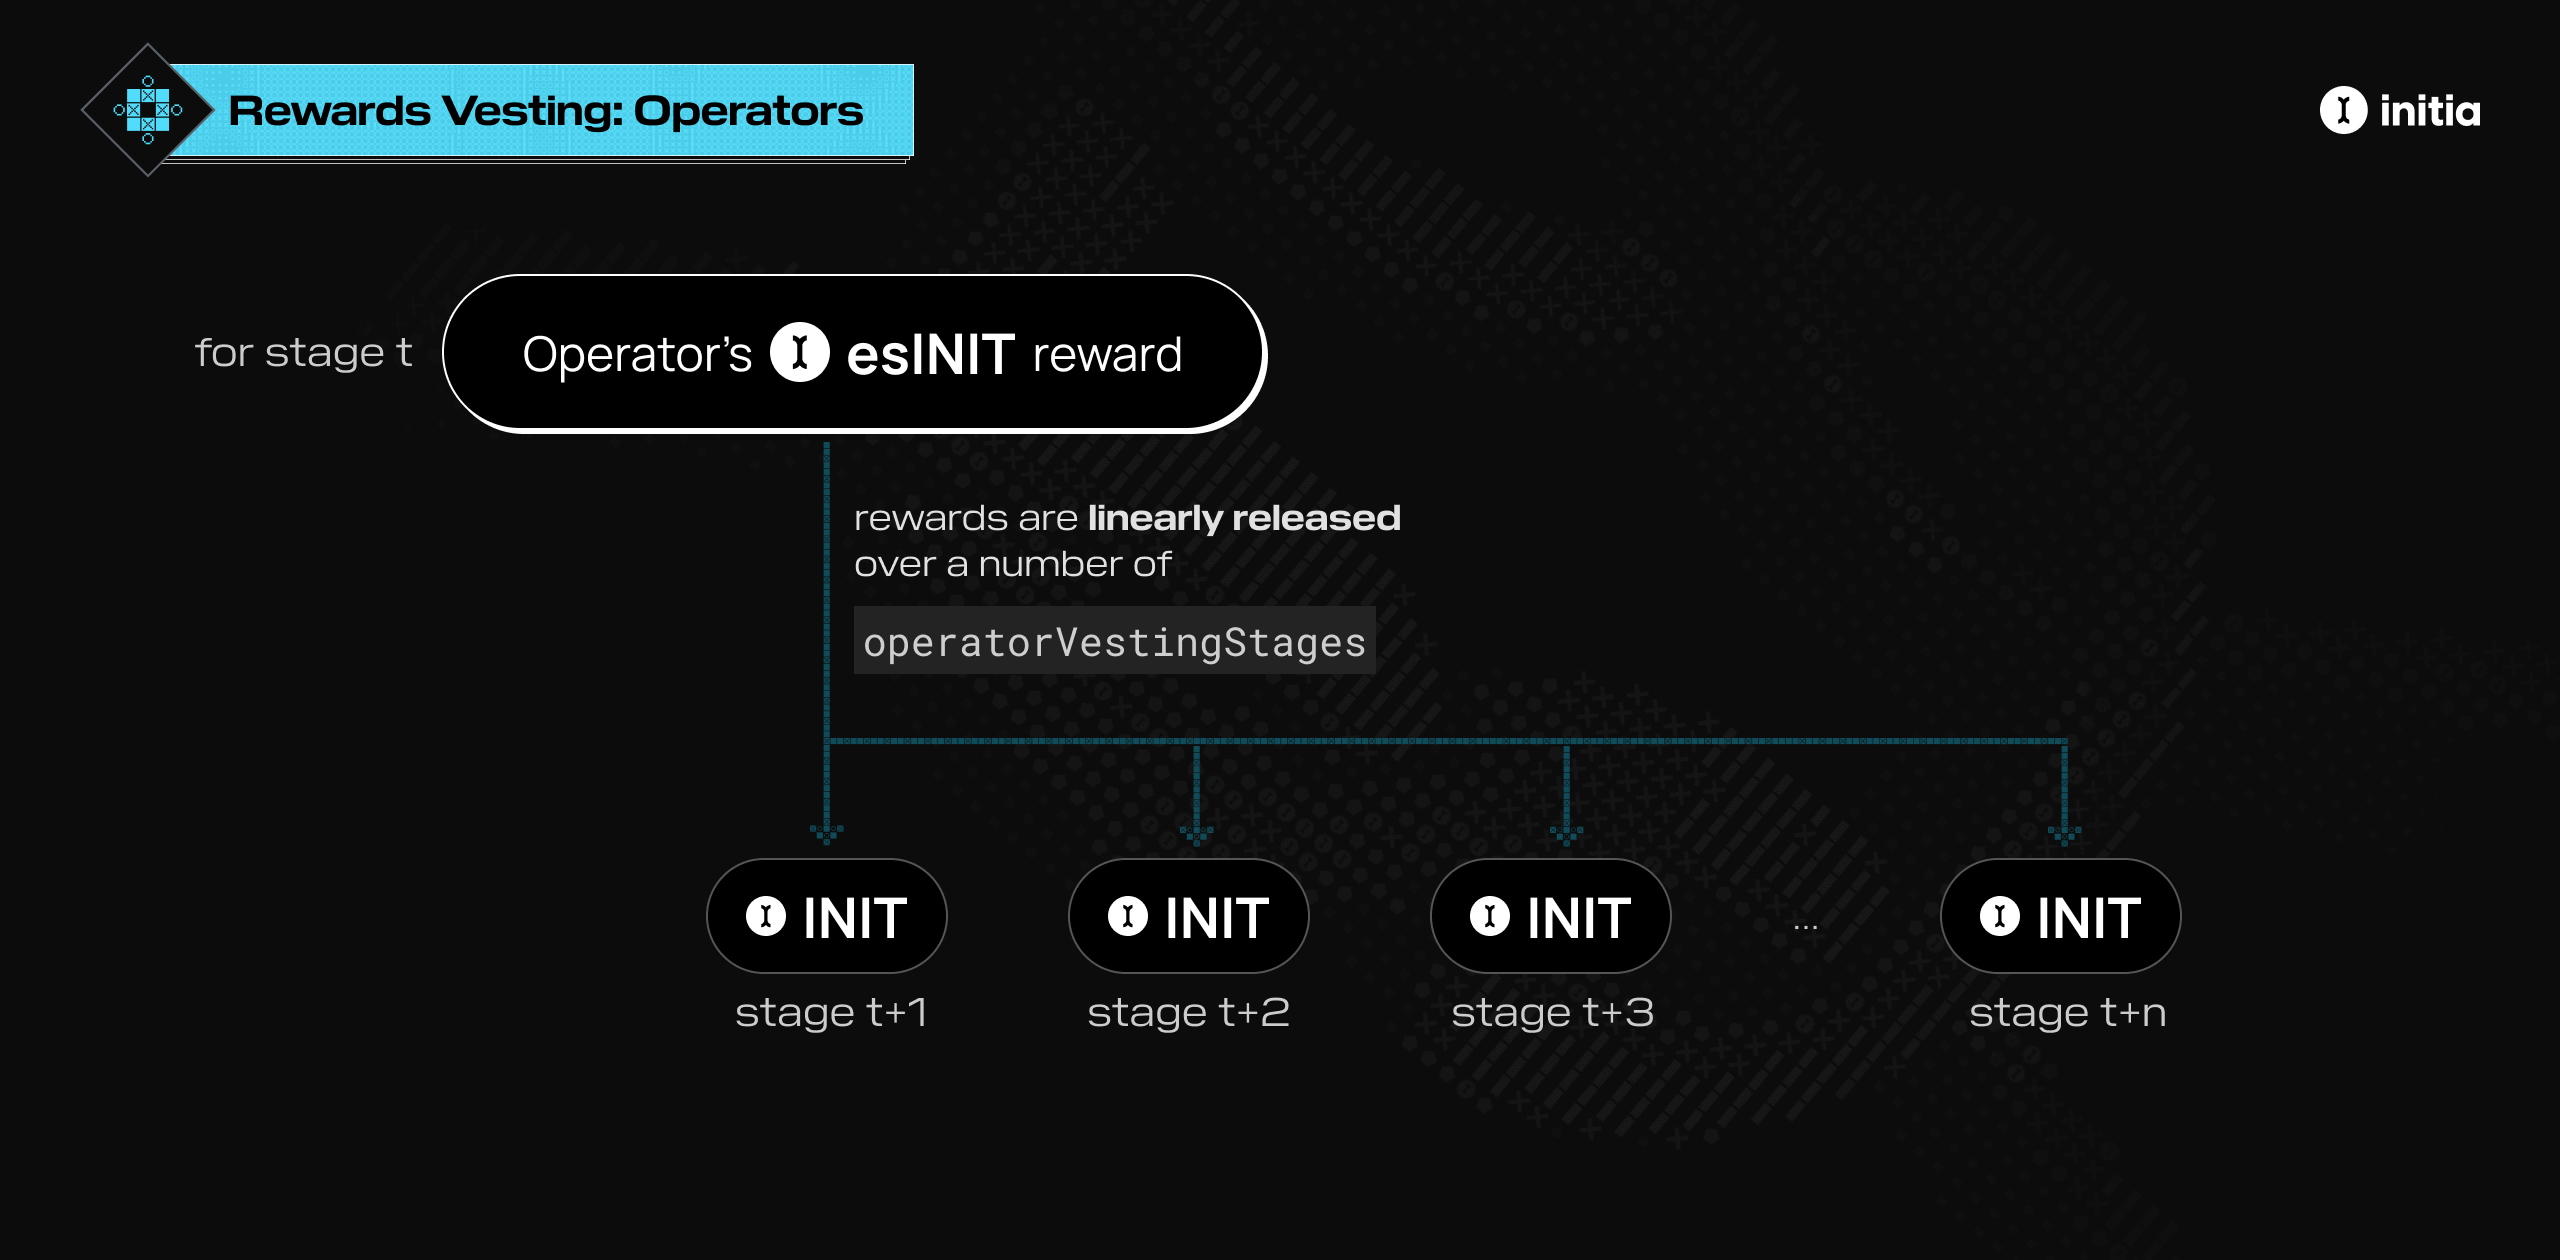
Similarly, rollup operators' esINIT rewards are also vested, but the process is slightly different. Operator esINIT rewards are released linearly over a number of `operatorVestingStages`. For example, if the operator vesting period consists of 10 stages, the operator will receive $\frac{1}{10}$ of their esINIT at each stage.
# VIP Eligibility
Source: https://docs.initia.xyz/home/core-concepts/vip/eligibility
For a rollup and its users to be eligible for VIP rewards, they first need to be whitelisted. The whitelisting process comprises of 2 steps:
1. Reaching the minimum INIT TVL threshold
2. Whitelisting via Initia L1 governance
## Minimum INIT TVL Threshold
To be considered for whitelisting on VIP, rollups must first meet a minimum INIT TVL (Total Value Locked) threshold.
* Rollups that somehow manage to get whitelisted without reaching the minimum INIT TVL threshold will still not be eligible for rewards until they meet this requirement.
* Rollups that have been whitelisted and successfully reached the minimum INIT TVL threshold will forfeit any VIP rewards if their TVL subsequently falls below this threshold.
## Governance Whitelisting
Once the minimum INIT TVL threshold is reached, the rollup needs to then submit a whitelisting proposal to the Initia L1 governance. As with all governance proposals, the whitelisting proposal will be voted on by INIT and Enshrined Liquidity stakers.
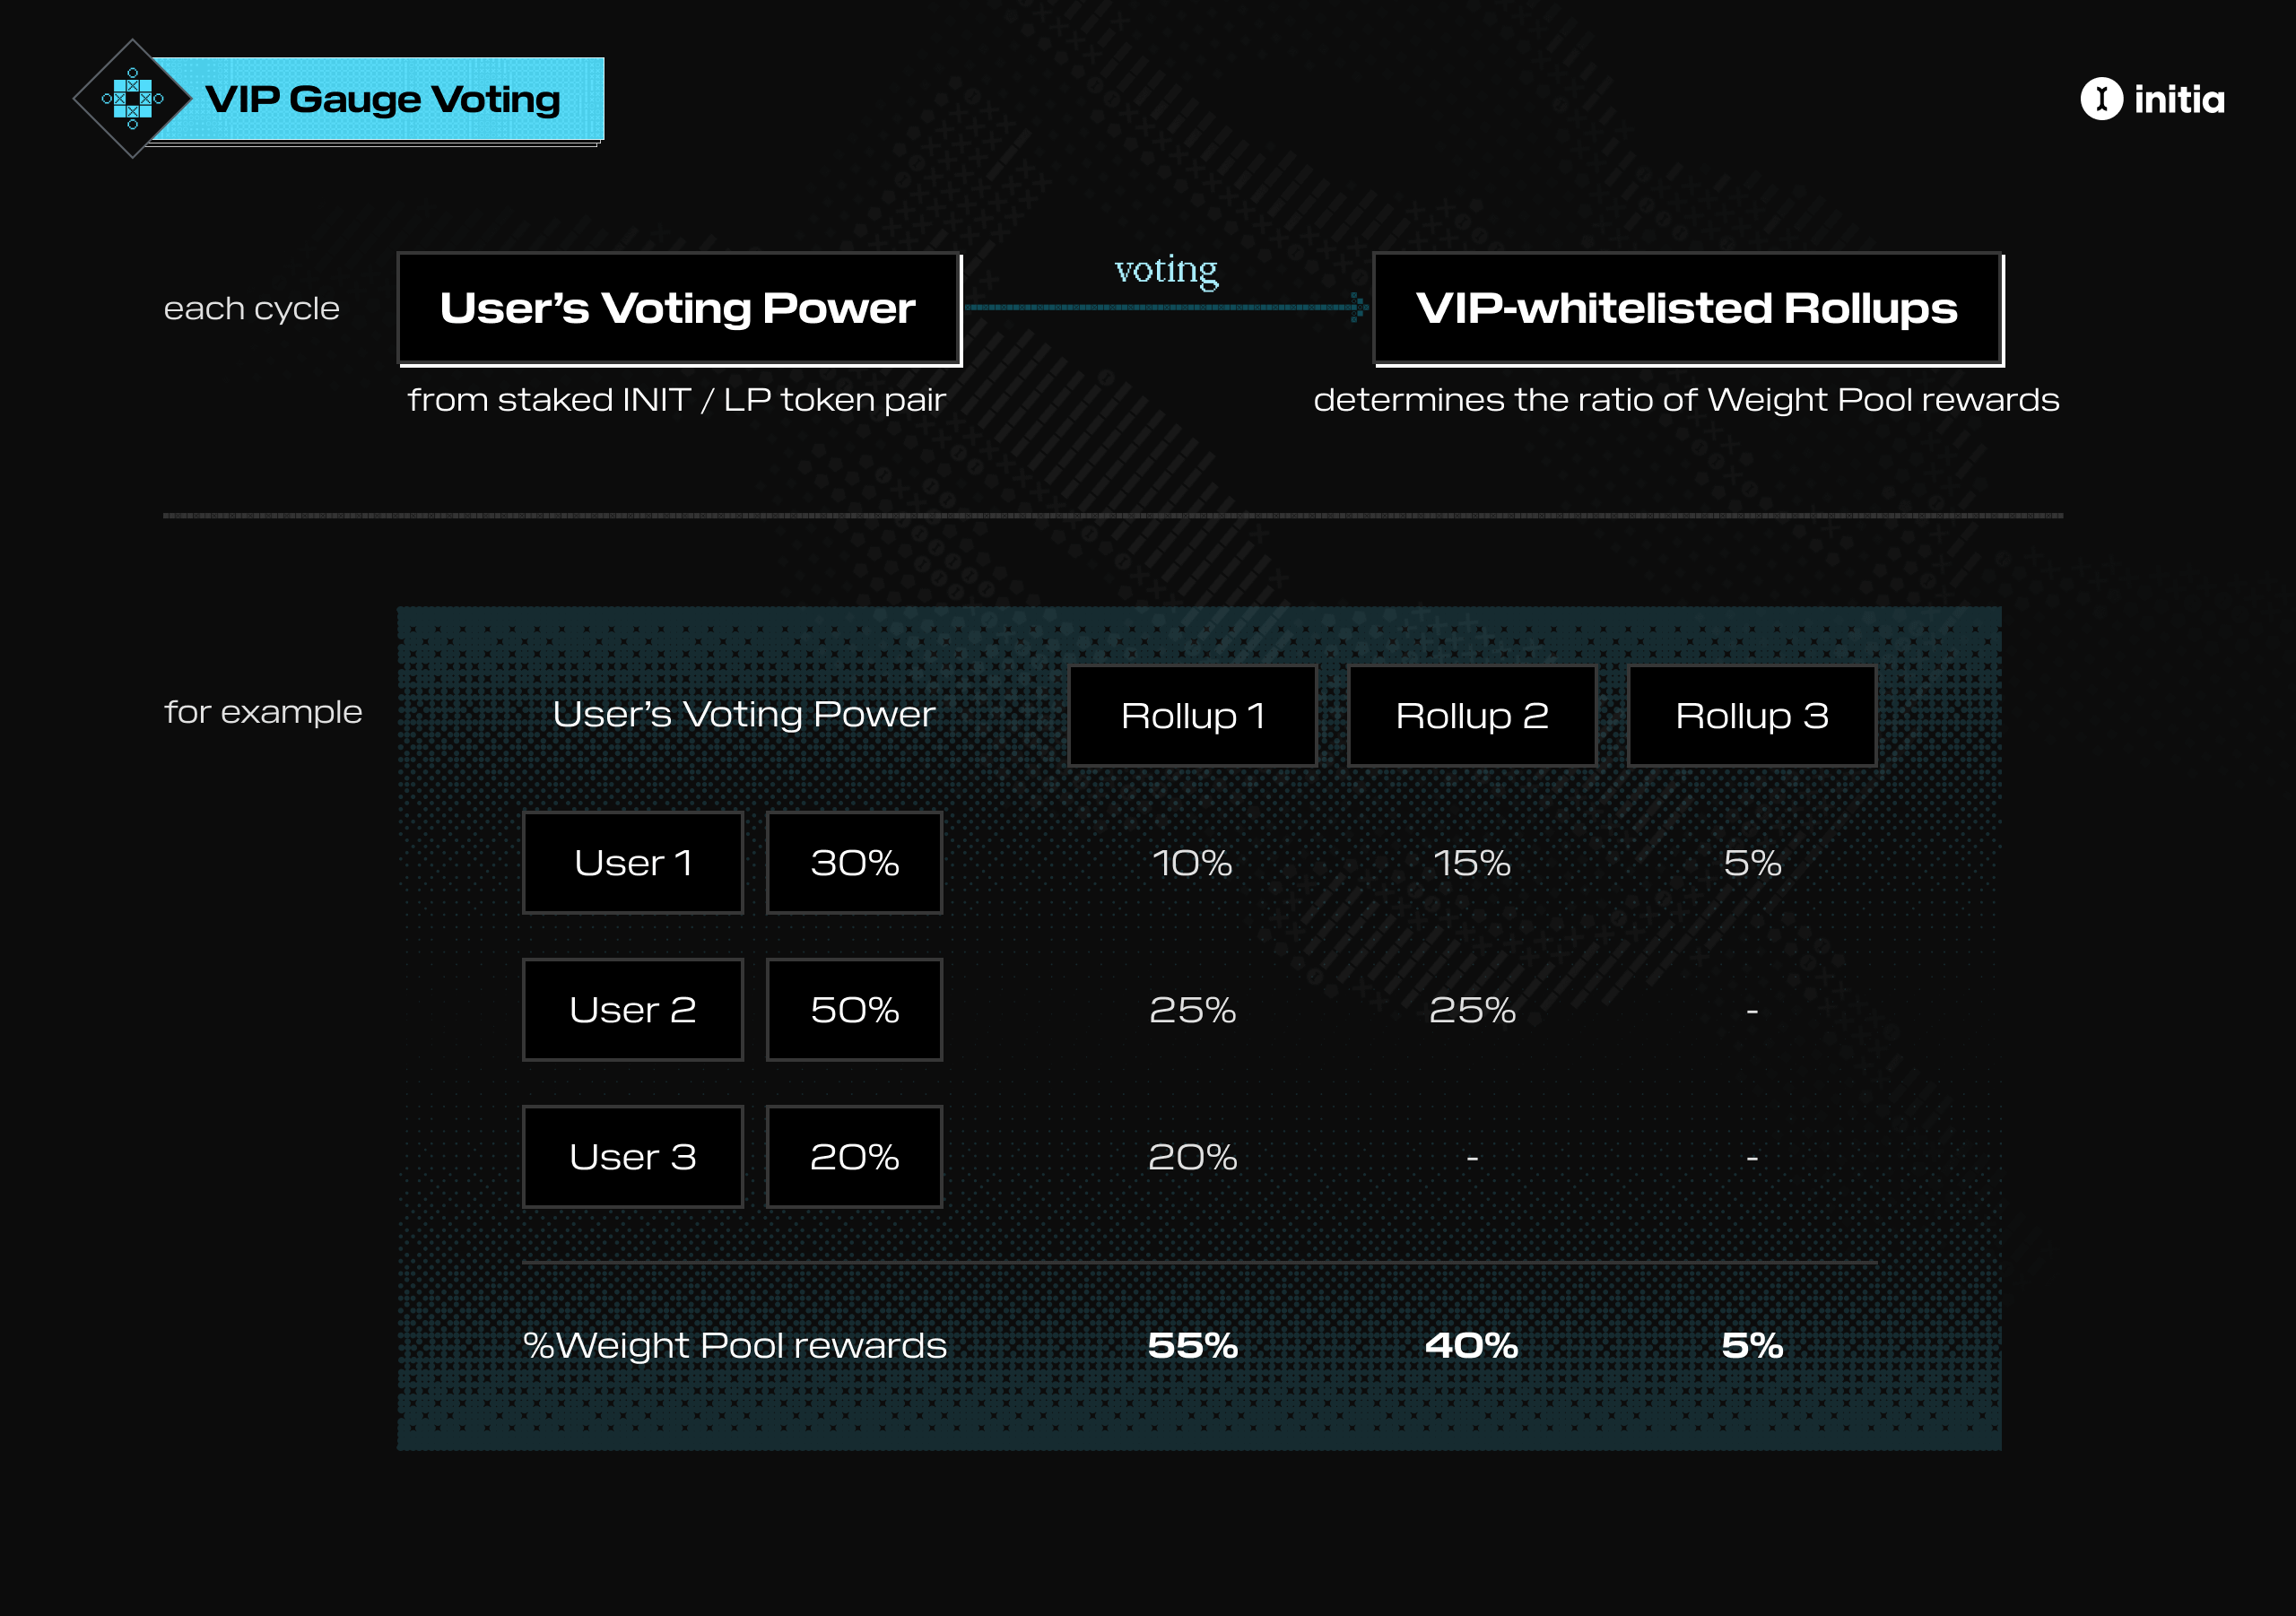
* Rollups that add little value to the ecosystem (e.g., rollups that only accumulate TVL with no productive use case)
* Rollups that exist solely to allow the corresponding app to qualify for VIP rewards (e.g., rollups where the app is otherwise completely off-chain)
# VIP Gauge Voting
Source: https://docs.initia.xyz/home/core-concepts/vip/gauges
To decide how much of the total [Weight Pool](/home/core-concepts/vip/architecture#weight-pool) rewards are distributed to each rollup in a given stage, a gauge weight voting process is used. This is similar to the one pioneered by Curve Finance for use with their liquidity pools.
### Voting Cycles
Voting on VIP gauges occurs at regular intervals called **cycles**. Every VIP-whitelisted rollup has a "gauge" that determines the ratio of total Weight Pool rewards it can receive. INIT and Enshrined Liquidity stakers can then use their voting power to increase the weight of the gauges for their preferred rollups. They can allocate their entire voting power to a single rollup's gauge or distribute it across multiple gauges. All gauge voting occurs on Initia L1.
### Gauge Voting Power
For VIP Gauge Votes, a user's voting power depends on their staking position. For INIT staking, their VIP voting power matches their voting power in the Initia L1 governance. However, for Enshrined Liquidity staking positions, an adjustment factor is applied to their voting power. This adjustment factor varies for each staked LP token pair.
#### Example Scenario
Consider a case with 3 users and 3 rollups:
| User | Total Voting Power |
| ------ | ------------------ |
| User 1 | 30% |
| User 2 | 50% |
| User 3 | 20% |
Each user decides to vote on the gauges as follows:
| User | Rollup 1 Gauge | Rollup 2 Gauge | Rollup 3 Gauge |
| ------ | -------------- | -------------- | -------------- |
| User 1 | 10% | 15% | 5% |
| User 2 | 25% | 25% | 0% |
| User 3 | 20% | 0% | 0% |
\*Percentages represent the portion of each user's total voting power allocated to each rollup.
After the voting period ends, the final Weight Pool reward distribution is calculated as follows:
| Rollup | Percentage of Total Rewards |
| -------- | --------------------------- |
| Rollup 1 | 55% |
| Rollup 2 | 40% |
| Rollup 3 | 5% |
In this case, the Weight Pool rewards for the cycle will then be split 55:40:5.
# VIP Introduction
Source: https://docs.initia.xyz/home/core-concepts/vip/introduction
In an ecosystem with a growing number of rollups, aligning the incentives of all participants is crucial. Although there have been attempts to achieve this, most encounter a few common core problems:
* Misalignment of incentives for dApps that generate high levels of on-chain activity and value
* Economic underutilization of the native token
* Inefficient distribution of protocol-level grants and incentives to foster long-term value and alignment
Initia aims to address these issues for Interwoven Rollups through a novel incentive alignment mechanism known as the Vested Interest Program (VIP). This is done by programmatically rewarding valuable economic activities:
* Rollup receive reward allocations for creating innovative apps and new use cases for the INIT token
* Users earn INIT tokens from performing beneficial actions or meeting criteria set by the L2s.
Finally, by allocating a portion of the overall rewards directly to the rollups, the VIP program ensures that the rollup teams, its users, and INIT holders are long-term aligned with the success of the ecosystem.
# VIP Scoring
Source: https://docs.initia.xyz/home/core-concepts/vip/scoring
## Introduction
The VIP Program employs a scoring system designed to allocate esINIT rewards to users. This system evaluates users based on their activities and contributions within a specific rollup. The specific scoring policy varies between each rollup, and the scoring process is conducted on-chain directly by the respective rollup team.
### Scoring Phase
First, during each epoch, rollup teams score their users based on their activity through a `vip_score` contract.
To score users, the rollup operator must first register the `deployer` account on the `vip_score` contract using their operator key. Once registered, the deployer can add and remove user scores based on the determined criteria. See [this page](/developers/developer-guides/integrating-initia-apps/vip) for more information on how scoring works. All future scoring actions can only be performed by the deployer until they are changed or removed.
Once the scoring for an epoch is complete, the scores must be finalized by calling a function on the `vip_score` contract.
### Snapshotting Phase
Once finalized, the VIP Agent snapshots and submits the scores from all miniatures, storing them in the Initia L1 VIP module. The Agent is an actor selected through Initia L1 governance. After all snapshots have been taken and stored, the esINIT rewards are distributed to the users.
### Claiming Phase
Finally, the user can finally claim the distributed rewards.
### VIP Criteria & Scoring Policies
#### Transparency
1. All scoring methodologies must be clearly listed and published in the rollup's VIP whitelisting proposal in full detail, both on the forums and in the on-chain proposal.
2. VIP scoring details included in the proposal must include all eligible user actions, criteria, distribution methodologies, and any calculations involved.
3. All scoring methodologies need to be transparent and verifiable by anyone.
#### Scoring Criteria
4. Points may be allocated based on a user's usage of other chains within the Interwoven Economy, provided that the usage is relevant and beneficial to the rollup conducting the scoring.
5. VIP scores must only be allocated based on actions or metrics that are on-chain, such as users performing specific actions or transactions, holding assets, or other positions
6. Actions performed off-chain, such as referrals and social media posts or engagements, cannot be used for scoring. This also include incentivizing usages of specific tools, frontends, wallets, or other applications.
#### Restrictions
7. VIP scores can not be granted directly to rollup operators, team members, or their associated accounts.
8. Rollup teams cannot use VIP scores to incentivize users to vote for them on the VIP gauges.
9. Incentivizing users to hold naked assets such as BTC, ETH, USDC, and governance tokens, or to provide liquidity for any pair on any DEX, is prohibited
10. If a rollup wants to incentivize holding specific assets, those assets must be ones where the underlying token is used productively (for example, LST, staking token variants, yield-bearing assets, etc.).
All whitelisting proposal and scoring criteria are reviewed by the VIP Committee. This committee consists of stewards who uphold Initia VIP requirements and prioritizes the sustainable success of the Interwoven Economy.
Final approval for whitelisting rollups comes from Initia L1 governance through an on-chain vote. Any changes to a rollup's criteria must be submitted to the forums for review and approval by the VIP Committee before implementation.
**Any attempts to bypass, circumvent, or abuse the VIP scoring system may result in the removal of the offending rollup from the VIP Program.**
# VIP Timelines
Source: https://docs.initia.xyz/home/core-concepts/vip/timelines
## Timelines
### Gauge Voting Cycles
The Vested Interest Program always begins with a [gauge voting](/home/core-concepts/vip/gauges) cycle. During this cycle, Initia L1 stakers vote on the gauge weights that will determine the VIP [Weight Pool](/home/core-concepts/vip/architecture#weight-pool) rewards distribution for the next rewards stage.
### Reward Distribution Stages
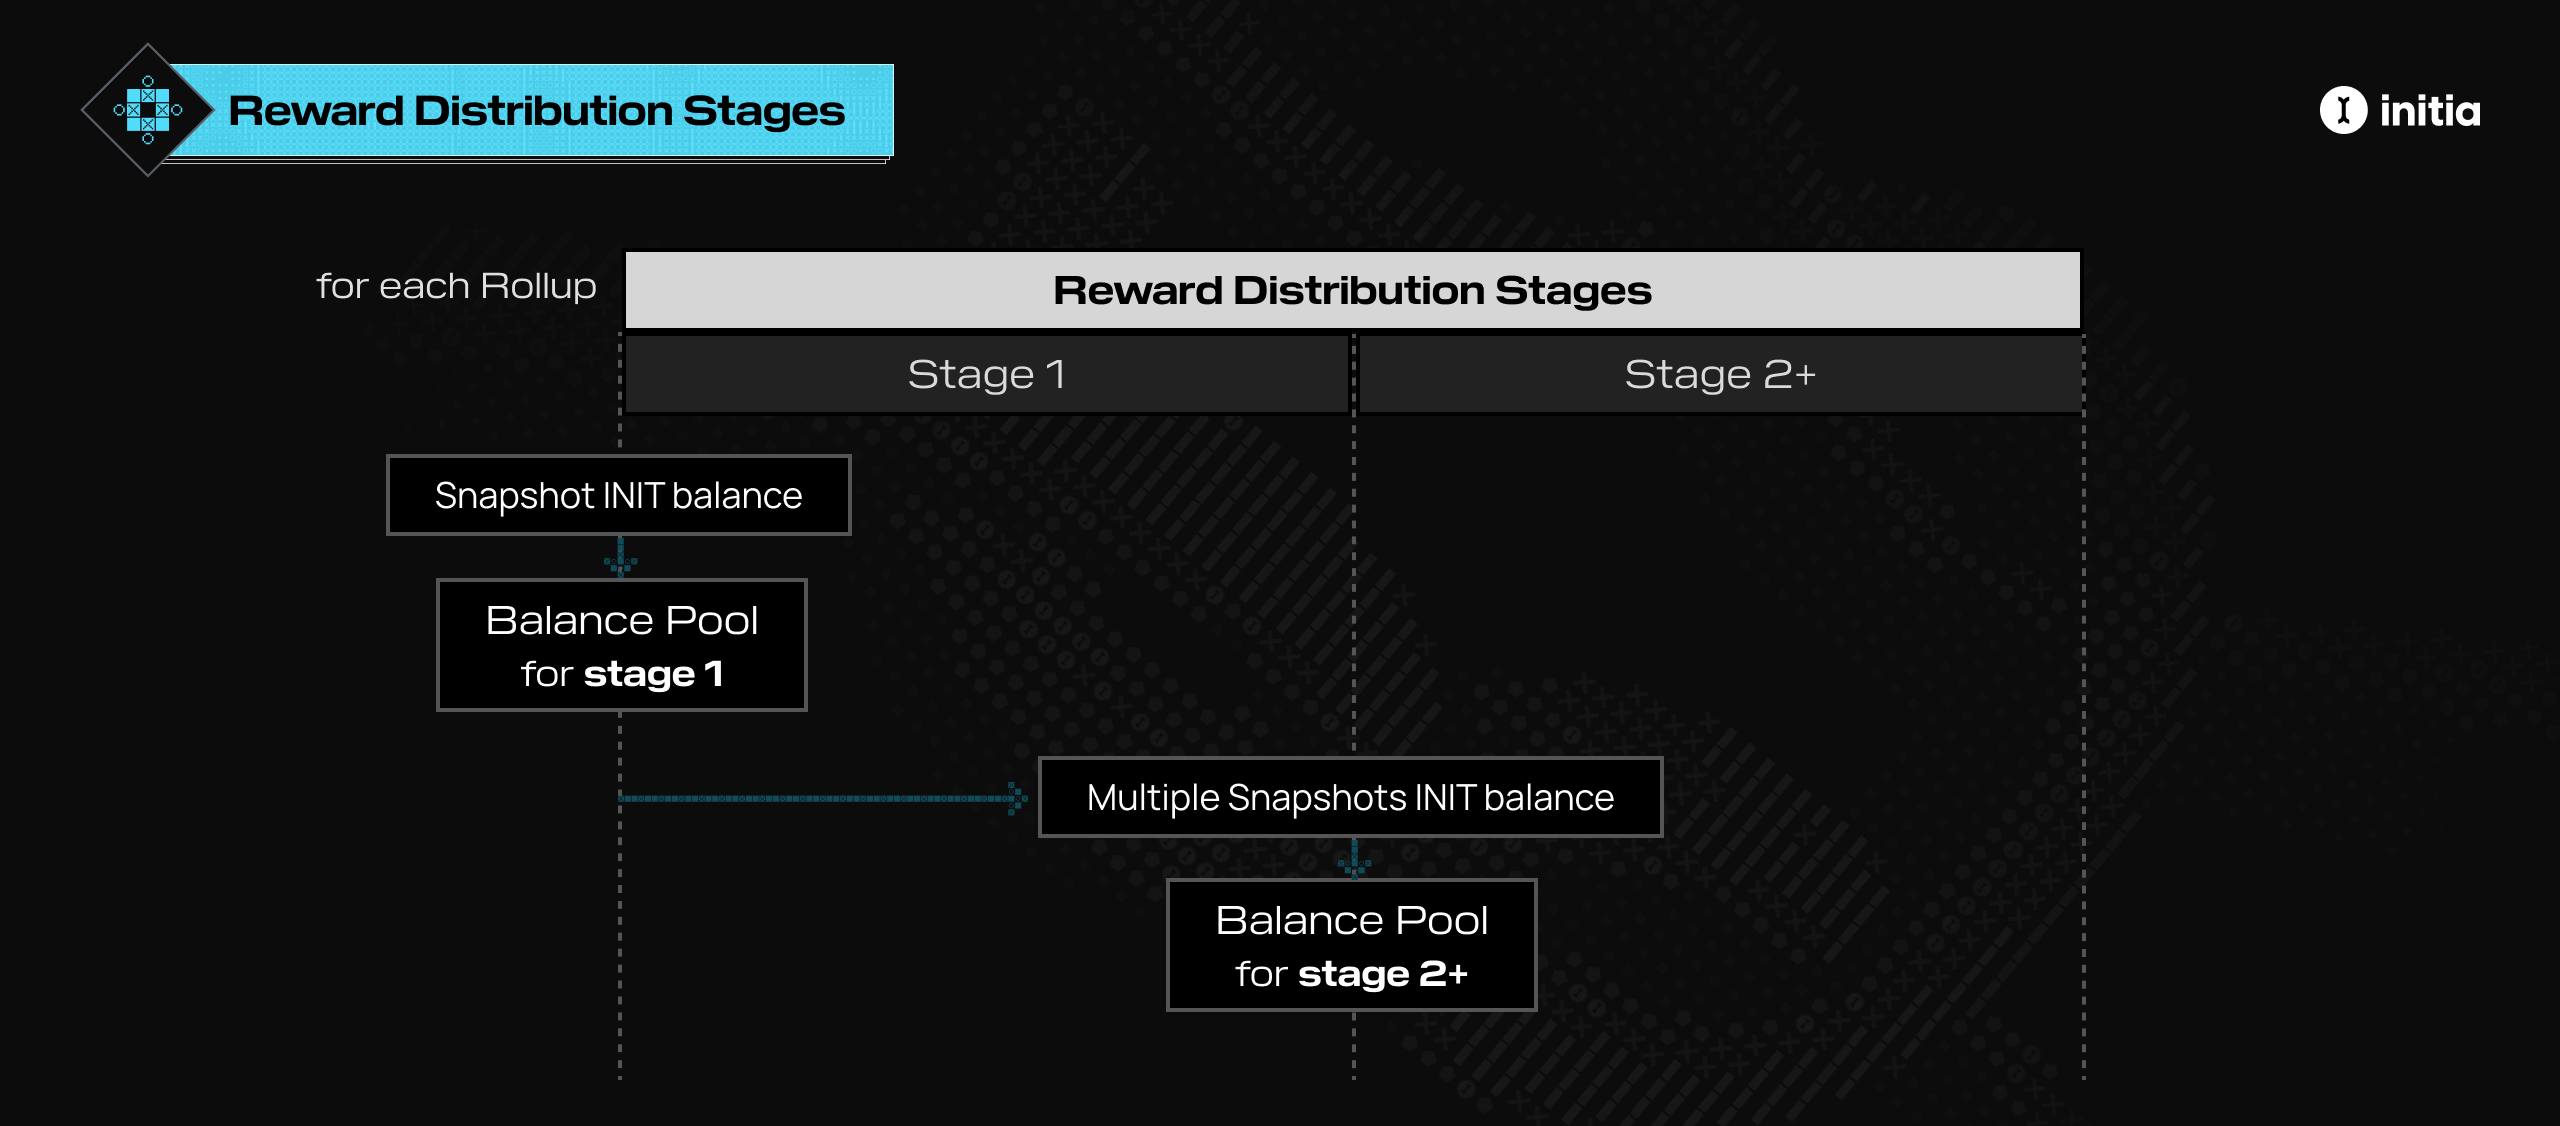
After the first gauge voting cycle concludes, the first reward distribution stage begins. During a stage, the individual rollup teams will begin to keep track of scores for all of their users based on their scoring criteria.
During a stage, the snapshot of each rollup's INIT balance will also be taken and used to determine the VIP \[Balance Pool] rewards. There are two ways the snapshot is done:
1. **For Stage 1**: Two snapshots are taken: a single snapshot at the beginning of the stage to determine the VIP Balance Pool rewards for Stage 1, and multiple snapshots throughout the stage to determine the VIP Balance Pool rewards for Stage 2+.
2. **For Stage 2+**: Multiple snapshots are taken throughout the stage to determine the VIP Balance Pool rewards for the next stage.
At the end of the stage, the scores for each user on each rollup are finalized, and the final rewards are distributed to the users.
The combined timelines of the the gauge voting cycle and rewards distribution stage then as follows:
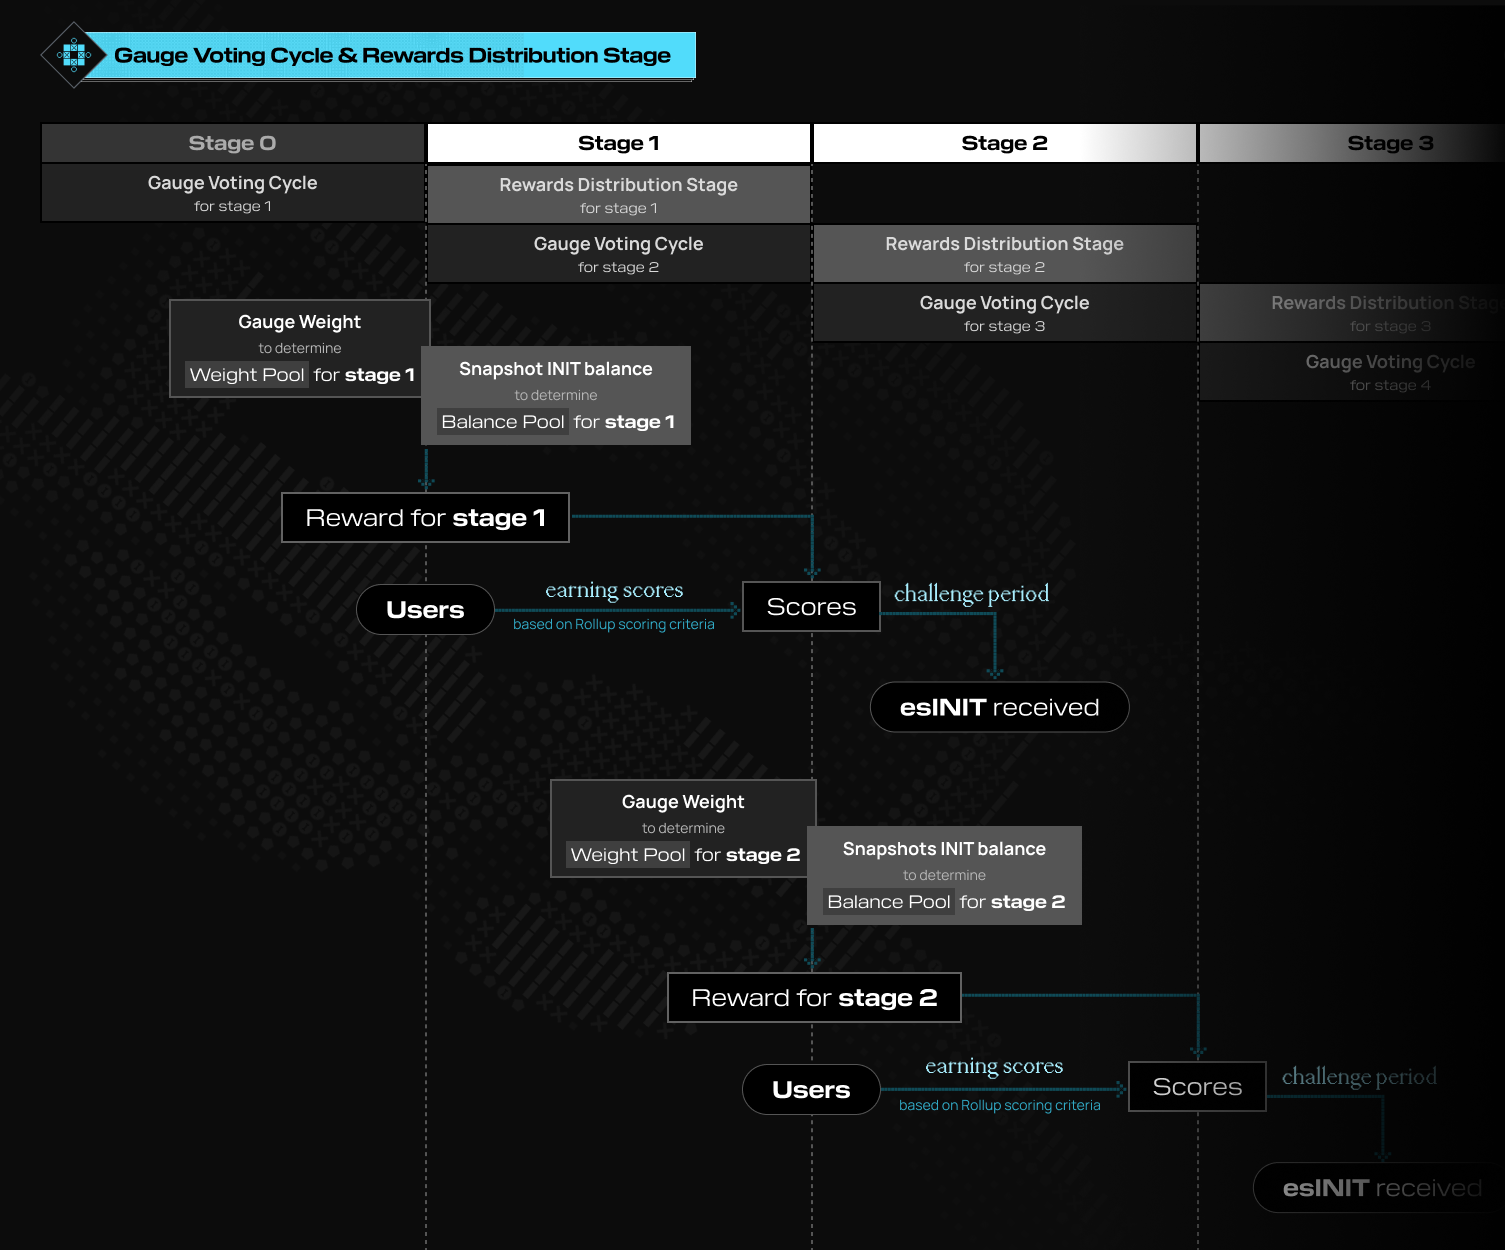
### Challenge Period
When a rollup finalizes its scores, it enters a **challenge period**. This period allows users and other parties to audit the scores submitted by the rollup, ensuring their accuracy and compliance with both the VIP scoring policy and the rollup's own scoring criteria. If someone finds an incorrect scoring, they can submit a challenge through an expedited or emergency governance proposal on Initia L1.
If a challenge succeeds, the following changes occur:
1. The system replaces the VIP scoring agent and transfers authority to a new agent.
2. The system recalculates rewards for the stage.
Note that the challenge period happens alongside the start of the next stage and does not delay its commencement, as seen in the timeline above.
# Welcome to Initia
Source: https://docs.initia.xyz/home/general/welcome
Initia's core philosophy is to make opinionated decisions on the underlying infrastructure such as data availability, interoperability, and oracles. By reducing decision fatigue, the Interwoven Stack empowers developers with the tools to craft application-specific environments while maintaining un-fragmented accessibility to the application ecosystem.
## Learn More About Initia
Discover the framework that powers all of Initia's rollups.
Initia's solution to bootstrapping cross-chain liquidity while maintaining network security.
Initia's incentive program that aims to foster long-term ecosystem-wide alignment.
## Start Developing
Learn how to easily deploy your own rollup on your own computer.
Deploy and interact with contracts on Interwoven Rollups on the various VMs.
# Bridge
Source: https://docs.initia.xyz/home/tools/bridge
The [Initia Bridge](https://bridge.testnet.initia.xyz) allows users to transfer tokens between the Initia L1, all Interwoven Rollups, and other ecosystems. Utilizing Skip Go API's routing, the Bridge aggregates various bridging protocols such as LayerZero, CCTP, IBC, and the Interwoven Stack's native optimistic bridge to provide the best price and the fastest route for users. By further combining this with various DEXs including Initia DEX, the Bridge enables users to also perform swaps as part of their bridging process, all in 1 user action. This enables various use cases and flows, including:
1. Bridging and swapping from USDC on Ethereum to INIT on Initia L1 (via [CCTP](https://www.circle.com/cross-chain-transfer-protocol), [IBC](https://cosmos.network/ibc), and Initia DEX)
2. Bridging and swapping from ETH on Optimism to Kamigotchi (via [LayerZero](https://layerzero.network/) and IBC)
3. Instantly bridging INIT from an Interwoven Rollup to Initia L1 (via IBC and Minitswap)
# Initia Wallet Widget
Source: https://docs.initia.xyz/home/tools/wallet-widget
One of the barriers for users to onboard into a new ecosystem has always been the need to download, install, and use a new wallet. The Initia Wallet Widget solves this by allowing users to connect and use their existing EVM-compatible wallets to interact with applications on Initia and all Interwoven Rollups, regardless of the VM or smart contract language they use.
* For users, they just need to click "Connect Wallet" and then select their preferred wallet, just like they do on any other chain or applications
* For developers, the Wallet Widget is a simple and lightweight library that can be easily integrated into any application.
# Deploying Rollups
Source: https://docs.initia.xyz/nodes-and-rollups/deploying-rollups/deploy
Learn how to deploy your own rollup on Initia
To get started, you need to first install our [Weave CLI](https://github.com/initia-labs/weave).
```bash macOS
brew install initia-labs/tap/weave
```
```bash Linux (AMD64)
VERSION=$(curl -s https://api.github.com/repos/initia-labs/weave/releases/latest | grep '"tag_name":' | cut -d'"' -f4 | cut -c 2-)
wget https://github.com/initia-labs/weave/releases/download/v$VERSION/weave-$VERSION-linux-amd64.tar.gz
tar -xvf weave-$VERSION-linux-amd64.tar.gz
```
```bash Linux (ARM64)
VERSION=$(curl -s https://api.github.com/repos/initia-labs/weave/releases/latest | grep '"tag_name":' | cut -d'"' -f4 | cut -c 2-)
wget https://github.com/initia-labs/weave/releases/download/v$VERSION/weave-$VERSION-linux-arm64.tar.gz
tar -xvf weave-$VERSION-linux-arm64.tar.gz
```
```bash From Source
git clone https://github.com/initia-labs/weave.git
cd weave
git checkout tags/v0.0.2
VERSION=$(curl -s https://api.github.com/repos/initia-labs/weave/releases/latest | grep '"tag_name":' | cut -d'"' -f4 | cut -c 2-)
git checkout tags/v$VERSION
make install
```
With Weave installed, you need to set up and fund your [gas station account](/developers/developer-guides/tools/clis/weave-cli/gas-station). This account will be used to fund the various bots and processes that is involved in the rollup's operations
```sh
weave init
```
This will prompt you to either generate a new account to use as your gas station account or import and existing account's mnemonic. Once you have created your account, you then need to fund it with some INIT tokens (for OPinit Bots bridging transactions) and TIA (for submitting data to Celestia).
Now that you have configured your gas station account, you can proceed to deploying your rollup.
```sh
weave rollup launch
```
From the provided options, you can:
* Select your VM
* Choose your Chain ID and (default) gas token denomination
* Choosing DA Layer
* Enable Price Oracle
* Setting Genesis Accounts
If you want more information about a specific option, access the tooltip by pressing `ctrl+T`. And if you want to go back to the previous step, press `ctrl+Z`.
To make sure that you have tokens to later send transactions on your rollup, you should add at least 1 address you control to the list of genesis accounts when prompted.
Once you have selected all the options, Weave will automatically start the rollup. When everything is complete, you will see the rollup's endpoint information, which includes the REST, RPC, and, for EVM rollups, JSON-RPC endpoints. The CLI will also create a magic link that you can use to add your rollup to InitiaScan.
```sh
# Example output
Rollup Endpoints:
• REST API: http://localhost:1317
• RPC: http://localhost:26657
• RPC-WS: ws://localhost:26657/websocket
• gRPC: http://localhost:9090
✨ Explore your new rollup here 🪄 (We already started the rollup app for you)
https://scan.testnet.initia.xyz/custom-network/add/link?config=eyJ2bSI6Im1vdmUiLCJjaGFpbklkIjoiZGVtby0zMTQiLCJtaW5HYXNQcmljZSI6MCwiZGVub20iOiJ1bWluIiwibGNkIjoiaHR0cDovL2xvY2FsaG9zdDoxMzE3IiwicnBjIjoiaHR0cDovL2xvY2FsaG9zdDoyNjY1NyJ9
i Important
Open this in Chrome is recommended because some browsers may not support localhost access from a different host, or edit your browser's settings to allow it if necessary.
```
At this point, you can now interact with your rollup, send transactions, and deploy contracts on the rollup. However, for full functionality, you will need to also run the OPinit Executor and Challenger Bots as well as the IBC Relayer.
At this stage, you can interact with your rollup and deploy contracts, as well as send transactions. However, to enable bridging INIT and other tokens from L1, setting up DA, and more, you will also need to run the OPinit Executor, Challenger Bots, and the IBC Relayer. To do this, follow the steps below.
The OPinit Executor bot is responsible for executing INIT bridging transactions between the Initia L1 and your rollup, submitting the rollup state output to the L1, submitting DA data to Celestia, and more. To start the bot, run
```sh
weave opinit init
```
This will prompt you to set up the bot's configuration through a series of questions.
```sh
✓ Existing keys in /Users/tansawit/.minitia/artifacts/config.json detected. Would you like to add these to the keyring before proceeding? > Yes, use detected keys
✓ Which bot would you like to run? > Executor
✓ Please select an option for the system key for Oracle Bridge Executor > Generate new system key
✓ Existing /Users/tansawit/.minitia/artifacts/config.json detected. Would you like to use the data in this file to pre-fill some fields? > Yes, prefill
✓ Specify listen address of the bot ... localhost:3000
✓ Specify L1 RPC endpoint ... https://rpc.testnet.initia.xyz:443/
✓ Specify rollup chain ID ... demo-314
✓ Specify rollup RPC endpoint ... http://localhost:26657
✓ Specify rollup gas denom ... umin
✓ OPInit bot setup successfully. Config file is saved at /Users/tansawit/.opinit/executor.json. Feel free to modify it as needed.
✓ You can start the bot by running `weave opinit start executor`
```
Once all of that is complete, you can start the bot by running the following command.
```sh
weave opinit start executor
```
You should see the bot running in the terminal.
```sh
Streaming logs from launchd com.opinitd.executor.daemon
2025-02-11T17:28:42.094+0700 INFO executor executor/executor.go:80 bridge info {"id": 659, "submission_interval": 60}
2025-02-11T17:28:42.508+0700 INFO executor node/node.go:118 initialize height
2025-02-11T17:28:42.525+0700 INFO executor node/node.go:118 initialize height
2025-02-11T17:28:42.631+0700 INFO executor node/node.go:118 initialize height
2025-02-11T17:28:43.844+0700 INFO executor node/node.go:118 initialize height
2025-02-11T17:28:43.845+0700 INFO executor host/host.go:88 host start {"height": 5315486}
2025-02-11T17:28:43.845+0700 INFO executor child/child.go:200 child start {"height": 1}
2025-02-11T17:28:43.845+0700 INFO executor batchsubmitter/batch_submitter.go:153 batch start {"height": 1}
2025-02-11T17:28:43.845+0700 INFO executor node/node.go:173 tx checker looper stopped
2025-02-11T17:28:43.845+0700 INFO executor celestia/celestia.go:98 celestia start
2025-02-11T17:28:43.950+0700 INFO executor child/child.go:138 initialize tree {"index": 1}
┌───────────────────────────────────────────────────┐
│ Fiber v2.52.5 │
│ http://127.0.0.1:3000 │
│ │
│ Handlers ............. 9 Processes ........... 1 │
│ Prefork ....... Disabled PID ............. 17969 │
└───────────────────────────────────────────────────┘
2025-02-11T17:28:46.207+0700 INFO executor batchsubmitter/batch.go:173 finalize batch {"height": 54, "batch start": 1, "batch end": 54, "batch size": 47462, "chunks": 1, "txs": 2}
2025-02-11T17:28:52.584+0700 INFO executor child/withdraw.go:174 finalize working tree {"tree_index": 1, "height": 54, "start_leaf_index": 1, "num_leaves": 0, "storage_root": "AAAAAAAAAAAAAAAAAAAAAAAAAAAAAAAAAAAAAAAAAAA="}
```
For production use, we recommend setting up the Challenger bot on a separate machine from the Executor bot.
The OPinit Challenger Bot is responsible for monitoring the Executor bot's output proposal and ensuring its validity. To start the bot, run
```sh
weave opinit init
```
Again, you'll be guided through a series of questions similar to the Executor. The main difference is that you'll be setting up the Challenger instead of the Executor.
```sh
✓ Existing keys in /Users/tansawit/.minitia/artifacts/config.json detected. Would you like to add these to the keyring before proceeding? > Yes, use detected keys
✓ Which bot would you like to run? > Challenger
✓ Existing /Users/tansawit/.minitia/artifacts/config.json detected. Would you like to use the data in this file to pre-fill some fields? > Yes, prefill
✓ Specify listen address of the bot ... localhost:3001
✓ Specify L1 RPC endpoint ... https://rpc.testnet.initia.xyz:443/
✓ Specify rollup chain ID ... demo-314
✓ Specify rollup RPC endpoint ... http://localhost:26657
✓ OPInit bot setup successfully. Config file is saved at /Users/tansawit/.opinit/challenger.json. Feel free to modify it as needed.
✓ You can start the bot by running `weave opinit start challenger`
```
Once all of that is complete, you can start the bot by running the following command.
```sh
weave opinit start challenger
```
You should see the bot running in the terminal.
```sh
Streaming logs from launchd com.opinitd.challenger.daemon
2025-02-11T17:31:59.060+0700 INFO challenger challenger/challenger.go:94 bridge info {"id": 659, "submission_interval": 60}
2025-02-11T17:31:59.200+0700 INFO challenger node/node.go:118 initialize height
2025-02-11T17:31:59.346+0700 INFO challenger node/node.go:118 initialize height
2025-02-11T17:31:59.347+0700 INFO challenger host/host.go:88 host start {"height": 5315486}
2025-02-11T17:31:59.347+0700 INFO challenger child/child.go:200 child start {"height": 1}
2025-02-11T17:31:59.347+0700 INFO challenger node/node.go:173 tx checker looper stopped
┌───────────────────────────────────────────────────┐
2025-02-11T17:31:59.347+0700 INFO challenger node/node.go:173 tx checker looper stopped
│ Fiber v2.52.5 │
2025-02-11T17:31:59.452+0700 INFO challenger child/child.go:138 initialize tree {"index": 1}
│ http://127.0.0.1:3001 │
│ │
│ Handlers ............ 11 Processes ........... 1 │
│ Prefork ....... Disabled PID ............. 20592 │
└───────────────────────────────────────────────────┘
```
If everything is working correctly, you will now have both the Executor and Challenger bots running.
Finally, you need to set up the IBC Relayer Bot. This bot relays IBC messages between the Initia L1 and your rollup. It is essential for oracle price updates and managing IBC bridging transactions, including compatibility with Minitswap.
```sh
weave relayer init
```
By default, Weave also allows you to setup the relayer for any whitelisted rollup. But in this case, we will be setting up the relayer for your local rollup.
```sh
✓ Select the type of Interwoven rollup you want to relay > Local Rollup (demo-314)
✓ L1 network is auto-detected > initiation-2
✓ Specify rollup RPC endpoint ... http://localhost:26657
✓ Specify rollup GRPC endpoint ... http://localhost:9090
✓ Specify rollup WebSocket endpoint ... ws://localhost:26657/websocket
✓ Select method to setup IBC channels for the relayer. > Subscribe to only `transfer` and `nft-transfer` IBC Channels (minimal setup)
✓ Select the IBC channels you would like to relay ... 2 IBC channels subscribed
✓ Do you want to setup relayer with the challenger key > Yes (recommended, open the tooltip to see the details)
✓ Relayer setup successfully. Config file is saved at /Users/tansawit/.hermes/config.toml. Feel free to modify it as needed.
✓ You can start the relayer by running `weave relayer start
```
Once all of that is complete, you can start the bot by running the following command.
```sh
weave relayer start
```
You should see the bot running in the terminal.
```sh
Updating IBC client: 07-tendermint-1 of network: demo-314
Successfully updated IBC client: 07-tendermint-1 of network: demo-314
Updating IBC client: 07-tendermint-0 of network: demo-314
wSuccessfully updated IBC client: 07-tendermint-0 of network: demo-314
Streaming logs from launchd com.hermes.daemon
2025-02-11T10:36:06.546411Z INFO ThreadId(01) using default configuration from '/Users/tansawit/.hermes/config.toml'
2025-02-11T10:36:06.547351Z INFO ThreadId(01) running Hermes v1.10.4+542e14f
2025-02-11T10:36:06.749253Z INFO ThreadId(16) REST service running, exposing REST API at http://127.0.0.1:7010
```
# Introduction
Source: https://docs.initia.xyz/nodes-and-rollups/introduction
This section is for:
* **Rollup teams** looking to launch their own Interwoven Rollup
* **Node operators** looking to run their own Initia L1 or rollup nodes
* **Validators** that wants to spin up a node to secure the Initia L1 network
# Becoming a Validator
Source: https://docs.initia.xyz/nodes-and-rollups/running-nodes/running-a-validator/becoming-a-validator
Before proceeding to create the a validator, first make sure that your Initia node is fully synced to the latest height. This can be done by running comparing the latest block height of your node with those of the network.
First, you need to create an account for your validator. This account will be used to run the validator node. To do so, you can run the following command:
```sh
initiad keys add validator
```
You then need to fund that account with the network's gas token.
Once you have funded the validator account, you can send a `CreateValidator` transaction to the network to register as a validator.
```sh
initiad tx mstaking create-validator \\
--amount="" \\
--pubkey=$(initiad tendermint show-validator) \\
--moniker="" \\
--identity="" \\
--chain-id="" \\
--from="" \\
--commission-rate="0.10" \\
--commission-max-rate="0.20" \\
--commission-max-change-rate="0.01"
```
| Flag | Description |
| ---------------------------- | ----------------------------------------------------------------------------------------------------------------------------------------------------------------------------------------------------------------------------------------------------------------------------------------------------------------- |
| `bond_amount` | This is the amount of tokens you wish to self-bond. It can be in uinit or other tokens that are whitelisted as liquidity provider (LP) tokens. |
| `pubkey` | The public key necessary for validator consensus. Typically, this is obtained from the output of the `initiadd tendermint show-validator` command. |
| `your_moniker` | A human-readable name for your validator. This should match either the moniker you used in the `initiadd init` command or a moniker registered in the `~/.inita/config/config.toml` file. |
| `chain_id` | The ID of the chain you wish to join as a validator. It must correspond with the ID specified in the `genesis.json` file. |
| `key_name` | The account address or name used to submit the transaction. The output of `initiadd keys show ` should correctly display your account details. If not, verify the accuracy of your `key_name` or keyring settings. A fee is required to submit the transaction, paid in the blockchain's native tokens. |
| `identity` | An optional field for adding your Keybase identity information, which allows displaying an icon for your validator. This requires a 16-digit string associated with your Keybase account. Without this, no icon will be displayed in user interfaces. |
| `commission-rate` | The commission rate you charge delegators, expressed as a fraction. It must be set above the `min_commission_rate` parameter specified by the mStaking protocol. |
| `commission-max-rate` | The maximum commission rate you can charge as a validator. |
| `commission-max-change-rate` | The maximum daily change in commission rate that is permissible for the validator. |
Once the message is submitted and successfully confirmed, your validator will be active and participating in the network.
Finally, to check whether your validator is active, you can run the following command:
```sh
initiad query tendermint-validator-set | grep "$(initiad tendermint show-validator)"
```
If the command returns something, your validator is in the active and is actively proposing and signing blocks.
Only the top 100 validators in voting power are included in the active validator set. This means that even if you `CreateValidator` transaction passes, your validator might not be active until it has sufficient token delegations.
Initia validators are also required to run the Connect Oracle Sidecar. For more information on how to run the sidecar, please refer to the [Skip Connect documentation](https://docs.skip.build/connect/validators/quickstart).
## Secure Your Validator Keys
Protecting and having a contingency backup plan for your keys will help mitigate catastrophic hardware or software failures of the node. It is a good practice to test your backup plan on a testnet node in case of node failure.
Also, always backup your validator node's mnemonic and `priv_validator_key.json` somewhere safe and secure in case you ever need to recover your validator node on a new machine.
# Running L1 Nodes with Initiad
Source: https://docs.initia.xyz/nodes-and-rollups/running-nodes/running-l1-nodes/l1-nodes-initiad
## Overview
This guide provides step-by-step instructions for setting up and running an Initia L1 node. It covers everything from system requirements to connecting to the Initia network.
## System Requirements
Before proceeding, ensure your system meets the following minimum requirements:
* **CPU**: 16 cores
* **Memory**: 32GB RAM
* **Storage**: 2 TB NVMe/SSD with Write Throughput > 1000 MiBps
* **Network**: 100 Mbps bandwidth
We strongly recommend running Initia nodes on a Linux-based operating system. While it may be possible to run on other operating systems, we have not tested them and cannot guarantee the same environment settings and running conditions.
## Installation
There are two ways to install the `initiad` CLI:
### Option 1: Building from Source
Install the required packages:
```bash
sudo apt install -y build-essential
```
Also, install the latest version of Go:
```bash
sudo apt install -y golang
```
Verify the installed versions:
```bash
make --version # Must be 3.8 or later
go version # Must be 1.22 or later
```
Clone and build the Initia node:
```bash
git clone git@github.com:initia-labs/initia.git
cd initia
git checkout $TAG # Replace with desired version
make install
```
Verify the installation:
```bash
initiad version
```
If `initiad` is not found, check your `$PATH` environment variable to ensure it includes `$GOBIN` or `$GOPATH/bin`.
### Option 2: Using Pre-built Binaries
Download pre-built `initiad` binaries from the [releases page](https://github.com/initia-labs/initia/releases). Choose the appropriate version for your operating system.
## System Configuration
### File Descriptor Limits
Initia requires a higher number of file descriptors than the default Linux limit. Adjust the system limits by adding the following to `/etc/security/limits.conf`:
```bash
* soft nofile 65535
* hard nofile 65535
```
## Node Setup
### Initialization
Initialize your node with a moniker (a human-readable name):
```bash
initiad init
```
Note that
* Moniker must contain only ASCII characters
* Maximum length is 70 characters
* The default home directory is `${HOME}/.initia`
* To use a different directory, add `--home ` to commands
Your private key is generated during initialization and stored in `${HOME}/.initia/config/priv_validator_key.json`.
**IMPORTANT**: Always backup your private key, especially for validator nodes. Loss of the private key may result in permanent node inaccessibility.
### Network Configuration
#### Endpoints
An Initia node comes with multiple endpoint that you can either enable or disable.
| Endpoint | Description | Configuration File |
| ------------- | ----------------------- | ------------------------------ |
| REST | RESTful HTTP API | `~/.initia/config/app.toml` |
| gRPC/gRPC-WEB | gRPC API | `~/.initia/config/app.toml` |
| RPC | Tendermint/CometBFT API | `~/.initia/config/config.toml` |
| P2P | Gossip P2P Network | `~/.initia/config/config.toml` |
Validator nodes are not recommended to expose these endpoints publicly.
#### Configuration Examples
1. **API Configuration** (`~/.initia/config/app.toml`):
```toml
[api]
enable = true
swagger = true
address = "tcp://0.0.0.0:1317"
[grpc]
enable = true
address = "0.0.0.0:9090"
[grpc-web]
enable = true
address = "0.0.0.0:9091"
```
2. **RPC and P2P Configuration** (`~/.initia/config/config.toml`):
```toml
[rpc]
laddr = "tcp://0.0.0.0:26657"
[p2p]
laddr = "tcp://0.0.0.0:26656"
```
### External Address Configuration
To allow external nodes to connect to your node, configure the external address in `config.toml`:
```toml
[p2p]
laddr = "tcp://0.0.0.0:26656"
external_address = "YOUR_PUBLIC_IP:26656"
```
You can automatically set your public IP using:
```bash
sed -i -e 's/external_address = \"\"/external_address = \"'$(curl httpbin.org/ip | jq -r .origin)':26656\"/g' ~/.initia/config/config.toml
```
## Connecting to Initia Network
To fully connect to the network, you first need to first download the genesis file and configure your peers, and sync the node.
You can find information on the genesis file, peers, and state sync for the network you want to join in the [networks page](/resources/developer/initia-l1)
### Genesis File
To start syncing the node, you first need to download the genesis file.
```bash
wget $GENESIS_FILE_URL -O $HOME/.initia/config/genesis.json
```
### Network Configuration
Once the genesis file is downloaded, you can configure the persistent peers in `~/.initia/config/config.toml`:
```bash
persistent_peers = "peer1@ip1:port1,peer2@ip2:port2"
```
Replace `peer1@ip1:port1,peer2@ip2:port2` with the list of peers for the network you want to join.
### State Sync & Snapshots
To then sync the node, you can use the [state sync](https://github.com/tendermint/tendermint/blob/v0.34.x/spec/p2p/messages/state-sync.md) feature.
## Running as a Service (Optional)
To run Initia as a system service, create a `initiad.service` file in `/etc/systemd/system`:
```ini
[Unit]
Description=initiad
[Service]
Type=simple
User=ubuntu
ExecStart=/usr/bin/initiad start
Restart=on-abort
StandardOutput=syslog
StandardError=syslog
SyslogIdentifier=initiad
LimitNOFILE=65535
[Install]
WantedBy=multi-user.target
```
Once the service file is created, you can enable and start the service:
```bash
systemctl enable initiad
systemctl start initiad
```
To then see the logs, you can use the following commands:
```bash
journalctl -t initiad # View current logs
journalctl -t initiad -f # Follow logs in real-time
journalctl -t initiad -n # View last N lines
```
# Running L1 Nodes with Weave
Source: https://docs.initia.xyz/nodes-and-rollups/running-nodes/running-l1-nodes/l1-nodes-weave
First, you need to install the [Weave CLI](https://github.com/initia-labs/weave)
```sh macOS
brew install initia-labs/tap/weave
```
```sh Linux
curl -s https://api.github.com/repos/initia-labs/weave/releases/latest | \
grep "browser_download_url.*linux-arm64.tar.gz" | \
sed -E 's/.*"([^"]+)".*/\1/' | \
xargs curl -L | tar xz
```
Once Weave is installed, you can initialize the L1 node. To do so, you need to run the following command:
```sh
weave initia init
```
This will guide you through the process of initializing the L1 node. You will need to provide the following information:
* The Initia L1 network your node will connect to
* Enabling gRPC and REST endpoints
* Pruning strategy
* Enabling automatic chain upgrade handling via Cosmovisor
* Node syncing method (Snapshot, State Sync)
and more.
```sh
✓ Which network will your node participate in? > Testnet (initiation-2)
✓ Existing /Users/tansawit/.initia/config/app.toml and /Users/tansawit/.initia/config/config.toml detected. Would you like to use the current files or replace them > Replace
✓ Specify node's moniker ... node
✓ Would you like to enable the following options? (Press space to select/unselect) > REST, gRPC
✓ Specify seeds ... 3715cdb41efb45714eb534c3943c5947f4894787@34.143.179.242:26656
✓ Specify persistent peers ... 89ff3df47beacbdc06585392cdbeaabe92cba960@47.236.109.113:26656,4e347f918e42fe8883b2c62bc695ae172d8fa8d2@207.180.207.61:26656,
4881cf2252da11c64f8dd6b7a492ebe3f61f1acb@152.53.134.160:26656,c258517ce775e9eefc0731632764c07c7be73b8f@146.190.108.47:26656,13a78fa3ed19a85a258cc8cca2505004d661d309@84.32.71.25:26656
✓ Select pruning strategy > Default (recommended)
✓ Would you like to enable automatic upgrades via Cosmovisor? > Yes
✓ Initialization successful.
✓ Select a sync option > Snapshot
✓ Existing /Users/tansawit/.initia/data detected. By syncing, the existing data will be replaced. Would you want to proceed ? > Yes
✓ Specify the snapshot endpoint to download ... https://snapshots.polkachu.com/testnet-snapshots/initia/initia_5311531.tar.lz4
✓ Snapshot download completed.
✓ Snapshot extracted to /Users/tansawit/.initia/data successfully.
✓ Initia node setup successfully. Config files are saved at /Users/tansawit/.initia/config/config.toml and /Users/tansawit/.initia/config/app.toml. Feel free to modify them as needed.
✓ You can start the node by running `weave initia start`
```
Once the L1 node is initialized, you can start it by running the following command:
```sh
weave initia start
```
If everything is successful, you should see an output similar to the following:
```sh
Streaming logs from launchd com.cosmovisor.daemon
6:07PM INF running app args=["start"] module=cosmovisor path=/Users/tansawit/.initia/cosmovisor/genesis/bin/initiad
6:07PM INF starting the batch watcher loop module=cosmovisor
6:07PM INF mempool max txs max_txs=2000 module=server
6:07PM INF query gas limit gas_limit=3000000 module=server
6:07PM INF starting node with ABCI CometBFT in-process module=server
6:07PM INF service start impl=multiAppConn module=proxy msg="Starting multiAppConn service"
6:07PM INF service start connection=query impl=localClient module=abci-client msg="Starting localClient service"
6:07PM INF service start connection=snapshot impl=localClient module=abci-client msg="Starting localClient service"
6:07PM INF service start connection=mempool impl=localClient module=abci-client msg="Starting localClient service"
6:07PM INF service start connection=consensus impl=localClient module=abci-client msg="Starting localClient service"
6:07PM INF service start impl=EventBus module=events msg="Starting EventBus service"
6:07PM INF service start impl=PubSub module=pubsub msg="Starting PubSub service"
6:07PM INF service start impl=IndexerService module=txindex msg="Starting IndexerService service"
6:07PM INF ABCI Handshake App Info hash=38D7B1C2574882732E7D65520AF9C56336280E72861DD09A7B25F40C56339DFF height=5311532 module=consensus protocol-version=0 software-version=v0.7.0
```
# ConnectOracle
Source: https://docs.initia.xyz/resources/developer/contract-references/evm/connect
GitHub: [ConnectOracle](https://github.com/initia-labs/minievm/blob/main/x/evm/contracts/connect_oracle/ConnectOracle.sol)
## Overview
The `ConnectOracle` contract is designed to interact with the Cosmos blockchain to fetch and process price data for various currency pairs from the Connect oracle.
## Imports
| Import File | Description |
| ---------------- | ----------------------------------------------------------- |
| `ICosmos.sol` | Interface for interacting with the Cosmos blockchain. |
| `JsmnSolLib.sol` | Library for JSON parsing. |
| `IsoToUnix.sol` | Library for converting ISO date strings to Unix timestamps. |
## Structs
### Price
A struct to hold price information.
* `uint256 price`: The price value.
* `uint256 timestamp`: The timestamp of the price.
* `uint64 height`: The block height at which the price was recorded.
* `uint64 nonce`: A unique identifier for the price record.
* `uint64 decimal`: The decimal precision of the price.
* `uint64 id`: The ID of the price record.
## Constructor
```solidity
constructor() {}
```
The constructor initializes the contract. It does not take any parameters or perform any actions upon deployment.
## Functions
### get\_price
Fetches the price for a specific currency pair from the Cosmos blockchain.
```solidity
function get_price(string memory base, string memory quote) external returns (Price memory)
```
#### Parameters
| Name | Type | Description |
| ------- | --------------- | ------------------------------ |
| `base` | `string memory` | The base currency of the pair |
| `quote` | `string memory` | The quote currency of the pair |
#### Returns
| Type | Description |
| -------------- | ----------------------------------------- |
| `Price memory` | A struct containing the price information |
### get\_prices
Fetches prices for multiple currency pairs from the Cosmos blockchain.
```solidity
function get_prices(string[] memory pair_ids) external returns (Price[] memory)
```
#### Parameters
| Name | Type | Description |
| ---------- | ----------------- | ----------------------------- |
| `pair_ids` | `string[] memory` | An array of currency pair IDs |
#### Returns
| Type | Description |
| ---------------- | -------------------------------------------------------------------------- |
| `Price[] memory` | An array of `Price` structs containing the price information for each pair |
### join
Concatenates an array of strings with a specified separator.
```solidity
function join(string[] memory strs, string memory separator) internal pure returns (string memory)
```
#### Parameters
| Name | Type | Description |
| ----------- | ----------------- | ------------------------------------------ |
| `strs` | `string[] memory` | An array of strings to be concatenated |
| `separator` | `string memory` | A separator to be used between the strings |
#### Returns
| Type | Description |
| --------------- | ----------------------- |
| `string memory` | The concatenated string |
### get\_price\_from\_tokens
Parses a JSON string to extract price information and populate a `Price` struct.
```solidity
function get_price_from_tokens(
string memory json,
JsmnSolLib.Token[] memory tokens,
uint256 priceObjectIndex
) internal pure returns (Price memory)
```
#### Parameters
| Name | Type | Description |
| ------------------ | --------------------------- | ---------------------------------------------------------- |
| `json` | `string memory` | The JSON string containing the price information |
| `tokens` | `JsmnSolLib.Token[] memory` | An array of JSON tokens |
| `priceObjectIndex` | `uint256` | The starting index of the price object in the tokens array |
#### Returns
| Type | Description |
| -------------- | ------------------------------------------------ |
| `Price memory` | A struct containing the parsed price information |
# Cosmos
Source: https://docs.initia.xyz/resources/developer/contract-references/evm/cosmos
GitHub: [ICosmos](https://github.com/initia-labs/initia-evm-contracts/blob/main/src/interfaces/ICosmos.sol)
## Overview
The `ICosmos` interface defines a set of functions for interacting with the Cosmos blockchain from an Ethereum Virtual Machine (EVM) environment. It includes functions for address conversion, querying, and executing Cosmos messages.
## Constants
### `COSMOS_ADDRESS`
The address of the `Cosmos` precompile contract.
```solidity
address constant COSMOS_ADDRESS = 0x00000000000000000000000000000000000000f1;
```
### `COSMOS_CONTRACT`
The instance of the ICosmos contract.
```solidity
ICosmos constant COSMOS_CONTRACT = ICosmos(COSMOS_ADDRESS);
```
## Functions
### `is_blocked_address`
Checks if an address is blocked by the Cosmos SDK bank module.
```solidity
function is_blocked_address(address account) external view returns (bool blocked);
```
#### Parameters
| Name | Type | Description |
| --------- | --------- | -------------------- |
| `account` | `address` | The address to check |
#### Returns
| Type | Description |
| ------ | --------------------------------------------------- |
| `bool` | `true` if the address is blocked, `false` otherwise |
### `is_module_address`
Checks if an address is a Cosmos SDK module account.
```solidity
function is_module_address(address account) external view returns (bool module);
```
#### Parameters
| Name | Type | Description |
| --------- | --------- | -------------------- |
| `account` | `address` | The address to check |
#### Returns
| Type | Description |
| ------ | ------------------------------------------------------------ |
| `bool` | `true` if the address is a module account, `false` otherwise |
### `to_cosmos_address`
Converts an EVM hex format address to a Cosmos bech32 format address.
```solidity
function to_cosmos_address(address evm_address) external returns (string memory cosmos_address);
```
#### Parameters
| Name | Type | Description |
| ------------- | --------- | -------------------------- |
| `evm_address` | `address` | The EVM address to convert |
#### Returns
| Type | Description |
| --------------- | -------------------------------- |
| `string memory` | The corresponding Cosmos address |
### `to_evm_address`
Convert a Cosmos bech32 format address to an EVM hex format address.
```solidity
function to_evm_address(string memory cosmos_address) external returns (address evm_address);
```
#### Parameters
| Name | Type | Description |
| ---------------- | --------------- | ----------------------------- |
| `cosmos_address` | `string memory` | The Cosmos address to convert |
#### Returns
| Type | Description |
| --------- | ----------------------------- |
| `address` | The corresponding EVM address |
### `to_denom`
Converts an ERC20 address to a Cosmos coin denom.
```solidity
function to_denom(address erc20_address) external returns (string memory denom);
```
#### Parameters
| Name | Type | Description |
| --------------- | --------- | ---------------------------- |
| `erc20_address` | `address` | The ERC20 address to convert |
#### Returns
| Type | Description |
| --------------- | ------------------------------ |
| `string memory` | The corresponding Cosmos denom |
### `to_erc20`
Converts a Cosmos coin denom to an ERC20 address.
```solidity
function to_erc20(string memory denom) external returns (address erc20_address);
```
#### Parameters
| Name | Type | Description |
| ------- | --------------- | --------------------------- |
| `denom` | `string memory` | The Cosmos denom to convert |
#### Returns
| Type | Description |
| --------- | ------------------------------- |
| `address` | The corresponding ERC20 address |
### `execute_cosmos`
Records a Cosmos message to be executed after the current message execution. The message should be in JSON string format.
```solidity
function execute_cosmos(string memory msg) external returns (bool dummy);
```
#### Parameters
| Name | Type | Description |
| ----- | --------------- | --------------------------------- |
| `msg` | `string memory` | The Cosmos message in JSON format |
#### Returns
| Type | Description |
| ------ | ------------------ |
| `bool` | Dummy return value |
### `query_cosmos`
Queries a whitelisted Cosmos SDK query.
```solidity
function query_cosmos(string memory path, string memory req) external returns (string memory result);
```
#### Parameters
| Name | Type | Description |
| ------ | --------------- | -------------------------------- |
| `path` | `string memory` | The query path |
| `req` | `string memory` | The query request in JSON format |
#### Returns
| Type | Description |
| --------------- | ------------------------------- |
| `string memory` | The query result in JSON format |
# ERC20ACL
Source: https://docs.initia.xyz/resources/developer/contract-references/evm/erc20-acl
GitHub: [ERC20ACL](https://github.com/initia-labs/initia-evm-contracts/blob/main/src/ERC20ACL.sol)
## Overview
The `ERC20ACL` contract provides access control mechanisms for ERC20 token operations. It includes modifiers to restrict certain actions based on conditions such as whether an address is a module address or a blocked address.
## Constants
### `CHAIN_ADDRESS`
The address of the chain signer.
```solidity
address constant CHAIN_ADDRESS = 0x0000000000000000000000000000000000000001;
```
## Modifiers
### `onlyChain`
Restricts the function to be called only by the chain signer.
```solidity
modifier onlyChain() {
require(msg.sender == CHAIN_ADDRESS, "ERC20: caller is not the chain");
_;
}
```
### `burnable`
Restricts the function to ensure the sender is not a module address.
```solidity
modifier burnable(address from) {
require(!COSMOS_CONTRACT.is_module_address(from), "ERC20: burn from module address");
_;
}
```
#### Parameters
| Name | Type | Description |
| ------ | --------- | -------------------- |
| `from` | `address` | The address to check |
### `mintable`
Restricts the function to ensure the recipient is not a blocked address.
```solidity
modifier mintable(address to) {
require(!COSMOS_CONTRACT.is_blocked_address(to), "ERC20: mint to blocked address");
_;
}
```
#### Parameters
| Name | Type | Description |
| ---- | --------- | -------------------- |
| `to` | `address` | The address to check |
### `transferable`
Restricts the function to ensure the recipient is not a blocked address.
```solidity
modifier transferable(address to) {
require(!COSMOS_CONTRACT.is_blocked_address(to), "ERC20: transfer to blocked address");
_;
}
```
#### Parameters
| Name | Type | Description |
| ---- | --------- | -------------------- |
| `to` | `address` | The address to check |
# ERC20Factory
Source: https://docs.initia.xyz/resources/developer/contract-references/evm/erc20-factory
GitHub: [ERC20Factory](https://github.com/initia-labs/initia-evm-contracts/blob/main/src/ERC20Factory.sol)
## Overview
The `ERC20Factory` contract is designed to create new InitiaERC20 tokens and register them with the MiniEVM's ERC20Registry
## Imports
* [InitiaERC20.sol](/resources/developer/contract-references/evm/initia-erc20): Contains the implementation of the ERC20 token.
* [ERC20Registry.sol](/resources/developer/contract-references/evm/erc20-registry): Contains the implementation of the ERC20 registry.
## Events
### `ERC20Created`
Emitted when a new ERC20 token is created.
| Parameter | Type | Description |
| --------- | ----------------- | --------------------------------------------------------- |
| `erc20` | `address indexed` | The address of the newly created ERC20 token |
| `owner` | `address indexed` | The address of the owner of the newly created ERC20 token |
## Functions
### `createERC20`
Creates a new ERC20 token and registers it with the ERC20 registry.
```solidity
function createERC20(string memory name, string memory symbol, uint8 decimals) external returns (address)
```
#### Parameters
| Name | Type | Description |
| ---------- | --------------- | -------------------------------------------- |
| `name` | `string memory` | The name of the new ERC20 token |
| `symbol` | `string memory` | The symbol of the new ERC20 token |
| `decimals` | `uint8` | The decimal precision of the new ERC20 token |
#### Returns
| Type | Description |
| --------- | -------------------------------------------- |
| `address` | The address of the newly created ERC20 token |
#### Emits
* [ERC20Created](#erc20created)
# ERC20Registry
Source: https://docs.initia.xyz/resources/developer/contract-references/evm/erc20-registry
GitHub: [ERC20Registry](https://github.com/initia-labs/initia-evm-contracts/blob/main/src/ERC20Registry.sol)
## Overview
The `ERC20Registry` contract provides modifiers for registering ERC20 tokens and their associated stores. The registration is done to allow the token to be recognized and interoperable with other parts of the MiniEVM rollup functionality.
## Modifiers
### `register_erc20`
Registers an ERC20 token with the ERC20 registry. This is done to allow the token to be recognized and interoperable with other parts of the MiniEVM rollup.
```solidity
modifier register_erc20() {
ERC20_REGISTRY_CONTRACT.register_erc20();
_;
}
```
### `register_erc20_store`
Registers an ERC20 store for a given account with the ERC20 registry if it is not already registered. This is done to keep track of which accounts are associated with which ERC20 tokens.
```solidity
modifier register_erc20_store(address account) {
if (!ERC20_REGISTRY_CONTRACT.is_erc20_store_registered(account)) {
ERC20_REGISTRY_CONTRACT.register_erc20_store(account);
}
_;
}
```
#### Parameters
| Name | Type | Description |
| --------- | --------- | ------------------------------------------------------------------------------ |
| `account` | `address` | The address of the ERC20 store to check and register if not already registered |
# InitiaCustomERC20
Source: https://docs.initia.xyz/resources/developer/contract-references/evm/initia-custom-erc20
GitHub: [InitiaCustomERC20](https://github.com/initia-labs/initia-evm-contracts/blob/main/src/InitiaCustomERC20.sol)
## Overview
The `InitiaCustomERC20` contract is a custom implementation of the ERC20 token standard. It includes additional access control mechanisms, registry functionalities, to allow for better integration with the rollup's underlying Cosmos SDK stack.
This is the main ERC20 token contract that developers should use to create their own custom ERC20 tokens on the MiniEVM.
## Inheritance
* `IERC20`: Interface for ERC20 standard functions.
* `Ownable`: Provides ownership control.
* `ERC20Registry`: Handles ERC20 registry functionalities.
* `ERC165`: Supports interface identification.
* `ERC20ACL`: Provides access control mechanisms.
## State Variables
* `mapping(address => uint256) public balanceOf`: Tracks the balance of each address.
* `mapping(address => mapping(address => uint256)) public allowance`: Tracks the allowance each address has given to another address.
* `string public name`: The name of the token.
* `string public symbol`: The symbol of the token.
* `uint8 public decimals`: The number of decimals the token uses.
* `uint256 public totalSupply`: The total supply of the token.
## Constructor
Initializes the contract with the token's name, symbol, and decimals. It also registers the ERC20 token with the ERC20Registry.
```solidity
constructor(string memory _name, string memory _symbol, uint8 _decimals) register_erc20 {
name = _name;
symbol = _symbol;
decimals = _decimals;
}
```
#### Parameters
| Name | Type | Description |
| ----------- | --------------- | ------------------------------------- |
| `_name` | `string memory` | The name of the token |
| `_symbol` | `string memory` | The symbol of the token |
| `_decimals` | `uint8` | The number of decimals the token uses |
## Functions
### `supportsInterface`
Checks if the contract supports a given interface.
```solidity
function supportsInterface(bytes4 interfaceId) public view virtual override(ERC165) returns (bool)
```
#### Parameters
| Name | Type | Description |
| ------------- | -------- | ------------------------ |
| `interfaceId` | `bytes4` | The interface identifier |
#### Returns
| Type | Description |
| ------ | ------------------------------------------------------- |
| `bool` | `true` if the interface is supported, `false` otherwise |
### `_transfer`
Transfers tokens from one address to another and registers the recipient's ERC20 store if necessary.
```solidity
function _transfer(address sender, address recipient, uint256 amount) internal register_erc20_store(recipient)
```
#### Parameters
| Name | Type | Description |
| ----------- | --------- | -------------------------------- |
| `sender` | `address` | The address sending the tokens |
| `recipient` | `address` | The address receiving the tokens |
| `amount` | `uint256` | The amount of tokens to transfer |
### `_mint`
Mints new tokens and assigns them to an address, registering the recipient's ERC20 store if necessary.
```solidity
function _mint(address to, uint256 amount) internal register_erc20_store(to)
```
#### Parameters
| Name | Type | Description |
| -------- | --------- | -------------------------------- |
| `to` | `address` | The address receiving the tokens |
| `amount` | `uint256` | The amount of tokens to mint |
### `_burn`
Burns tokens from an address.
```solidity
function _burn(address from, uint256 amount) internal
```
#### Parameters
| Name | Type | Description |
| -------- | --------- | ----------------------------------- |
| `from` | `address` | The address whose tokens are burned |
| `amount` | `uint256` | The amount of tokens to burn |
### `transfer`
Transfers tokens to a recipient, ensuring the recipient is not a blocked address.
```solidity
function transfer(address recipient, uint256 amount) external transferable(recipient) returns (bool)
```
#### Parameters
| Name | Type | Description |
| ----------- | --------- | -------------------------------- |
| `recipient` | `address` | The address receiving the tokens |
| `amount` | `uint256` | The amount of tokens to transfer |
#### Returns
| Type | Description |
| ------ | ------------------------------------- |
| `bool` | `true` if the transfer was successful |
### `approve`
Approves an address to spend a specified amount of tokens on behalf of the caller.
```solidity
function approve(address spender, uint256 amount) external returns (bool)
```
#### Parameters
| Name | Type | Description |
| --------- | --------- | --------------------------------------- |
| `spender` | `address` | The address allowed to spend the tokens |
| `amount` | `uint256` | The amount of tokens to approve |
#### Returns
| Type | Description |
| ------ | ------------------------------------- |
| `bool` | `true` if the approval was successful |
### `transferFrom`
Transfers tokens from one address to another on behalf of the sender, ensuring the recipient is not a blocked address.
```solidity
function transferFrom(address sender, address recipient, uint256 amount) external transferable(recipient) returns (bool)
```
#### Parameters
| Name | Type | Description |
| ----------- | --------- | -------------------------------- |
| `sender` | `address` | The address sending the tokens |
| `recipient` | `address` | The address receiving the tokens |
| `amount` | `uint256` | The amount of tokens to transfer |
#### Returns
| Type | Description |
| ------ | ------------------------------------- |
| `bool` | `true` if the transfer was successful |
### `mint`
Mints new tokens to a specified address, ensuring the recipient is not a blocked address. This function can only be called by the owner.
```solidity
function mint(address to, uint256 amount) external mintable(to) onlyOwner
```
#### Parameters
| Name | Type | Description |
| -------- | --------- | -------------------------------- |
| `to` | `address` | The address receiving the tokens |
| `amount` | `uint256` | The amount of tokens to mint |
### `burn`
Burns tokens from a specified address, ensuring the sender is not a module address. This function can only be called by the owner.
```solidity
function burn(address from, uint256 amount) external burnable(from) onlyOwner
```
#### Parameters
| Name | Type | Description |
| -------- | --------- | ----------------------------------- |
| `from` | `address` | The address whose tokens are burned |
| `amount` | `uint256` | The amount of tokens to burn |
### `sudoTransfer`
Transfers tokens from one address to another, bypassing the usual access control checks. This function can only be called by the chain signer.
```solidity
function sudoTransfer(address sender, address recipient, uint256 amount) external onlyChain
```
#### Parameters
| Name | Type | Description |
| ----------- | --------- | -------------------------------- |
| `sender` | `address` | The address sending the tokens |
| `recipient` | `address` | The address receiving the tokens |
| `amount` | `uint256` | The amount of tokens to transfer |
# InitiaERC20
Source: https://docs.initia.xyz/resources/developer/contract-references/evm/initia-erc20
GitHub: [InitiaERC20](https://github.com/initia-labs/initia-evm-contracts/blob/main/src/InitiaERC20.sol)
## Overview
The `InitiaERC20` contract is an implementation of the ERC20 token standard with additional functionalities such as access control, registry integration, and support for Cosmos blockchain interactions. This contract inherits from multiple contracts including `IERC20`, `Ownable`, `ERC20Registry`, `ERC165`, and `ERC20ACL`.
The InitiaERC20 contract is only meant to be used by the [ERC20Factory](/resources/developer/contract-references/evm/erc20-factory) contract. It is not meant to be used directly and does not have the necessary modifiers for full compatibility with the MiniEVM.
To deploy a custom ERC20 token, developers should use the [InitiaCustomERC20](/resources/developer/contract-references/evm/initia-custom-erc20) contract instead.
## Inheritance
* `IERC20`: Interface for ERC20 standard functions.
* `Ownable`: Provides ownership control.
* `ERC20Registry`: Handles ERC20 registry functionalities.
* `ERC165`: Supports interface identification.
* `ERC20ACL`: Provides access control mechanisms.
## Events
* `Transfer`: Emitted when tokens are transferred from one address to another.
* `address indexed from`: The address sending the tokens.
* `address indexed to`: The address receiving the tokens.
* `uint256 value`: The amount of tokens transferred.
* `Approval`: Emitted when an address approves another address to spend tokens on its behalf.
* `address indexed owner`: The address granting the approval.
* `address indexed spender`: The address receiving the approval.
* `uint256 value`: The amount of tokens approved.
## State Variables
* `mapping(address => uint256) public balanceOf`: Tracks the balance of each address.
* `mapping(address => mapping(address => uint256)) public allowance`: Tracks the allowance each address has given to another address.
* `string public name`: The name of the token.
* `string public symbol`: The symbol of the token.
* `uint8 public decimals`: The number of decimals the token uses.
* `uint256 public totalSupply`: The total supply of the token.
## Constructor
Initializes the contract with the token's name, symbol, and decimals.
```solidity
constructor(string memory _name, string memory _symbol, uint8 _decimals) {
name = _name;
symbol = _symbol;
decimals = _decimals;
}
```
#### Parameters
| Name | Type | Description |
| ----------- | --------------- | ------------------------------------- |
| `_name` | `string memory` | The name of the token |
| `_symbol` | `string memory` | The symbol of the token |
| `_decimals` | `uint8` | The number of decimals the token uses |
## Functions
### `supportsInterface`
Checks if the contract supports a given interface.
```solidity
function supportsInterface(bytes4 interfaceId) public view virtual override(IERC165, ERC165) returns (bool)
```
#### Parameters
| Name | Type | Description |
| ------------- | -------- | ------------------------ |
| `interfaceId` | `bytes4` | The interface identifier |
#### Returns
| Type | Description |
| ------ | ------------------------------------------------------- |
| `bool` | `true` if the interface is supported, `false` otherwise |
### `_transfer`
Transfers tokens from one address to another and registers the recipient's ERC20 store if necessary.
```solidity
function _transfer(address sender, address recipient, uint256 amount) internal register_erc20_store(recipient)
```
#### Parameters
| Name | Type | Description |
| ----------- | --------- | -------------------------------- |
| `sender` | `address` | The address sending the tokens |
| `recipient` | `address` | The address receiving the tokens |
| `amount` | `uint256` | The amount of tokens to transfer |
### `_mint`
Mints new tokens and assigns them to an address, registering the recipient's ERC20 store if necessary.
```solidity
function _mint(address to, uint256 amount) internal register_erc20_store(to)
```
#### Parameters
| Name | Type | Description |
| -------- | --------- | -------------------------------- |
| `to` | `address` | The address receiving the tokens |
| `amount` | `uint256` | The amount of tokens to mint |
### `_burn`
Burns tokens from an address.
```solidity
function _burn(address from, uint256 amount) internal
```
#### Parameters
| Name | Type | Description |
| -------- | --------- | ----------------------------------- |
| `from` | `address` | The address whose tokens are burned |
| `amount` | `uint256` | The amount of tokens to burn |
### `transfer`
Transfers tokens to a recipient, ensuring the recipient is not a blocked address.
```solidity
function transfer(address recipient, uint256 amount) external transferable(recipient) returns (bool)
```
#### Parameters
| Name | Type | Description |
| ----------- | --------- | -------------------------------- |
| `recipient` | `address` | The address receiving the tokens |
| `amount` | `uint256` | The amount of tokens to transfer |
#### Returns
| Type | Description |
| ------ | ------------------------------------- |
| `bool` | `true` if the transfer was successful |
### `approve`
Approves an address to spend a specified amount of tokens on behalf of the caller.
```solidity
function approve(address spender, uint256 amount) external returns (bool)
```
#### Parameters
| Name | Type | Description |
| --------- | --------- | --------------------------------------- |
| `spender` | `address` | The address allowed to spend the tokens |
| `amount` | `uint256` | The amount of tokens to approve |
#### Returns
| Type | Description |
| ------ | ------------------------------------- |
| `bool` | `true` if the approval was successful |
### `transferFrom`
Transfers tokens from one address to another on behalf of the sender, ensuring the recipient is not a blocked address.
```solidity
function transferFrom(address sender, address recipient, uint256 amount) external transferable(recipient) returns (bool)
```
#### Parameters
| Name | Type | Description |
| ----------- | --------- | -------------------------------- |
| `sender` | `address` | The address sending the tokens |
| `recipient` | `address` | The address receiving the tokens |
| `amount` | `uint256` | The amount of tokens to transfer |
#### Returns
| Type | Description |
| ------ | ------------------------------------- |
| `bool` | `true` if the transfer was successful |
### `mint`
Mints new tokens to a specified address, ensuring the recipient is not a blocked address. This function can only be called by the owner.
```solidity
function mint(address to, uint256 amount) external mintable(to) onlyOwner
```
#### Parameters
| Name | Type | Description |
| -------- | --------- | -------------------------------- |
| `to` | `address` | The address receiving the tokens |
| `amount` | `uint256` | The amount of tokens to mint |
### `burn`
Burns tokens from a specified address, ensuring the sender is not a module address. This function can only be called by the owner.
```solidity
function burn(address from, uint256 amount) external burnable(from) onlyOwner
```
#### Parameters
| Name | Type | Description |
| -------- | --------- | ----------------------------------- |
| `from` | `address` | The address whose tokens are burned |
| `amount` | `uint256` | The amount of tokens to burn |
### `sudoTransfer`
Transfers tokens from one address to another, bypassing the usual access control checks. This function can only be called by the chain signer.
```solidity
function sudoTransfer(address sender, address recipient, uint256 amount) external onlyChain
```
#### Parameters
| Name | Type | Description |
| ----------- | --------- | -------------------------------- |
| `sender` | `address` | The address sending the tokens |
| `recipient` | `address` | The address receiving the tokens |
| `amount` | `uint256` | The amount of tokens to transfer |
### `sudoMint`
Mints new tokens to a specified address, bypassing the usual access control checks. This function can only be called by the chain signer.
```solidity
function sudoMint(address to, uint256 amount) external onlyChain
```
#### Parameters
| Name | Type | Description |
| -------- | --------- | -------------------------------- |
| `to` | `address` | The address receiving the tokens |
| `amount` | `uint256` | The amount of tokens to mint |
### `sudoBurn`
Burns tokens from a specified address, bypassing the usual access control checks. This function can only be called by the chain signer.
```solidity
function sudoBurn(address from, uint256 amount) external onlyChain
```
#### Parameters
| Name | Type | Description |
| -------- | --------- | ----------------------------------- |
| `from` | `address` | The address whose tokens are burned |
| `amount` | `uint256` | The amount of tokens to burn |
# Deployed Contracts (Initia)
Source: https://docs.initia.xyz/resources/developer/deployed-contracts/initia
### VIP Contract
| Contract Name | Address |
| ------------------------------------------- | ------------------------------------------------------------------------------------------------------------------------------------------------------------------------------------------- |
| [VIP](/home/core-concepts/vip/introduction) | [`0x3a886b32a802582f2e446e74d4a24d1d7ed01adf46d2a8f65c5723887e708789`](https://scan.initia.xyz/interwoven-1/modules/0x3a886b32a802582f2e446e74d4a24d1d7ed01adf46d2a8f65c5723887e708789/vip) |
| Contract Name | Address |
| ------------------------------------------- | --------------------------------------------------------------------------------------------------------------------------------------------------------------------------------------------------- |
| [VIP](/home/core-concepts/vip/introduction) | [`0x81c3ea419d2fd3a27971021d9dd3cc708def05e5d6a09d39b2f1f9ba18312264`](https://scan.testnet.initia.xyz/initiation-2/modules/0x81c3ea419d2fd3a27971021d9dd3cc708def05e5d6a09d39b2f1f9ba18312264/vip) |
# Deployed Contracts (MiniEVM)
Source: https://docs.initia.xyz/resources/developer/deployed-contracts/minievm
| Contract Name | Address | ABI |
| ---------------------------------------------------------------------------- | -------------------------------------------- | --- |
| [Cosmos](/resources/developer/contract-references/evm/cosmos) | `0xf1` | TBA |
| [ERC20Registry](/resources/developer/contract-references/evm/erc20-registry) | `0xf2` | TBA |
| [ERC20Factory](/resources/developer/contract-references/evm/erc20-factory) | `0xd53506E20eA25122aC6adc6462D9D1cf810Ef5a4` | TBA |
| [ConnectOracle](/resources/developer/contract-references/evm/connect) | `0x031ECb63480983FD216D17BB6e1d393f3816b72F` | TBA |
# Initia L1 Networks
Source: https://docs.initia.xyz/resources/developer/initia-l1
## Network Details
| Item | Value |
| ------------------------ | ----------------------------------------------------------------------------------------------------------------------------------------------------------------------------------------- |
| Chain ID | `interwoven-1` |
| LCD | [https://rest.initia.xyz](https://rest.initia.xyz) |
| RPC | [https://rpc.initia.xyz](https://rpc.initia.xyz) |
| Genesis Hash (sha256sum) | `f2521b5130e0b26ff47d6155e42e3a0e1e3e1a2676727a317ba34069f3650955` |
| Genesis File | [https://storage.googleapis.com/init-common-genesis/interwoven-1/genesis.json](https://storage.googleapis.com/init-common-genesis/interwoven-1/genesis.json) |
| Peers | `80e8870743458d1a28ce9f9da939e4ddcb7cedfe@34.142.172.124:26656,c02d9c632bcbc7af974399c122eae36a8ed466bb@34.126.106.6:26656,b58e3dacc8c8009514c14e36730b564962028adc@34.124.183.130:26656` |
| Seeds | `80e8870743458d1a28ce9f9da939e4ddcb7cedfe@34.142.172.124:26656` |
| Address Book | TBA |
| Item | Value |
| ------------------------ | ---------------------------------------------------------------------------------------------------------------------------------------------------------------- |
| Chain ID | `initiation-2` |
| LCD | [https://lcd.testnet.initia.xyz](https://lcd.testnet.initia.xyz) |
| RPC | [https://rpc.testnet.initia.xyz](https://rpc.testnet.initia.xyz) |
| Genesis Hash (sha256sum) | `a342fa276722bc90b3bf1ff8cc028102ccd9e897cd7a4ad55161998359a1cde3` |
| Genesis File | [https://storage.googleapis.com/init-common-genesis/initiation-2/genesis.json](https://storage.googleapis.com/init-common-genesis/initiation-2/genesis.json) |
| Peers | `3715cdb41efb45714eb534c3943c5947f4894787@34.143.179.242:26656` |
| Seeds | `3715cdb41efb45714eb534c3943c5947f4894787@34.143.179.242:26656` |
| Address Book | [https://storage.googleapis.com/init-common-addrbook/initiation-2/addrbook.json](https://storage.googleapis.com/init-common-addrbook/initiation-2/addrbook.json) |
## Network Parameters
| Item | Value |
| ------------------------ | ----------- |
| Minimum Gas Prices | 0.015uinit |
| Block Gas Limit | 200,000,000 |
| Staking Unbonding Period | 21 days |
| Governance Voting Period | 7 days |
| Item | Value |
| ------------------------ | ----------- |
| Minimum Gas Prices | 0.015uinit |
| Block Gas Limit | 200,000,000 |
| Staking Unbonding Period | 7 days |
| Governance Voting Period | 2 days |
## Endpoints
You can find a number of RPCs, APIs, and gRPCs for the network in the [Initia Registry](https://github.com/initia-labs/initia-registry) repository.
* [Mainnet (interwoven-1)](https://github.com/initia-labs/initia-registry/blob/main/mainnets/initia/chain.json)
* [Testnet (initiation-2)](https://github.com/initia-labs/initia-registry/blob/main/testnets/initia/chain.json)
## Explorers
* [InitiaScan](https://scan.initia.xyz)
* [InitiaScan](https://scan.testnet.initia.xyz)
## VIP Parameters
| Category | Parameter | Mainnet | Explanation |
| ------------------ | ----------------------------- | ------------------------ | ------------------------------------------------------------------------------------------------------------------------------- |
| VIP | `stage_interval` | 2 weeks | Length of one stage (frequency of esINIT distribution) |
| VIP | `vesting_period` | 26 stages | Total vesting period for esINIT |
| VIP | `minimum_lock_staking_period` | 26 weeks | Minimum lock period for an esINIT lock-staking position (“zapping”) |
| VIP | `challenge_period` | 3 days | Window during which a score-snapshot challenge may be submitted |
| VIP | `min_score_ratio` | 0.5 | Multiplier applied to the previous stage’s score to determine the minimum score required to fully vest esINIT in the next stage |
| VIP | `pool_split_ratio` | 0.2 | Portion of total rewards directed to the balance pool |
| VIP | `minimum_eligible_tvl` | 0 | Minimum INIT TVL required for whitelisting and eligibility for stage rewards |
| VIP | `maximum_weight_ratio` | 0.4 | Maximum share of gauge votes from a single L2, relative to total votes, counted for esINIT distribution |
| VIP (Operator) | `max_commission_rate` | 0.25 | Maximum esINIT commission rate a rollup can set |
| VIP (TVL manager) | `snapshot_interval` | 1 hour | Frequency of TVL snapshots for all L2s |
| VIP (Lock Staking) | `min_lock_period` | 30 days | Minimum lock period for any lock-staking position |
| VIP (Lock Staking) | `max_lock_period` | 2 years | Maximum lock period for all lock-staking positions (including esINIT positions) |
| VIP (Lock Staking) | `max_delegation_slot` | 60 | Maximum number of unique lock-staking positions per user |
| VIP (gauge vote) | `cycle_start_time` | Same as stage start time | Start time of the first gauge-vote cycle |
| VIP (gauge vote) | `cycle_interval` | 2 weeks | Length of a gauge-vote cycle |
| VIP (gauge vote) | `voting_period` | 13 days | Duration of the voting window within a cycle |
| VIP (gauge vote) | `max_lock_period_multiplier` | 4 | Voting-power multiplier for the maximum lock duration |
| VIP (gauge vote) | `min_lock_period_multiplier` | 1 | Voting-power multiplier for the minimum lock duration |
| VIP (gauge vote) | `pair_multipliers` | 1 for all pools | Voting-power multiplier applied to each enshrined liquidity pair |
| Category | Parameter | Testnet | Explanation |
| ------------------ | ----------------------------- | ------------------------ | ------------------------------------------------------------------------------------------------------------------------------- |
| VIP | `stage_interval` | 1 day | Length of one stage (frequency of esINIT distribution) |
| VIP | `vesting_period` | 26 stages | Total vesting period for esINIT |
| VIP | `minimum_lock_staking_period` | 1 day | Minimum lock period for an esINIT lock-staking position (“zapping”) |
| VIP | `challenge_period` | none | Window during which a score-snapshot challenge may be submitted |
| VIP | `min_score_ratio` | 0.5 | Multiplier applied to the previous stage’s score to determine the minimum score required to fully vest esINIT in the next stage |
| VIP | `pool_split_ratio` | 0.5 | Portion of total rewards directed to the balance pool |
| VIP | `minimum_eligible_tvl` | 0 | Minimum INIT TVL required for whitelisting and eligibility for stage rewards |
| VIP | `maximum_weight_ratio` | 1 | Maximum share of gauge votes from a single L2, relative to total votes, counted for esINIT distribution |
| VIP (Operator) | `max_commission_rate` | none | Maximum esINIT commission rate a rollup can set |
| VIP (TVL manager) | `snapshot_interval` | 4 hours | Frequency of TVL snapshots for all L2s |
| VIP (Lock Staking) | `min_lock_period` | 12 hours | Minimum lock period for any lock-staking position |
| VIP (Lock Staking) | `max_lock_period` | 6 days | Maximum lock period for all lock-staking positions (including esINIT positions) |
| VIP (Lock Staking) | `max_delegation_slot` | 50 | Maximum number of unique lock-staking positions per user |
| VIP (gauge vote) | `cycle_start_time` | Same as stage start time | Start time of the first gauge-vote cycle |
| VIP (gauge vote) | `cycle_interval` | 1 day | Length of a gauge-vote cycle |
| VIP (gauge vote) | `voting_period` | 23 hours | Duration of the voting window within a cycle |
| VIP (gauge vote) | `max_lock_period_multiplier` | 4 | Voting-power multiplier for the maximum lock duration |
| VIP (gauge vote) | `min_lock_period_multiplier` | 1 | Voting-power multiplier for the minimum lock duration |
| VIP (gauge vote) | `pair_multipliers` | 1 for all pairs | Voting-power multiplier applied to each enshrined liquidity pair |
# Audits
Source: https://docs.initia.xyz/resources/security/audits
You can find the audit reports for all of Initia's codebase in our [audits repository](https://github.com/initia-labs/audits).